A home embroidery machine is powerful hardware. It can stitch fast, change colors automatically, and handle multiple designs. But it can not fix poor digitizing. Machine quality does not automatically equal digitizing quality. The file you load into the machine determines how smooth, clean, and professional your final sew-out will look.
If the stitch angles are wrong, the density is too heavy, or the underlay is missing, even the best machine will produce puckering, thread breaks, and uneven lettering. Beginners often blame the machine, the thread, or the needle. In reality, the embroidery file itself is usually the real problem.
This guide will break down what really controls stitch quality, production efficiency, cost, and long-term business success. You’ll learn why digitizing is a technical skill that takes time to master, and why production efficiency depends more on stitch science than on machine price.
And if your goal is to deliver clean, professional results from day one, it’s worth understanding when it makes sense to rely on experienced digitizers while you focus on growing your customer base and production workflow.
Before you digitize your first logo, there are a few important truths every beginner should understand.
- The Big Myth: A Good Machine Automatically Gives Professional Results
- Hardware vs Skill: What Your Machine Can and Cannot Do
- Same Machine, Two Files: Why Results Can Look Completely Different
- What This Means for You
- What Is Embroidery Digitizing (In Simple Terms)?
- Built-In Auto-Digitizing: Why It’s Limited
- Stitch Science: What Actually Determines Sew out Quality
- Learning Digitizing Software Takes Time
- Production Efficiency: What Most Beginners Overlook
The Big Myth: A Good Machine Automatically Gives Professional Results
Many beginners believe that once they buy a home embroidery machine, professional results will come automatically. This sounds logical, especially when you invest serious money into a good brand. But embroidery does not work like that. A great machine can stitch beautifully, but it cannot “fix” a bad design file.
Hardware vs Skill: What Your Machine Can and Cannot Do
A home embroidery machine is hardware. It is built to follow stitch commands accurately, stitch at a set speed, and repeat the same design again and again. That’s its job.
Embroidery Digitizing is different. Digitizing is software plus skill. It is the process of turning artwork into stitch instructions that control stitch type, direction, density, underlay, trims, and sequencing. This is where quality is decided. Even a $2,000 to $5,000 machine cannot correct poor digitizing, because it can only sew what the file tells it to sew.
Same Machine, Two Files: Why Results Can Look Completely Different
Here’s the easiest way to understand it. Use the same machine, same fabric, and same thread, but load two different digitized files.
-
With good digitizing, the sew out looks smooth and clean. Stitches sit flat, edges are sharp, and the design feels balanced.
-
With bad digitizing, the sew out struggles. You may see puckering, gaps, thread breaks, messy outlines, or distorted small text.
The machine didn’t change. The file did.
What This Means for You
Before you try to digitize your first logo, you need to understand what digitizing really is and why it controls the final sew out more than the machine itself.
What Is Embroidery Digitizing (In Simple Terms)?
Converting Artwork into Stitch Instructions
Embroidery digitizing is the process of converting artwork into stitch commands that an embroidery machine can read and execute. A machine cannot understand a JPG, PNG, or PDF file directly. It needs a structured embroidery file format that tells it exactly where to place each stitch, when to change colors, and how to move across the fabric. Digitizing is the bridge between artwork and actual thread on fabric.
Controlling the Technical Details
Digitizing controls several important elements that affect the final sew out:
-
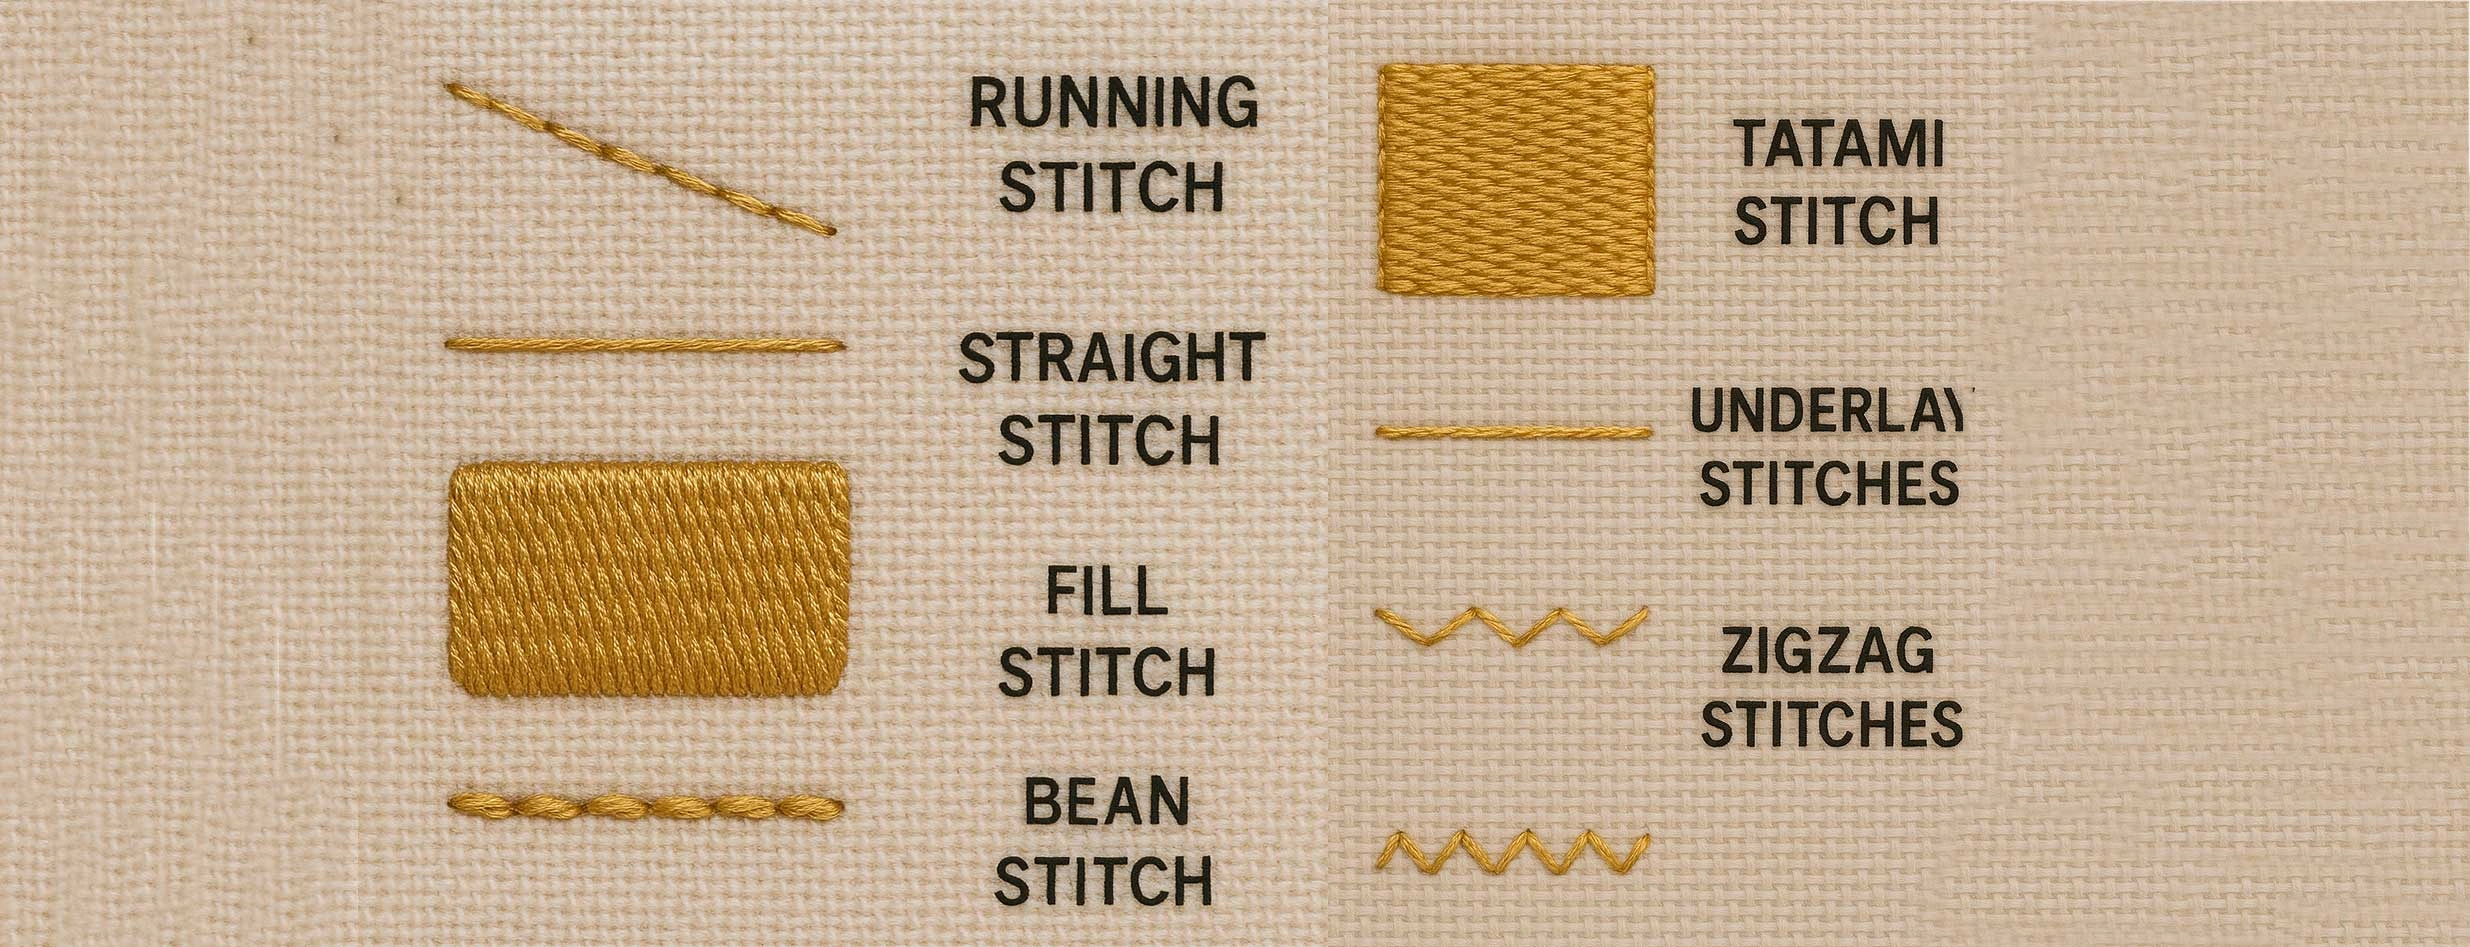
Stitch Type – Choosing between satin, fill (tatami), or running stitches depending on the design.
-
Stitch Direction – Adjusting angles to improve appearance and reduce distortion.
-
Density – Setting how close the stitches are placed to avoid gaps or stiffness.
-
Underlay – Adding foundation stitches to stabilize the fabric.
-
Pull Compensation – Correcting for fabric movement during stitching.
Not Just “Click and Convert”
Embroidery digitizing is not an automatic one-click process. It requires skill, planning, and an understanding of how stitches behave on different fabrics. The quality of these decisions determines whether a design looks professional or problematic.
Built-In Auto-Digitizing: Why It’s Limited
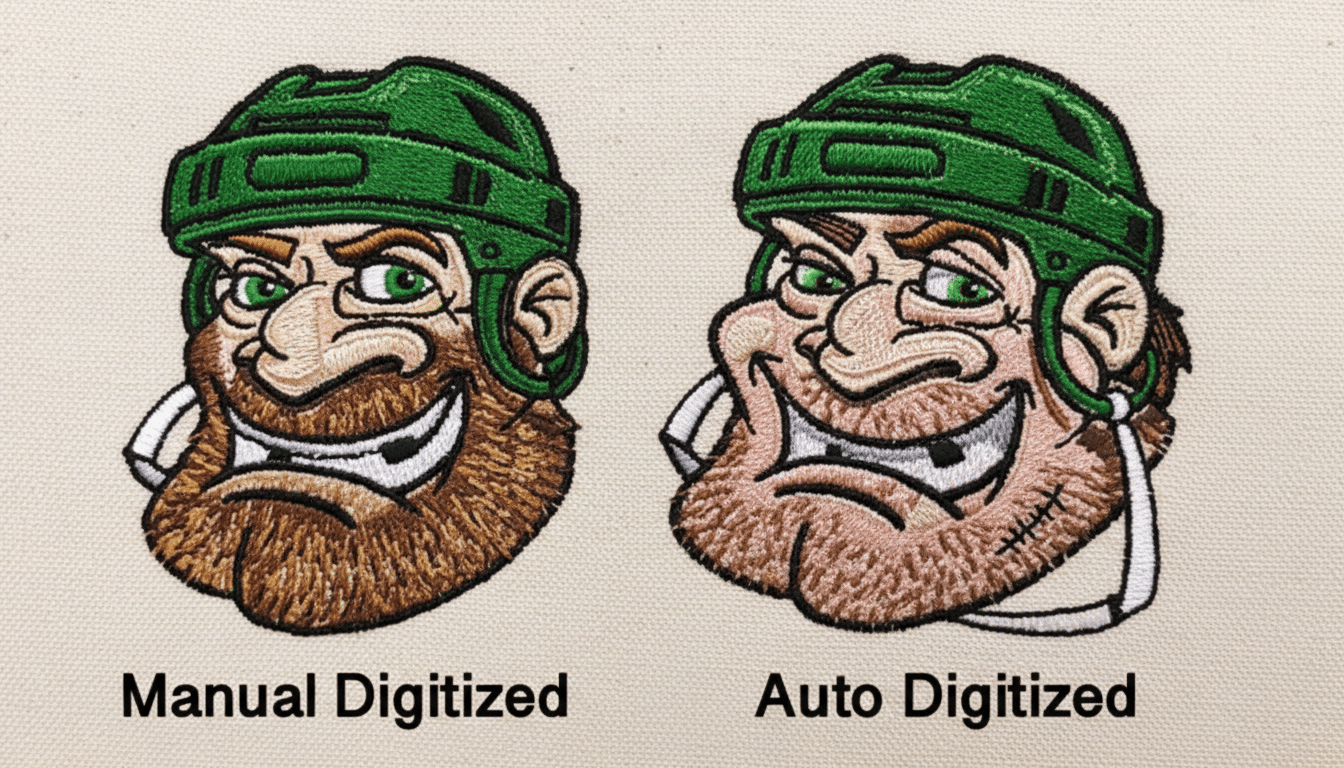
What Most Beginners Assume
Many home embroidery machines come with built-in auto-digitizing features. These tools allow you to import a simple image and automatically convert it into stitches. For beginners, this feels convenient and exciting. It creates the impression that the machine can handle the technical work for you.
However, auto-digitizing is very basic. It follows simple rules and patterns, not professional embroidery logic.
What Auto Tools Cannot Do
Auto-digitizing software cannot:
-
Adjust stitch angles intelligently to improve light reflection and smoothness
-
Control fabric distortion based on stretch or thickness
-
Properly manage push and pull compensation
-
Optimize underlay to stabilize the design
These details require human decision-making and experience.
The Result of Poor Automation
Because of these limitations, auto-digitized designs often become:
-
Heavy and overly dense
-
Stiff and uncomfortable on garments
-
Prone to puckering
-
Weak in small text or fine details
Auto-digitizing can work for simple hobby shapes or basic monograms. But for professional logos and customer work, it rarely delivers consistent, high-quality results.