| Quick Summary |
|---|
Thread tension controls how the top thread and bobbin thread lock together during machine embroidery.
|
“Embroidery thread tension” means the pull on the top thread and bobbin thread as your machine forms each stitch. When both threads meet inside the fabric, the design looks smooth, clean, and even.
When tension goes wrong, you may see loops, thread breaks, puckering, gaps, or bobbin thread on top. These issues waste blanks, slow orders, and make a design look less professional.
However, the fix is not always the tension dial. You also need to check the needle, thread path, bobbin, stabilizer, hooping, fabric, and design file. A dense or poorly planned file can create the same problems.
At Absolute Digitizing, we help reduce these issues with the best embroidery digitizing services that match your design, fabric, and final use.
- What Is Thread Tension in Machine Embroidery?
- How Does Thread Tension Impact Stitch Quality?
- What Is the Difference Between Top Thread Tension and Bobbin Thread Tension?
- What Are the Common Signs of Incorrect Thread Tension?
- What Is the Ideal Tension Setting for Embroidery Machines?
- How to Adjust Machine Embroidery Thread Tension Step by Step
- How to Recognize When Tension Isn’t the Real Problem?
- What Are the Best Practices for Maintaining Consistent Thread Tension?
- Why Outsourcing Professional Digitizing Is the Best Choice
What Is Thread Tension in Machine Embroidery?
Thread tension means the amount of pull your machine puts on the thread while stitching. In machine embroidery, this pull must stay balanced between the top thread and the bobbin thread.
How the threads work together
The top thread comes down through the needle. At the same time, the bobbin thread comes up from under the fabric. As your machine runs, the fabric brings both threads together, locking each stitch in place.
As a result, the design looks clean on the front and neat on the back.
Why the right balance matters
Good thread balance helps your machine create smooth and even stitches. It also keeps the fabric flat and reduces thread breaks during stitching.
Key things it controls:
- stitch coverage
- thread breaks
- loops
- puckering
- Bobbin thread showing
- design clarity
However, tension does not work alone. Fabric, stabilizer, needle, thread type, hooping, and digitizing all affect the final result.
How Does Thread Tension Impact Stitch Quality?

Thread tension affects how clean, smooth, and strong each stitch looks. When the top thread and bobbin thread pull evenly, the stitches sit flat on the fabric. The design also holds its shape better.
What good tension creates
Good tension helps your embroidery look polished and consistent. It also keeps the machine running with fewer stops.
It supports:
- smooth stitch coverage
- clean outlines
- even satin stitches
- fewer thread breaks
- better fabric control
- stronger finished embroidery
However, poor tension can quickly change the result. If the top thread pulls too hard, the bobbin thread may show on the front. If it pulls too loosely, you may see loops on top or under the fabric.
Common quality problems
Incorrect tension can cause puckering around the design. It can also make stitches look loose, rough, or uneven.
In some cases, the thread may snap again and again. This slows down production and wastes materials.
So, check tension before stitching the final item. A small test can save your fabric, thread, and time.
What Is the Difference Between Top Thread Tension and Bobbin Thread Tension?

Top thread tension controls the thread that runs through the needle. Bobbin thread tension controls the thread that comes from under the fabric.
In short, both must work together. If one pulls too hard or too loose, the stitches will not lock in the right place.
Top thread vs bobbin thread
| Type | Main Role | How You Adjust It | Signs It Is Wrong |
|---|---|---|---|
| Top thread tension | Controls the needle thread on the front | Use the machine tension setting or dial | Loops, thread breaks, or bobbin thread on top |
| Bobbin thread tension | Controls the lower thread under the fabric | Adjust the bobbin case screw carefully | Loose backing, uneven stitches, or poor stitch balance |
| Thread path | Helps the thread move smoothly | Rethread the machine and check the guides | Snags, frays, or sudden breaks |
| Design stress | Affects how the thread pulls through the fabric | Fix density, underlay, and stitch order | Puckering, gaps, or stiff embroidery |
Key points to remember
- Usually, you should adjust the top tension first.
- However, do not turn the dial too much at once.
- Make a small change, then test again.
- Also, adjust bobbin tension only when needed.
- A tiny change can make a big difference.
For best results, check threading, needle, stabilizer, fabric, and digitizing before blaming the bobbin.
What Are the Common Signs of Incorrect Thread Tension?
Incorrect thread balance shows up in clear ways. Before you adjust the machine, look at the front and back of the design. This way, you can identify the real cause faster.
Real-Time Example: Gaps and Uneven Stitches in Embroidery

A beginner shared this issue in the Facebook machine embroidery help group. The design shows gaps, loose thread, and uneven stitch coverage, which can happen from poor thread balance, wrong stabilizer, needle issues, or a digitizing problem.
Signs to check before adjusting
| Sign | What It May Mean | What to Try |
|---|---|---|
| Bobbin thread shows on top | The top tension may be too tight | Loosen top tension slightly and test again |
| Loops on top | The top thread may be too loose | Tighten top tension in small steps |
| Loops under the fabric | The machine may be threaded incorrectly | Rethread with the presser foot up |
| The thread keeps breaking | Tension, needle, or dense stitching may be the cause | Change the needle and check the design |
| Birdnesting under fabric | The thread may not be in the tension discs | Stop, cut threads, clean, and rethread |
| Uneven stitches | The thread path or needle may be off | Check guides, spool flow, and needle size |
| Puckering | Fabric may be pulled too tight | Check hooping, stabilizer, and stitch density |
| The design looks distorted | Fabric may shift during stitching | Use better backing and test the file |
However, do not turn the tension dial right away. In many cases, these issues come from simple setup mistakes.
Also, check the bobbin area for lint. A small thread piece can affect stitch quality.
What Is the Ideal Tension Setting for Embroidery Machines?
There is no single perfect tension number for every machine. Instead, the best setting depends on your machine, fabric, thread, needle, stabilizer, and design type.
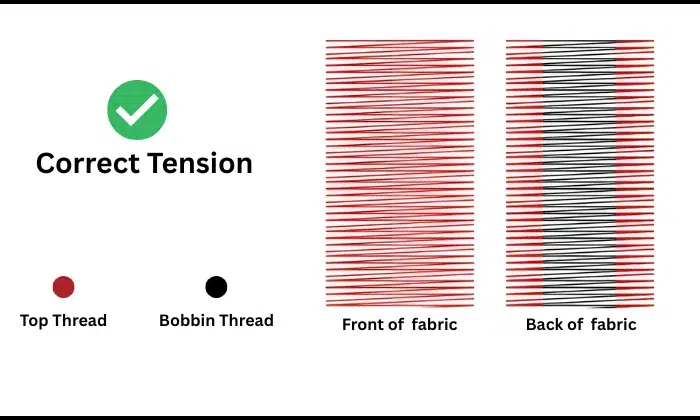
Start with a balanced stitch
A good setting keeps the top thread smooth on the front. On many embroidery machines, the upper thread should show slightly on the back of the fabric.
For bobbin tension, many shops use about 18 to 22 grams as a common starting range. Caps may need a little more, often up to 25 grams.
Basic tension guide
| Project Type | Tension Tip |
|---|---|
| Flat fabric | Start with the default setting |
| Dense designs | Test before full stitching |
| Small lettering | Use a clean thread balance |
| Caps | Check the bobbin pull carefully |
| Thick fabric | Watch for thread drag |
However, different brands use different dials, screens, and settings.
So, test on the same fabric and backing before the final stitch. Adjust in small steps, then check both sides of the design.
How to Adjust Machine Embroidery Thread Tension Step by Step
Before you change any settings, stop the machine and check the stitch problem. Look at the front and back of the fabric. This helps you avoid random adjustments.
Check the thread path
Start by removing the top thread and rethreading the machine. Raise the presser foot while threading so the thread can sit inside the tension discs.
Also, check the spool. Make sure the thread feeds smoothly and does not catch on the cap, cone, or guide.
Reset the bobbin
After that, remove the bobbin and place it back correctly. A bobbin that sits the wrong way can cause loops, breaks, and messy stitches.
Clean the bobbin area too. Lint and small thread pieces can block smooth thread flow.
Change the needle
A dull, bent, or wrong-size needle can often look like a tension issue. Before adjusting the machine, start with a fresh needle and make sure you have a clear understanding of embroidery needles, fabric types, and thread weight.
Match the needle to your fabric and thread. Thick fabric or heavy thread may need a larger needle.
Test before adjusting
Now stitch a small test design on the same fabric and stabilizer. Do not test on random scrap unless it matches the final item.
Good test options include:
- satin column
- small filled shape
- simple lettering
- outline or border
Adjust the top thread setting slowly
On manual machines, turn the tension dial or setting in small steps. On automatic machines, use the screen setting if your model allows it.
Loosen the top setting slightly if the bobbin thread shows on top. If the top thread forms loops, tighten it a little.
Adjust bobbin tension only when needed
Bobbin tension needs extra care. A small screw turn can make a big change.
Use the manual before adjusting it. Many users keep a separate bobbin case for embroidery work.
For a visual walkthrough, you can also watch this beginner-friendly video that shows how to set machine embroidery tension before making final adjustments.
Test and save your settings
Once you make one change, test again. Do not change the needle, thread, stabilizer, and tension at the same time.
Keep simple notes like this:
| Project | Fabric | Thread | Needle | Stabilizer | Best Setting |
|---|---|---|---|---|---|
| Logo | Cotton polo | 40 wt. polyester | 75/11 | Cutaway | Smooth front |
| Cap | Twill cap | 40 wt. polyester | 80/12 | Cap backing | Clean back |
Best tension tips by fabric type
Different fabrics react in different ways. Some stretch, some drag the thread, and some need extra support.
| Fabric Type | Tension Tip | Extra Tip |
|---|---|---|
| Cotton | Start with the default setting | Use proper backing |
| Knits | Avoid tight pull | Use a cutaway stabilizer |
| Denim | Watch the thread drag | Use a strong needle |
| Towels | Prevent loose loops | Add water-soluble topping |
| Fleece | Support the stitches well | Use topping and backing |
| Caps | Test before production | Check bobbin balance |
| Thin fabric | Reduce stitch stress | Use a lighter density |
However, do not use the tension dial alone to fix fabric problems. Use the right stabilizer, hooping, and design setup.
How thread type affects tension
Each thread moves through the machine in its own way. Smooth thread feeds easily. Rough, old, or thick thread creates more drag.
Polyester thread works well for many embroidery jobs because it stays strong. Rayon gives a soft shine, but it may need careful handling. Metallic thread often needs a slower speed and a lighter pull.
Thread factors to check:
- thread weight
- thread age
- thread quality
- spool flow
- needle size
- machine speed
Also, use the right bobbin thread. Poor bobbin thread can cause uneven stitches, even when the top setting looks correct.
How digitizing affects thread tension
A machine can only stitch what the design file tells it to stitch. Poor digitizing can create stress that looks like a tension problem.
Too much density can make the design stiff. A weak underlay can let stitches sink. Incorrect stitch direction can distort the fabric. Poor push and pull settings can also cause gaps, thick edges, or uneven outlines.
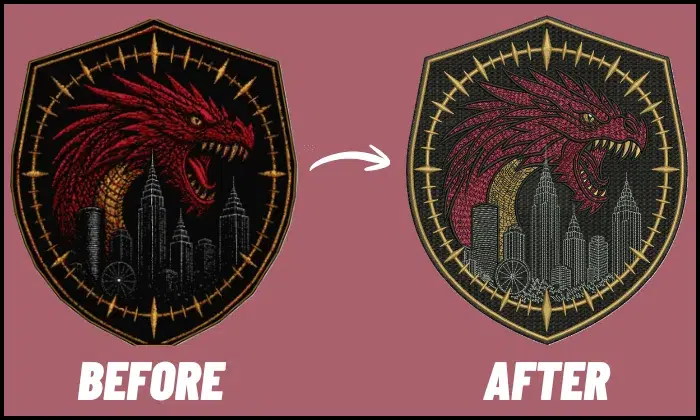
Real Example: When the Design File Causes Tension Issues
A Reddit user shared that their own digitized files showed bobbin thread on top, while professionally digitized files stitched fine. This shows how density, stitch order, underlay, and pull compensation can affect thread balance.
Grrr – my own digitized files are revealing tension issues that pro files are not….
As the title suggests, when I digitize my own files, I am getting bobbin thread up-top. Not a whole lot – just a little bit poking through on the edges every once and a while.
Logic and experience says the top thread is too tight or the bobbin thread too loose, BUT
My pro-digitized files are fine, as is my tension test stitch-out. I don’t want to mess with thread tension mechanically if it is a software issue. I use Embird and have for years (I will try posting there as well) and this seems to only happen on my multi-needle. It is driving me nuts! Is there something I am missing? Something that is maybe not specific to the software but a general setting?
This shows why tension issues need a full check, not just machine adjustment. If a professional file stitches cleanly but another file does not, the problem may be in density, underlay, stitch order, or pull compensation.
A clean file controls:
- stitch density
- underlay
- pull compensation
- stitch direction
- stitch length
- stitch order
- trims and jumps
As a result, the machine runs smoother, and the fabric stays flatter.
If your design keeps puckering or breaking thread after setup changes, Absolute Digitizing can help with a cleaner, fabric-ready file.
How to Recognize When Tension Isn’t the Real Problem?
Many embroidery issues look like tension trouble at first. However, the real cause may come from the setup, fabric, needle, or design file.
Before you adjust the dial, check the full stitching process. This saves time and prevents more problems.
Common causes that look like tension issues
| Real Problem | How It Looks | What to Check |
|---|---|---|
| Wrong stabilizer | Fabric puckers or shifts | Use backing that fits the fabric |
| Loose hooping | Design moves or misaligns | Hoop fabric firm, not stretched |
| Old needle | Thread breaks or skips | Replace the needle |
| Wrong needle size | Holes, frays, or breaks | Match the needle to the thread and fabric |
| Threading error | Loops or birdnesting | Rethread with the presser foot up |
| Dirty bobbin area | Uneven stitches | Clean lint and thread bits |
| Fast machine speed | Breaks or rough stitching | Slow the machine down |
| Poor digitizing | Gaps, puckering, or stiff areas | Check density and underlay |
So, test one fix at a time. If the same issue returns, the design file may need review.
Quick tension problem troubleshooting chart
Use this chart when stitches start looking uneven. It helps you spot the issue, find the likely cause, and try a safe fix before changing too many settings.
| What You See | Likely Cause | What to Try |
|---|---|---|
| Bobbin thread shows on top | The top tension may be too tight | Loosen the top setting slightly |
| Loops on top | The top thread may be too loose | Tighten the top setting in small steps |
| Loops under the fabric | The thread may not sit in the tension discs | Rethread with the presser foot up |
| The thread keeps breaking | Tight pull, old needle, or dense design | Change the needle and test again |
| Fabric puckers | Stabilizer, hooping, or density issue | Use better backing and check the file |
| Birdnesting happens | Thread path or bobbin issue | Stop, clean the bobbin area, and rethread |
| Satin stitches look uneven | Pull, density, or needle issue | Test on the same fabric |
| Design feels stiff | Too many stitches in one area | Reduce density in the design file |
However, make one change at a time. Then run a short test before stitching the final item.
What Are the Best Practices for Maintaining Consistent Thread Tension?
Consistent thread balance comes from good habits. When you repeat the same setup steps, your machine gives cleaner results across different projects.
Simple habits that help
| Best Practice | Why It Helps |
|---|---|
| Rethread before testing | Fixes hidden thread path issues |
| Clean the bobbin area | Removes lint and thread bits |
| Use fresh needles | Reduces breaks and skipped stitches |
| Match the needle to the fabric | Helps the thread move smoothly |
| Use quality thread | Prevents fraying and weak stitches |
| Test before production | Saves blanks, time, and thread |
| Use the right stabilizer | Supports the fabric during stitching |
| Keep a settings log | Helps repeat good results |
| Slow down when needed | Reduces thread stress |
| Check the design file | Prevents density and pull issues |
Also, avoid changing too many things at once. Make one change, test it, and then move forward.
Good tension does not come from one dial. It comes from a complete, steady setup.
Why Outsourcing Professional Digitizing Is the Best Choice
Professional digitizing services help your machine stitch with less stress. A skilled digitizer plans the design for the fabric, size, thread, and final use.
How expert digitizing helps
A clean file controls the way stitches pull on the fabric. This can reduce puckering, thread breaks, gaps, and stiff areas.
Good digitizing improves:
- stitch density
- underlay support
- stitch direction
- pull compensation
- stitch order
- trims and jumps
Also, the right stitch plan helps the machine run more smoothly during production.
If tension changes do not resolve the issue, the design file may need better digitizing. In that case, expert help can save time, blanks, and thread.
Final Thoughts
Thread tension plays a big role in clean machine embroidery. When the top thread and bobbin thread work together, your stitches look smooth, even, and professional.
However, tension is only one part of the setup. Fabric, stabilizer, needle, thread quality, hooping, machine speed, and digitizing all affect the final result. So, test first, adjust slowly, and make one change at a time.
If the same problems keep coming back, your design file may need expert help. Contact Absolute Digitizing for reliable embroidery digitizing services and get a free quote today.
FAQs
Your tension may be too tight if the bobbin thread shows on top, the fabric puckers, or the thread keeps breaking. Loosen the top setting in small steps. Then run a test stitch on the same fabric and stabilizer.
Loose tension can cause loops on top or under the fabric. The stitches may also look uneven or weak. Rethread the machine first. Then tighten the top setting slightly and test again.
In most cases, adjust the top tension first. It is easier and safer to control. Only adjust bobbin tension when needed, and always make minimal changes.
Bobbin thread may show on top when the top tension pulls too hard. It can also happen due to incorrect threading, poor bobbin placement, or dense stitching. Check the thread path, bobbin, needle, and design file before making big changes.
The thread can break due to tight tension, a dull needle, poor thread quality, wrong needle size, or a dense design. It may also break if the thread catches on the spool or guide. Rethread the machine and change the needle before adjusting settings.
Yes. Poor digitizing can create too much stitch stress. High density, weak underlay, wrong stitch direction, and poor stitch order can cause puckering, gaps, thread breaks, and stiff embroidery.
Use the same fabric, stabilizer, needle, thread, and design size you plan to use for the final item. Stitch a small satin column, filled shape, or lettering sample. Then check both the front and back.