
| Quick Summary |
|---|
Underlay stitches help embroidery stay smooth, stable, and clean on different fabrics.
|
Clean embroidery starts with a strong base. Underlay stitches create that base before the top stitches appear. They hold the fabric steady, support the design, and help each stitch sit in the right place.
As a result, the final embroidery looks smoother, sharper, and more professional. Without proper underlay, the design may pucker, sink, shift, or lose its shape. This matters even more on soft, stretchy, thick, or textured fabrics.
Furthermore, every fabric needs the right stitch support. Cotton, polyester, fleece, silk, and performance wear all react in different ways. A skilled digitizer chooses the best underlay type based on the fabric, design size, stitch direction, and final use.
In this guide, we explain how underlay improves embroidery quality in digitizing. For cleaner stitch results, get your artwork digitized with the right underlay before production starts.

- The Science Behind Underlay Stitches
- Types of Underlay Stitches and Their Uses
- How Underlay Stitches Improve Embroidery Quality
- Choosing the Right Underlay for Different Fabrics
- Common Mistakes in Underlay Stitching and How to Fix Them
- Underlay Settings in Embroidery Software
- Conclusion: Mastering Underlay Stitches for Flawless Embroidery
- Frequently Asked Questions
The Science Behind Underlay Stitches
How Underlay Improves Thread Grip and Prevents Sinking
Underlay stitches are the hidden foundation of embroidery, playing a critical role in ensuring a crisp and professional finish. Without proper underlay, embroidery threads can sink into the fabric, causing a loss of detail and making the design look uneven or distorted. Underlay stitches act as a support system, gripping the fabric tightly and creating a smooth surface for the top stitches to rest on.
This is especially important when working with plush fabrics like fleece or terry cloth, where stitches tend to get buried within the material.
Underlay’s Role in Adding Structure to Designs
Beyond preventing threads from sinking, underlay stitches also provide structural support, particularly for thin or delicate fabrics. Lightweight fabrics such as silk or polyester tend to shift and pucker under high stitch density, but a well-planned underlay stabilizes the material, ensuring the final embroidery holds its shape.
The right underlay stitch also minimizes stretch, which is crucial for fabrics like knits or performance wear that naturally expand and contract.
The Effect of Underlay Stitches on Stitch Density and Quality
Another key benefit of underlay is its impact on stitch density and embroidery quality. When the underlay is properly applied, it reduces the need for excessive top stitches, allowing for a smoother, more balanced design. This enhances the embroidery’s overall appearance and makes production more efficient by reducing thread consumption and minimizing machine stress.
In short, underlay stitches are the unsung heroes of embroidery, ensuring durability, clarity, and precision in every design.
Types of Underlay Stitches and Their Uses

Underlay stitches are not a one-size-fits-all solution. Different types of underlay serve specific purposes, depending on the design, fabric, and stitch type. Using the right underlay ensures better stitch quality, durability, and overall embroidery precision. Below are the most commonly used underlay stitches and their ideal applications.
1. Center Run Underlay – Perfect for Small Text and Fine Details
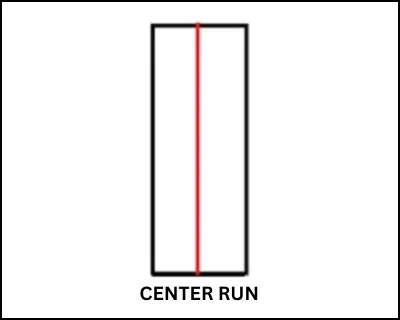
A center-run underlay consists of a single straight stitch running through the center of narrow design elements.
It is primarily used for:
- Small text, fine lines, and intricate details
- Preventing distortion without adding bulk
- Ensuring stability in delicate embroidery elements
This underlay lightly secures the fabric while avoiding excessive stitch density. It’s the go-to choice for monograms, logos with thin lines, and detailed lettering where precision is key.
2. Edge Walk Underlay – Best for Satin Stitches
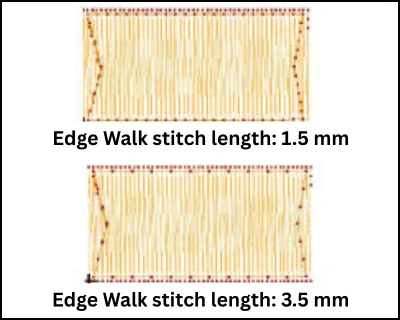
Edge walk underlay, also known as contour underlay, runs along the edges of a satin-stitched design.
It helps to:
- Maintain sharp, clean edges
- Prevent fabric from pulling in or fraying
- Reduce puckering, especially on stretchy fabrics
This underlay is particularly useful for embroidering on knits, performance wear, and high-stretch fabrics, where stitches tend to shift or distort.
3. Zigzag Underlay – Ideal for Wider Satin Stitches and 3D Embroidery
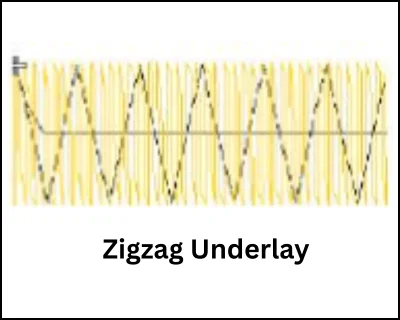
A zigzag underlay follows a diagonal stitching pattern beneath satin stitches.
It is particularly effective for:
- Providing loft and depth in 3D embroidery
- Supporting wider satin stitches for a smooth finish
- Reducing thread breaks and improving stitch consistency
This underlay is widely used in puffy embroidery, bold satin lettering, and large decorative elements where texture and elevation are essential.
4. Tatami Underlay (Grid Underlay) – Designed for Fill Stitches

Tatami underlay, also called grid underlay, is a crosshatch pattern used underneath large fill areas.
Its benefits include:
- Ensuring smooth, even stitch coverage
- Preventing gaps in large embroidered sections
- Minimizing puckering and distortion on lightweight fabrics
This underlay is commonly used in corporate logos, large embroidered patches, and intricate background fills, where stability and evenness are crucial.
Using the right underlay stitch for each design element is essential for achieving professional-quality embroidery. Whether working with delicate details, bold satin stitches, or large fill areas, underlay stitches provide the necessary support for a flawless finish.
How Underlay Stitches Improve Embroidery Quality
Underlay stitches are essential for achieving high-quality embroidery. They provide the necessary foundation for a design, ensuring stability, clarity, and durability. Without proper underlay, embroidery can become distorted, messy, or prone to issues like puckering and thread breakage. Below, we’ll explore how underlay stitches enhance embroidery quality and create a professional finish.
1. Enhancing Fabric Stability
One of the most important functions of underlay stitches is stabilizing the fabric before the main embroidery begins. Fabrics, especially stretchy materials like knits, fleece, or performance wear, tend to shift and distort under the pressure of embroidery needles.
Underlay stitches help by:
- Anchoring the fabric in place to prevent movement during stitching.
- Maintaining the shape of the design, ensuring letters and patterns don’t warp.
- Providing extra reinforcement for delicate or slippery fabrics.
With the right underlay, designs stay sharp and properly aligned, even on tricky materials.
2. Improving Design Clarity
A well-digitized embroidery design should have sharp edges and smooth curves. Underlay stitches help define the structure before the top stitches are applied.
How underlay enhances clarity:
- Edge walk underlay ensures letters remain crisp and don’t blend together.
- Zigzag underlay adds loft to satin stitches, making them appear smoother.
- Prevents fraying and distortion in complex patterns.
By adding this structural support, underlay stitches ensure embroidery looks clean, professional, and visually striking.
3. Preventing Puckering and Fabric Shrinkage
Puckering happens when embroidery stitches pull the fabric too tightly, causing wrinkling around the design. This is especially common on lightweight or delicate fabrics.
Underlay helps to prevent puckering by:
- Evenly distributing tension across the fabric.
- Minimizing shrinkage and ensuring the design retains its original size and shape.
- Providing a stable foundation for large fill areas (Tatami underlay).
By reducing puckering, the underlay ensures embroidery remains smooth and flat, even after multiple washes.
4. Optimizing Stitch Density and Reducing Thread Breaks
Using the right underlay stitch also helps optimize stitch density and prevent thread breaks, leading to a smoother embroidery process.
Key benefits include:
- Reducing the need for excessive top stitching improves efficiency.
- Minimizing thread consumption and reducing material costs.
- Absorbing stress from embroidery machines, reducing wear and tear.
Proper underlay stitches create stronger, more durable embroidery, reducing production time and minimizing machine downtime.
Choosing the Right Underlay for Different Fabrics
Selecting the right underlay stitch is essential for achieving high-quality embroidery, especially when working with different fabric types. The type of fabric determines how stitches behave, and the wrong underlay can lead to issues like puckering, distortion, or loss of detail. Below, we explore the best underlay techniques for various fabric types to ensure smooth, professional results.
1. Lightweight Fabrics (Silk, Thin Cotton, Chiffon)
Lightweight fabrics tend to be delicate and prone to puckering, making it essential to use minimal but effective underlay to maintain stability without adding bulk.
Best Underlay Techniques:
- Center Run Underlay – A single straight stitch that lightly secures the fabric without excess density.
- Edge Walk Underlay – Helps reinforce fine details and prevent fraying, especially on small text.
- Lower Stitch Density – Reducing the number of top stitches prevents fabric distortion.
Pro Tip: Use a tear-away stabilizer to reinforce lightweight fabrics during the embroidery process.
2. Stretchy Fabrics (Knits, Jerseys, Performance Wear)
Stretchy fabrics like knits and jerseys tend to shift and distort when stitched, causing warped designs. Proper underlay prevents this by adding structure before the main embroidery begins.
Best Underlay Techniques:
- Edge Walk Underlay – Runs along the edges of satin stitches to maintain shape and prevent stretching.
- Zigzag Underlay—Adds flexibility while stabilizing wide satin stitches, keeping them smooth.
- Combination with Cut-Away Stabilizer – Helps control fabric movement and ensures longevity.
Pro Tip: Using a cutaway stabilizer ensures embroidery holds its shape over time, especially for garments that experience frequent washing and wear.
3. Thick Fabrics (Denim, Canvas, Leather)

Thicker fabrics are dense and less flexible, which means embroidery stitches need extra reinforcement for better penetration and visibility.
Best Underlay Techniques:
- Zigzag Underlay – Provides extra loft and depth, ensuring raised satin stitches stand out.
- Tatami Underlay (Grid Underlay) – Used for large fill areas to maintain even coverage.
- Lower Top Stitch Density – Reducing stitch density helps prevent excessive needle penetration issues.
Pro Tip: For leather, use a water-soluble topping to prevent stitches from sinking and improve embroidery clarity.
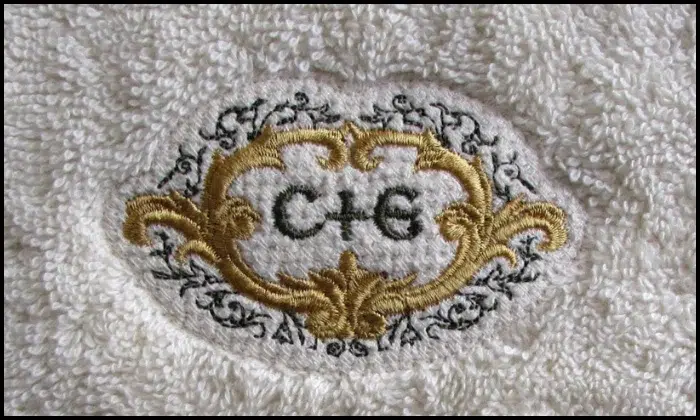
4. Textured Fabrics (Fleece, Towels, Velvet)
Textured fabrics have loose fibers that can interfere with embroidery, causing stitches to sink into the fabric. Underlay creates a smooth base to keep designs crisp and readable.
Best Underlay Techniques:
- Tatami Underlay – Lays down a flat base for fill stitches, preventing thread from sinking into plush fabrics.
- Zigzag Underlay – Adds extra support for raised stitches, improving texture.
- Edge Walk Underlay – Helps maintain clean edges on logos and lettering.
Pro Tip: Use a water-soluble topping on textured fabrics to keep embroidery looking sharp and prevent thread from getting lost in the fabric pile.
Common Mistakes in Underlay Stitching and How to Fix Them
Underlay stitching plays a crucial role in embroidery quality, but even experienced digitizers can make mistakes that affect the final outcome. Below are some of the most common underlay mistakes and how to fix them for better embroidery results.
1. Using No Underlay or the Wrong Type
Many embroidery issues arise from not using underlay at all or selecting the wrong type for the fabric and design. Without underlay, stitches can sink into the fabric, leading to poor coverage, distortion, or frayed edges.
How to Fix It:
- Always use underlay, even for small designs, to maintain structure.
- Choose the right underlay based on fabric type: use edge walk for satin stitches, tatami for fills, and zigzag for 3D embroidery.
- Adjust underlay density to balance support and stitch efficiency.
2. Too Much Underlay
Excessive underlay stitches can make embroidery too stiff, bulky, and uncomfortable to wear. This is a common issue when using multiple layers of underlay unnecessarily.
How to Fix It:
- Use just enough underlay to stabilize the fabric without adding excess weight.
- Reduce underlay density for thick or heavy fabrics to avoid stiffness.
- Test a small sample before finalizing your stitch settings.
3. Wrong Stitch Direction
Incorrect underlay stitch direction can interfere with the top stitches, causing misalignment, uneven coverage, or design distortion.
How to Fix It:
- Ensure the underlay follows the natural flow of the design to support top stitches effectively.
- Use the Edge Walk underlay for satin stitches, and align its direction with the fill stitch for large areas.
- Preview underlay placement in embroidery software before stitching.
4. Not Adjusting Underlay Settings for Different Designs
A one-size-fits-all approach to underlay can lead to poor results. Different fabrics and designs require customized underlay settings to achieve optimal embroidery quality.
How to Fix It:
- Adjust the underlay type and density based on the fabric’s texture and thickness.
- Use a lighter underlay for delicate fabrics and a stronger underlay for heavy materials.
- Always test-stitch a sample to refine underlay settings before full production.
Underlay Settings in Embroidery Software
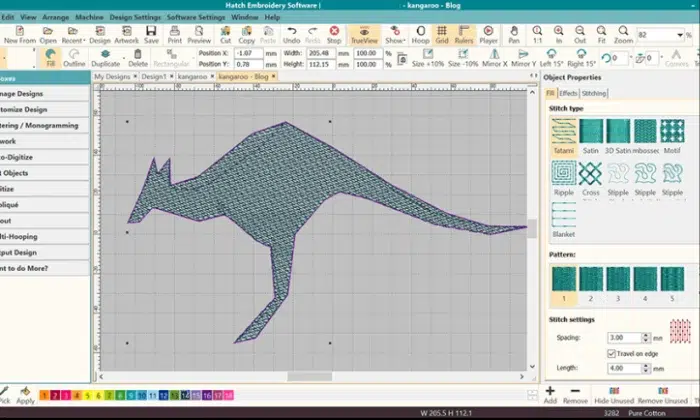
Embroidery digitizing software plays a crucial role in setting up underlay stitches for high-quality embroidery. Professional software like Wilcom Embroidery Studio, Chroma, and Hatch provides built-in underlay settings that allow digitizers to customize and optimize stitch placement for different fabrics and designs. Understanding how to adjust these settings ensures better stability, cleaner details, and reduced production errors.
How Embroidery Software Handles Underlay
Most embroidery software automatically assigns underlay based on the stitch type selected.
For example:
- Wilcom Embroidery Studio offers multiple underlay types with customization options for stitch density, length, and direction.
- Chroma by Ricoma has a simplified underlay setup with preset configurations, making it beginner-friendly.
- Hatch Embroidery Software provides auto-underlay options with manual overrides for advanced control.
Each software uses default settings for different stitch types, but adjustments are often necessary to match fabric behavior and design complexity.
Adjusting Underlay for Different Stitch Types
- Satin stitches: Use edge walk or zigzag underlay to prevent fraying and add loft.
- Fill stitches: Apply tatami underlay to ensure even coverage and prevent gaps.
- Small text & fine details: Center run underlay helps stabilize delicate elements without adding bulk.
Digitizers can modify underlay settings by adjusting stitch length, density, and direction to match the material.
Auto-Underlay Features: When to Override
Many embroidery programs include auto-underlay functions that apply default settings based on stitch type. While convenient, they are not always ideal for every fabric.
When to Override Auto-Underlay:
- When working on stretchy fabrics, increase underlay density for stability.
- For thick materials like leather, reduce the underlay to avoid excessive stiffness.
- When aiming for 3D puff embroidery, adjust the underlay to create more loft.
Conclusion: Mastering Underlay Stitches for Flawless Embroidery
Underlay stitches play a key role in clean, strong, and professional embroidery. They support the fabric, control stitch movement, and help the top stitches sit smoothly. Without the right underlay, designs can pucker, shift, sink, or lose detail.
That is why each design requires the right type of underlay. Center Run, Edge Walk, Zigzag, and Tatami all serve different needs. Also, fabric choice matters. Light fabrics need gentle support, stretchy fabrics need extra hold, and thick or textured fabrics need stronger stability.
In the end, effective underlay planning helps reduce mistakes and improve stitch quality. Always test your design before full production.
Need clean, stitch-ready files? Contact Absolute Digitizing today and get a free quote for expert embroidery digitizing services.
Frequently Asked Questions
Underlay stitches are the first stitches placed under the visible design. They hold the fabric steady and create a smooth base for top stitches.
Underlay stitches improve embroidery quality by reducing puckering, shifting, sinking, and distortion. They help the final design look clean and sharp.
Edge Walk and Zigzag underlay work best for satin stitches. Edge Walk keeps edges clean, while Zigzag adds support and loft.
Tatami underlay works best for large fill areas. It helps create even coverage and prevents gaps, puckering, and uneven stitching.
Yes. The wrong underlay can make embroidery look bulky, loose, puckered, or distorted. A test stitch helps check the settings before full production.