
| Quick Summary |
|---|
Low-quality artwork can look clear on screen but fail in print.
|
Low-quality artwork can slow down a print job fast. A small JPG, screenshot, or blurry logo may look fine on a phone, but it can lose detail when you enlarge it for shirts, signs, labels, or promo items.
Also, poor artwork can create rough edges, dull colors, and fuzzy text. This is why many files need cleanup before they go to print or vector conversion.
Photoshop can help you improve some files. It lets you check image size, reduce JPG noise, soften harsh pixel blocks, sharpen details, and replace unclear text.
However, Photoshop cannot rebuild every missing detail. If your logo still looks broken or pixelated, a clean vector redraw gives better results.
For designs that need cleaner lines, Absolute Digitizing provides expert vector artwork conversion help. So, your artwork stays crisp for apparel, signage, labels, packaging, and other print-ready uses.
- What Is Low-Quality Artwork?
- Why Does Artwork Look Good on Screen but Bad in Print?
- Can Photoshop Fully Fix Low-Resolution Artwork?
- Tip 1: Check the File Resolution Before Editing
- Tip 2: Reduce JPG Noise and Compression Artifacts
- Tip 3: Use Gaussian Blur and Sharpening Carefully
- Tip 4: Replace Blurry Text With Clean Type
- When Photoshop Is Not Enough
- Best File Formats for Clean Artwork
What Is Low-Quality Artwork?
Low-quality artwork means a design file does not have enough detail for clean output. It may look fine at a small size, but it often breaks down when you enlarge it for print, packaging, signs, or apparel.
This problem often comes from small JPG files, web images, screenshots, or files saved too many times with heavy compression. As a result, the file loses sharp edges, smooth color, and clear shape.
Common Signs of Poor Artwork
- Pixelated edges
- Blurry lines
- Rough or broken text
- Uneven colors
- Fuzzy logo details
- Poor print results
These signs matter because printers, cutters, and design software need clean artwork to create smooth output. If the file starts weak, the final product may look unprofessional.
Raster vs Vector Artwork
Raster files use tiny pixels to build an image. JPG, PNG, and BMP files are common raster formats. When you make them larger, the pixels stretch, and the design can look soft or blocky.
However, vector files use shapes, paths, and curves. AI, EPS, SVG, PDF, and CDR files can stay sharp at almost any size. That is why vector artwork works better for logos and print-ready designs.
Why Does Artwork Look Good on Screen but Bad in Print?
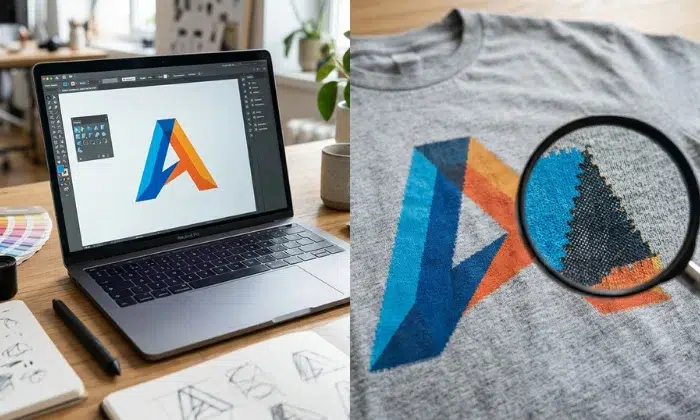
Artwork can look clean on a screen because screens show images with light. They also shrink the design to fit your phone, laptop, or browser. This can hide rough edges, blur, and weak detail.
However, print is different. Printing turns the file into ink, thread, vinyl, or another real material. Because of that, the artwork needs enough detail at the final size.
Screen Size Can Hide Problems
A small logo may look sharp when you view it at normal size. But when you zoom in, you can see the real quality. Pixel blocks, fuzzy lines, and broken text become easier to spot.
Many online images are 72 DPI. That works for screens in many cases, but print work often needs higher resolution at the final size. Also, low-quality JPG files can lose detail each time they are compressed or saved.
Simple Example
A logo may look fine on a phone. However, the same file can look rough when printed on a banner, shirt, sign, or product label.
Can Photoshop Fully Fix Low-Resolution Artwork?
Photoshop can improve low-resolution artwork, but it cannot always make it truly print-ready. It can clean up some problems, yet it cannot bring back detail that the file no longer has.
What Photoshop Can Improve
Photoshop can help you fix small quality issues before print or vector work. It can:
- Reduce JPG noise
- Soften blocky artifacts
- Adjust image size
- Sharpen weak edges
- Clean or replace blurry text
However, these tools work best when the artwork still has enough detail to guide the cleanup. If the image is too small, too compressed, or badly damaged, filters may only make it look softer.
When Redrawing Works Better
A logo with missing edges, broken letters, or rough curves often needs manual redrawing. This is where vector tracing gives better results than editing pixels.
For the cleanest logo, rebuild the artwork as a vector file. It stays sharp, scales easily, and works better for real production.
Tip 1: Check the File Resolution Before Editing
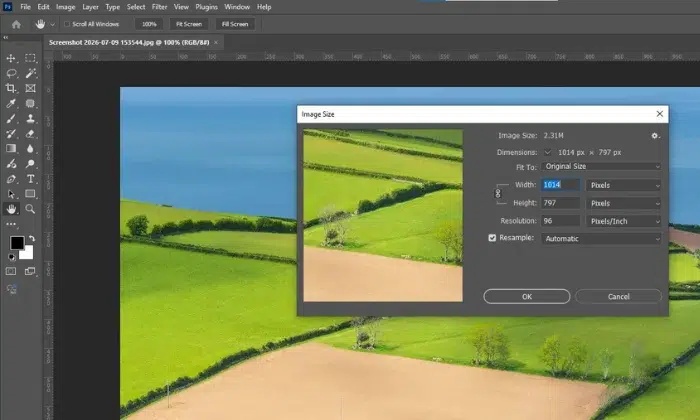
Open your file in Photoshop before you start fixing anything. Then go to Image> Image Size. This window shows the width, height, resolution, and real output size of your artwork.
Resolution often appears as PPI or DPI. In simple words, it tells you how much detail fits inside each inch of the file. A higher number can help, but it does not always mean the artwork is good.
Do Not Trust DPI Alone
Many people change a file to 300 DPI and think it is ready for print. However, a small image at 300 DPI may still be too small for a shirt, sign, label, or banner.
Also, Photoshop can resample the image to make it larger. This adds new pixels, but it may also make the artwork look soft. For this reason, use Preserve Details or a similar resizing option when available.
After resizing, always check the design at the final print size. Zoom in and look at the edges, text, and small details before moving forward.
Quick Resolution Checklist
- What is the current file size?
- What size do you need for print?
- Does the artwork blur when enlarged?
- Are the edges clean enough?
- Is the text easy to read?
This step helps you decide if Photoshop cleanup is enough or if the artwork needs a clean vector redraw.
Tip 2: Reduce JPG Noise and Compression Artifacts
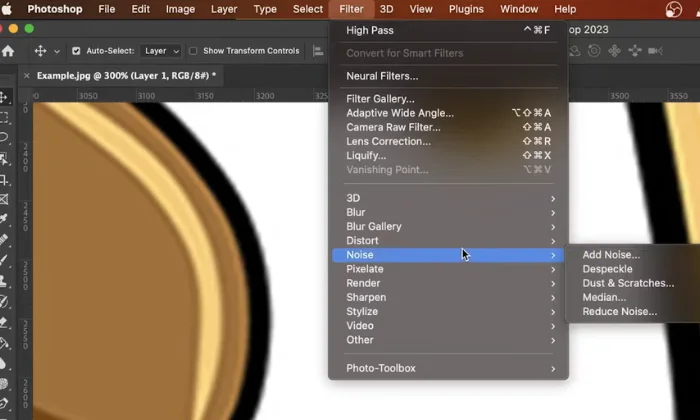
JPG files often lose detail when people save, resize, or upload them many times. This compression can create blocky areas, rough edges, color stains, and uneven shadows. As a result, the artwork may look dirty when you print it.
To start cleanup, open the file in Photoshop. Then go to Filter, Noise, and Reduce Noise. This tool can soften harsh spots and make the image look smoother.
Use Small Changes First
Apply light settings before you make strong edits. Too much noise reduction can make the artwork look plastic, blurry, or flat. Also, small letters and thin lines can lose shape if you smooth the file too much.
If your Photoshop version shows Remove JPEG Artifacts, turn it on when the file has visible boxes or rough color patches. This option can help reduce damage caused by JPG compression.
Compare Before and After
Always work on a duplicate layer. This lets you go back if the cleanup does not look right.
Then zoom in and compare the before and after view. Check the edges, colors, and text. This step works best for mild quality problems. However, it will not fully fix a badly damaged logo.
Use noise reduction before sharpening. If you sharpen first, you may make blocks, dots, and rough edges even more visible.
Tip 3: Use Gaussian Blur and Sharpening Carefully
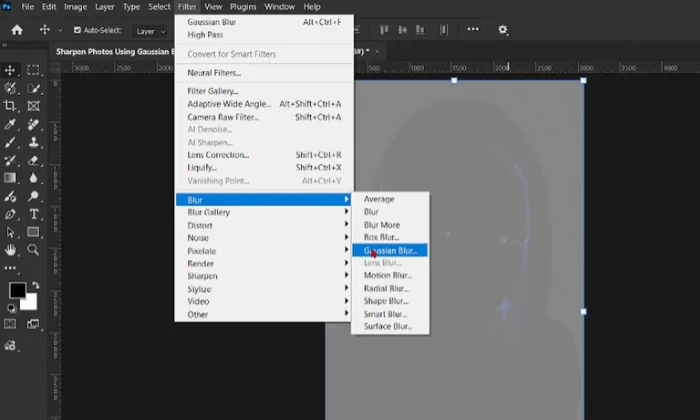
Gaussian Blur can help when a JPG has harsh pixel boxes or rough color patches. It softens blocky areas, so the artwork looks less damaged before you make the next edit.
However, you need to use it with care. Too much blur can remove real detail from the design. It may hide pixels, but it can also ruin fine lines, small shapes, and tiny text.
Apply Blur Only Where Needed
Use a light blur setting and check the artwork as you go. If only one part of the design looks rough, use a mask instead of blurring the whole file.
Also, some color channels may show more damage than others. For example, one channel may have more blocks or stains than the full image. In that case, a careful channel-based edit can give cleaner results without softening everything.
Sharpen With a Light Hand
After a light blur, use sharpening carefully. Smart Sharpen or Unsharp Mask can help bring back some edge detail. Still, strong sharpening can create halos, rough outlines, or fake-looking edges.
The goal is not to make the image look extra sharp. The goal is to make it cleaner and easier to prepare for print or vector redraw work.
Never blur the whole logo heavily. A soft logo may look smoother on screen, but it can print with weak edges and unclear text.
Tip 4: Replace Blurry Text With Clean Type
Text often suffers the most in low-resolution artwork. Small letters can turn soft, uneven, or broken. Curves may look rough, and thin strokes may disappear when you enlarge the file.
Photoshop filters can help with noise and blur, but they cannot always fix damaged text. If the letters no longer have clear shapes, the best fix is to retype them with the correct font.
Recreate the Text Clearly
Start by finding the same font used in the design. If you do not know the font, choose the closest match. Then create a new text layer in Photoshop.
After that, match the size, spacing, color, and placement as closely as possible. This makes the design look cleaner without forcing weak pixels to do the job.
Keep Print Text Editable
If the design will go to print, keep the text clean and editable when possible. Editable type lets you adjust size, spacing, and color without losing quality.
For logos, it is often better to recreate the text in Illustrator, CorelDRAW, or another vector program. This gives the letters sharp paths instead of soft pixels.
Also, replace the text after resizing the image. This keeps the new letters sharp at the final print size and helps the full design look more professional.
When Photoshop Is Not Enough
Photoshop edits pixels, so it can only improve the detail already inside the file. It can clean noise, soften rough spots, and make small changes. However, it may not create perfect print edges from a weak image.
Some files are too small, too compressed, or too damaged to fix with filters. If a logo has missing details, rough curves, broken shapes, or unreadable text, it often needs redrawing instead of more editing.
Why Vector Tracing Works Better
Vector tracing rebuilds the design with clean shapes, smooth paths, and sharp edges. Instead of stretching pixels, it creates artwork that can scale without losing quality.
Photoshop can improve a bad file, but vector art can rebuild it.
Best Uses for Vector Redraws
A clean vector file works better for:
- Logos
- Patches
- Signs
- Screen printing
- DTG printing
- Vinyl cutting
- Promotional products
For this reason, vector tracing is often the safer choice when the artwork must look clean, sharp, and ready for real production.
If your file still looks rough after Photoshop cleanup, Absolute Digitizing can help turn it into a clean vector file for smoother printing and better results.
Best File Formats for Clean Artwork
The right file format can save time and prevent print issues. Some files work well for quick viewing, while others work better for editing, scaling, and production.
Common Artwork File Formats
| File Format | Type | Best Use | Quality Notes |
|---|---|---|---|
| JPG | Raster | Photos and web previews | Common, but loses quality when compressed |
| PNG | Raster | Web graphics and transparent backgrounds | Better for transparency, but still pixel-based |
| BMP | Raster | Basic image storage | Large file, not ideal for modern print workflow |
| PSD | Editable Photoshop file | Layered image editing | Good for edits, but not always print-ready |
| Raster or vector | Sharing and printing | Can hold clean vector data if saved correctly | |
| AI | Vector | Illustrator artwork | Best for editable logo and print files |
| EPS | Vector | Professional print use | Common format for signs, apparel, and packaging |
| SVG | Vector | Web and scalable graphics | Stays sharp at many sizes |
| CDR | Vector | CorelDRAW artwork | Useful for print and vector design work |
However, always check the file before production. A PDF or EPS may still contain a low-quality image inside.
Get Clean Vector Artwork From a Low-Quality File
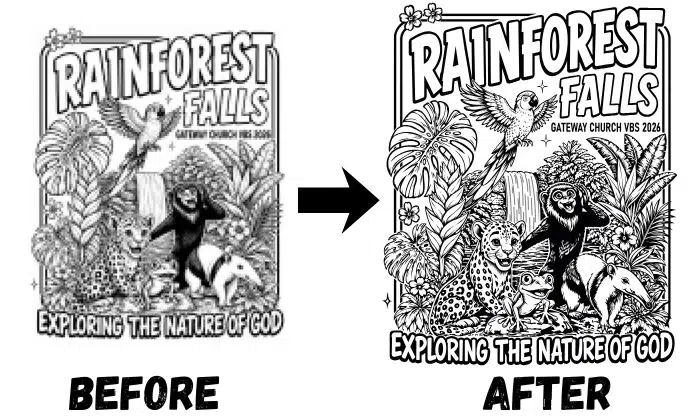
A rough file does not have to stop your project. If you only have a low-quality JPG, blurry logo, or pixelated artwork, a clean vector redraw can make the design sharp again.
Absolute Digitizing can convert rough raster images into clean vector files for real production. This helps your artwork stay clear when used on apparel, signs, labels, packaging, and promotional products.
Clean Artwork Starts With the Right File
Photoshop can improve some files, but vector artwork gives you smoother lines and better scaling. So, if your design still looks soft or broken, send it for professional cleanup.
Vector conversion starts at $10. Upload your artwork today and get a free quote before production begins.
Final Thoughts
Low-quality artwork can create many problems in print and production. A small JPG, screenshot, or blurry logo may look fine on screen, but it can lose detail when enlarged. Photoshop can help you check resolution, reduce noise, soften rough spots, sharpen edges, and replace unclear text.
However, some files need more than basic cleanup. If the artwork has broken lines, fuzzy text, or rough shapes, vector tracing gives a cleaner result. It rebuilds the design so it stays sharp at any size.
Need help fixing a rough file? Contact Absolute Digitizing today and get a free quote for clean, print-ready vector artwork.
FAQs
Photoshop can improve low-quality artwork by adjusting size, reducing noise, softening JPG artifacts, sharpening edges, and replacing blurry text. However, it cannot always restore missing detail.
Your logo may look blurry because the file is too small, compressed, or saved as a low-quality JPG. Print needs more detail than a screen display.
The best way to fix a pixelated logo is to redraw it as a vector file. This creates clean lines, sharp text, and artwork that stays clear at any size.
You can use a JPG for some print jobs, but it must be high resolution at the final print size. For logos and sharp designs, vector files are usually better.
AI, EPS, SVG, PDF, and CDR are usually best for clean artwork because they can hold vector data. These files scale better than JPG or PNG files.