
In this blog, you will learn what embroidery digitizing is and how it turns artwork into a stitch file. You will also learn how beginners can improve results with the right tools, settings, and fabric choices.
- Meaning of digitizing
- Core components
- Step-by-step process
- Software options
- Beginner tips
- Common errors
Use this guide to start smart, avoid common mistakes, and choose Absolute Digitizing when you need reliable, production-ready embroidery.
If you are new to embroidery, the word “digitizing”can sound confusing at first. Many small business owners and hobbyists think they can send a regular image file straight to an embroidery machine. But that is not how it works. Embroidery machines need a special file with clear stitch instructions. That is where embroidery digitizing comes in.
Embroidery digitizing turns your logo, artwork, or design into a stitch-ready file that an embroidery machine can read. It tells the machine where to stitch, what kind of stitch to use, and how the design should flow on fabric. This step plays a huge role in how clean, smooth, and professional the final embroidery looks.
When digitizing is done well, your design looks sharp and runs better on the machine. If you want polished results without trial and error, working with a professional digitizing service can save time and stress.
- What Is Embroidery Digitizing?
- What Are the Core Components of Embroidery Digitizing?
- How Does the Embroidery Digitizing Process Work Step by Step?
- Which Software Is Used for Embroidery Digitizing?
- What File Formats Do Embroidery Machines Use?
- What Type of Artwork Works Best for Embroidery Digitizing?
- What Are the Best Embroidery Digitizing Tips for Beginners?
- Which Fabric you should use for Embroidery?
- What Types of Embroidery Are Trending Right Now?
What Is Embroidery Digitizing?
Embroidery digitizing is the process of changing a design into a file that tells an embroidery machine how to stitch it. It does much more than copy a picture. A digitized file gives the machine exact instructions for stitch type, stitch direction, stitch order, and stitch density.
For example, if you have a business logo in PNG or JPG format, the embroidery machine cannot use that file by itself. A digitizer studies the design and decides how to rebuild it with stitches.
They choose:
- Where satin stitches should go.
- Where fill stitches should work better.
- How the design should hold up on fabric.
This matters because thread does not behave like ink. Fabric can stretch, shift, or pull during stitching.
Good digitizing helps prevent:
- Gaps
- Puckering
- Messy results
In simple words, embroidery digitizing is the bridge between your artwork and a clean embroidered design.
What Are the Core Components of Embroidery Digitizing?
Embroidery digitizing has a few main parts that work together. Each one helps the design stitch cleanly on fabric. When you understand these parts, the whole process feels much easier.
Stitch Type
The first component is stitch type. A digitizer picks the best stitch for each part of the design. Satin stitches work well for borders and letters. Fill stitches cover larger areas. Running stitches help with fine details and outlines.
Stitch Direction
The next part is stitch direction. This controls the way the thread flows. It also changes the texture and shine of the design. Good direction makes the embroidery look neat and balanced.
Stitch Density
Another key part is density. Density means how close the stitches sit together. Too many stitches can make the design stiff. Too few stitches can leave gaps.
Underlay
Underlay is also important. It is the base layer of stitches under the top design. It helps support the fabric and improves the final shape.
Here are the core components in a simple list:
- Stitch type : chooses the right stitch style.
- Stitch direction: controls flow and texture.
- Density: manages stitch spacing.
- Underlay : supports the top stitches.
- Pathing: sets the stitch order.
- Pull compensation: adjusts for fabric movement.
Each part plays a big role. When all of them work together, the design looks clean, strong, and professional.
How Does the Embroidery Digitizing Process Work Step by Step?
The embroidery digitizing process follows a clear path. Each step helps turn simple artwork into a file that an embroidery machine can read. When you understand the steps, the process feels less confusing.
First, the digitizer reviews the design. They check the logo, text, or image and see if it will work well in the thread. Small details may need to be cleaned up or simplified.
Next, they choose the final size. Size matters because a design that looks appealing on a screen may not stitch well at a smaller size. Then they pick the right stitch types for each part of the design.
After that, the digitizer sets the stitch direction, density, and underlay. These settings help the design look clean and hold its shape on fabric. Then they plan the stitch order so the machine runs smoothly.
Here is the process in simple steps:
- Review the artwork.
- Clean up the design if needed.
- Choose the embroidery size.
- Assign stitch types.
- Set direction, density, and underlay.
- Plan the stitch order.
- Save the file in the right machine format .
- Test stitch the design.
- Make final edits if needed.
At the end, the design is ready for production. A good test run helps catch problems before full stitching begins.
Want Perfect Embroidery? Watch How To Digitize Your Logo in Seconds!
This quick video shows exactly how we digitize your logo, resizing your design, choosing the right stitches for every detail, and adding those pro angles for extra depth.
Love these quick digitizing tips? Visit our YouTube channel for more easy embroidery secrets, click here.
Which Software Is Used for Embroidery Digitizing?
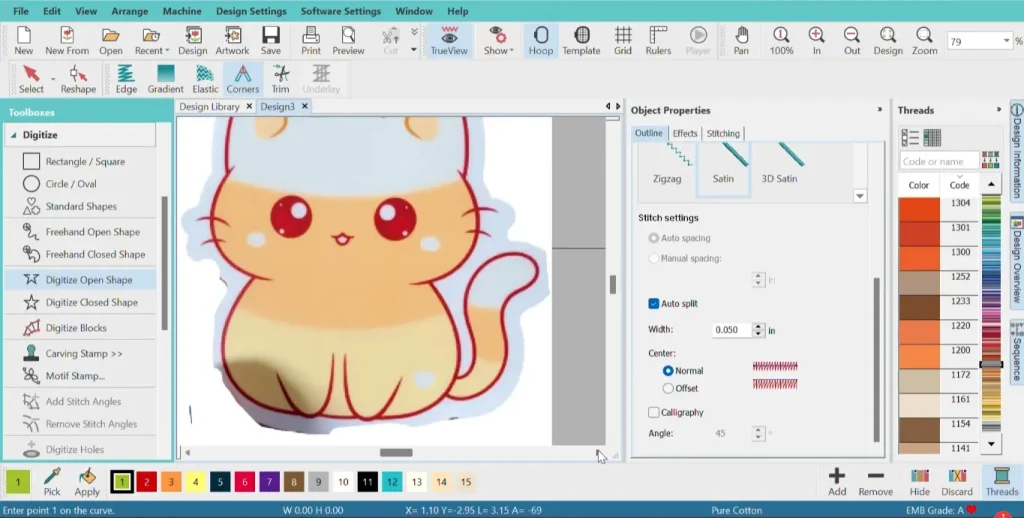
Several software programs help create embroidery files. Some work well for beginners, while others fit advanced users and busy shops.
Here are some popular options:
- Hatch Embroidery: A beginner-friendly program with simple tools, built-in fonts, and easy editing features.
- Wilcom EmbroideryStudio: A professional program with strong control and advanced tools for detailed digitizing work.
- Embrilliance Essentials and StitchArtist: Good for home users who want to learn step by step and grow their skills over time.
- Brother PE-Design: A solid choice for beginners, especially for people who use Brother embroidery machines.
- Ink/Stitch: A helpful option for beginners who want a free, open-source tool. It works with Inkscape and is great for learning basic digitizing.
Each program helps users turn artwork into stitch files, but the learning curve can differ. Beginners usually do best with software that has simple controls and clear previews. If you want polished results for business logos, a professional digitizing service can also save you time and mistakes.
Here’s a quick comparison.
| Software / Level | Best For | Pricing Model |
|---|---|---|
| Ink/Stitch | True beginners and budget users | Open-source |
| Hatch Organizer 3 | Entry-level hobby use | One-time payment |
| Hatch Composer 3 | Beginners who want more editing tools | One-time or FlexPay |
| Hatch Digitizer 3 | Serious hobbyists and small shops | One-time or FlexPay |
| Embrilliance Essentials | Home users who want simple editing and lettering | One-time payment |
| Embrilliance StitchArtist Level 1 | First-time digitizing practice | One-time payment |
| Embrilliance StitchArtist Level 2 | Users creating logos and more detailed designs | One-time payment |
| Embrilliance StitchArtist Level 3 | Advanced and commercial digitizing | One-time payment |
| Brother PE-DESIGN 11 | Brother users and home-based businesses | Dealer pricing |
| Wilcom EmbroideryStudio Lettering 2026 | Lettering-heavy production work | One-time payment |
| Wilcom EmbroideryStudio Editing 2026 | Editing stitch files and production prep | One-time payment |
| Wilcom EmbroideryStudio Decorating 2026 | Commercial shops that want auto-digitizing | Annual subscription |
| Wilcom EmbroideryStudio Designing 2026 | Pro digitizers and full commercial work | One-time payment |
Quick read: Ink/Stitch is the best free option. Hatch is the friendliest paid path for hobbyists. Wilcom is the most professional option, but it is also the most expensive. PE-DESIGN 11 works best for Brother-centered workflows.
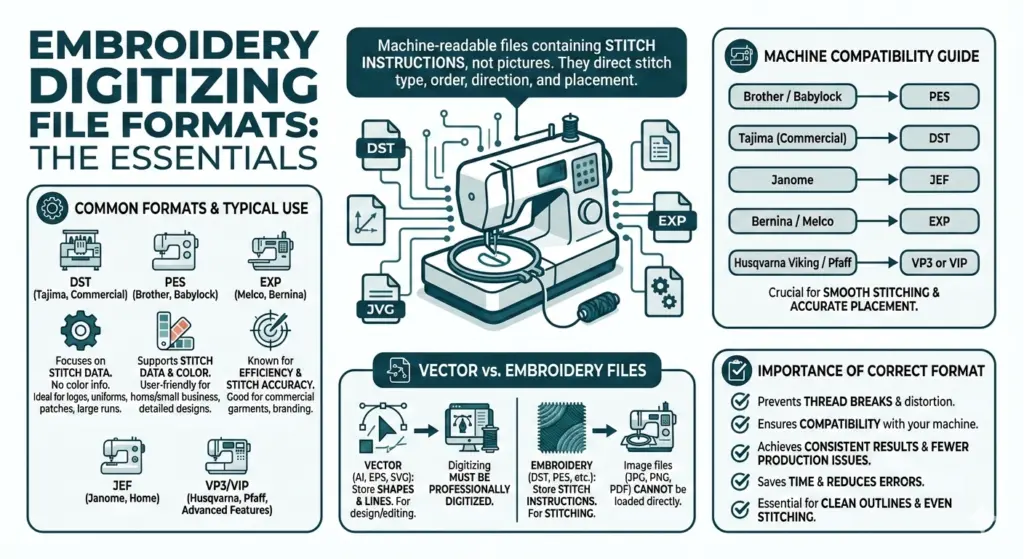
What File Formats Do Embroidery Machines Use?

Embroidery machines use different file formats based on the machine brand. Digitizing software creates the design and then exports it in the format your machine can read. That is why the same logo may be saved in more than one file type.
Common machine formats include:
- DST: Tajima and common commercial use
- PES: Brother and Baby Lock
- JEF: Janome
- EXP: Melco and Bernina
- VP3: Husqvarna Viking and Pfaff
- DSB: Barudan
Always ask for the file that matches your machine model so the design runs smoothly and stitches correctly.
What Type of Artwork Works Best for Embroidery Digitizing?
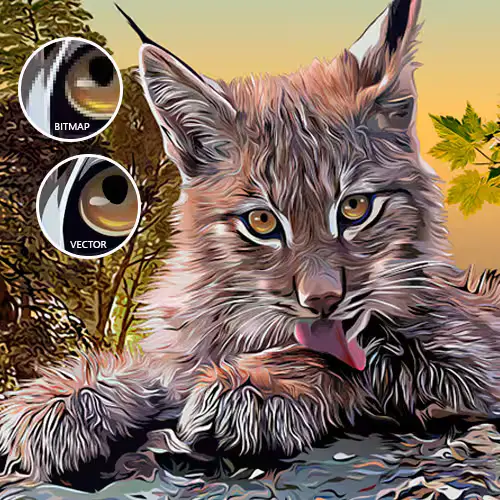
Clean artwork gives you better embroidery results. Clear lines and sharp edges help a digitizer build a cleaner stitch file. The best files keep details easy to read and stitch.
Best artwork for embroidery digitizing:
- Vector files: AI, EPS, SVG
- High-resolution PNG files
- Clean logos with solid shapes
- Clear text with enough size
Artwork that causes problems:
- Blurry JPG images
- Tiny text
- Gradients
- Shadows
- Busy details
If you have clean artwork, the digitizing process moves faster and the final embroidery looks better. Better artwork also reduces edits, saves time, and helps your logo stitch out clean on fabric.
What Are the Best Embroidery Digitizing Tips for Beginners?
If you are new to embroidery digitizing, start with simple designs. Do not choose tiny text or too many details at first. Clean shapes are easier to digitize and test. Learn the basic stitch types before trying advanced effects. Always think about the fabric because each fabric reacts in a different way.
Here are some helpful beginner tips:
- Start with simple artwork.
- Use larger letters.
- Learn basic stitch types.
- Match design to fabric.
- Use the right stabilizer.
- Test stitch every design.
- Keep stitch density balanced.
These tips can help you learn faster and get cleaner embroidery results. For better quality and less trial and error, an expert embroidery digitizing service can also help.
Which Fabric you should use for Embroidery?
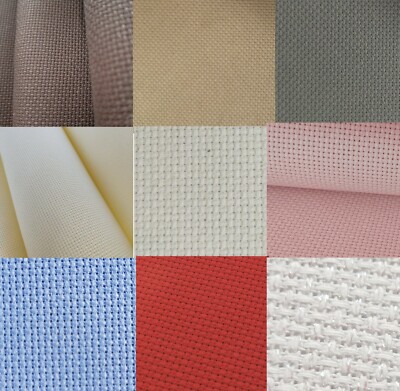
Some fabrics do not work well for embroidery, especially if you are a beginner. Very thin fabrics, like chiffon and silk, can shift, tear, or pucker during stitching. Stretchy fabrics, like jersey and spandex, can pull out of shape and make the design look uneven. Slippery fabrics can also move too much in the hoop. Thick fabrics with high texture, like velvet or fluffy fleece, can hide small details and make stitches sink in.
Fabrics that are harder for embroidery include:
- Thin fabrics: chiffon, silk.
- Stretchy fabrics: jersey, spandex.
- Slippery fabrics: satin-like materials.
- High-texture fabrics: velvet, fleece.
These fabrics are not impossible to use, but they need more skill, careful settings, and the right backing. If you are just starting out, choose stable fabrics instead.
Better fabric choices for beginners include:
- Cotton
- Denim
- Twill
- Canvas
These fabrics hold stitches more evenly and make it easier to get clean embroidery results.
What Types of Embroidery Are Trending Right Now?
Right now, embroidery buyers want styles that feel bold, personal, and textured. 3D puff embroidery stands out because it adds height and dimension, especially on hats and streetwear. Chenille and micro chenille are also popular because they create a soft, raised look that works well for fashion, patches, and team-style designs.
Custom patches stay in demand because they help products stand out and work across many markets. Personalized embroidery is also growing because names, initials, and custom details are easy to sell and gift.
Popular embroidery trends include:
- 3D puff for bold, raised designs.
- Chenille for soft, textured looks.
- Custom patches for fashion and branding.
- Personalized embroidery for names and gifts.
These styles stay popular because they look unique, feel premium, and help small brands offer custom products people remember.
Is Embroidery Digitizing Hard to Learn for Beginners?
Embroidery digitizing can feel hard at first, but beginners can learn it with practice. The main challenges are choosing the right stitch type, setting proper density, and understanding how fabric reacts. Many beginners also struggle with small text and uneven stitching.
So, start with simple designs, test your files often, and learn one tool at a time. If you want sharp, clean, and production-ready embroidery, a professional digitizing service is often the safest and smartest choice.
What Are the Most Common Embroidery Digitizing Mistakes?
Many beginners make simple mistakes when they start embroidery digitizing. These errors can affect stitch quality, fabric shape, and the final look of the design.
Cause of errors:
- Too much detail.
- Wrong stitch type.
- High stitch density.
- Poor fabric match.
- No test run.
Designs with too much detail often look messy when stitched. Tiny text and small shapes are harder to sew cleanly. The wrong stitch type can also ruin the design because each shape needs the right stitch style.
Moreover, high stitch density can make the fabric pucker or feel too stiff. Many beginners also forget that fabric matters. A design that works on cotton may not work the same on caps or fleece. Skipping a test run is another common mistake, because screen results do not always match fabric results.
What’s the Future of AI in Embroidery Digitizing?
The future of AI in embroidery digitizing will likely bring faster tools, more automation, and easier online workflows. That is a reasonable expectation because major embroidery platforms already promote automation, web-based apps, and personalized file creation.
- Faster auto tools
- More custom orders
- Smarter web workflows
Auto digitizing can save time and help beginners start fast, especially with simple artwork. The downside is that it still works best on clean designs and often needs manual cleanup for better stitch quality and control.
As embroidery keeps changing, a trusted digitizing service can help you keep up with new tools without risking quality.
If you need faster delivery, Absolute Digitizing offers a standard turnaround of 4 to 12 hours and a 2-hour rush option for urgent orders. That helps you stay on schedule and get clean, ready-to-run files faster.
How Long Does Embroidery Digitizing Take?
Embroidery digitizing time depends on the size, detail, and stitch style of the artwork. A simple logo usually takes about 1 to 3 hours. A medium design often takes 4 to 8 hours. Complex artwork with fine details or special effects can take 12 to 24 hours. Test stitching and final edits can also add time.
Here is a simple timeline:
- Simple logo: 1–4 hours
- Medium design: 4–8 hours
- Complex artwork: 12–24 hours
If you need faster delivery, Absolute Digitizing offers a standard turnaround of 4 to 12 hours and a 2-hour rush option for urgent orders. That helps you stay on schedule and get clean, ready-to-run files faster.
Why Should You Choose Professional Embroidery Digitizing Services?
Professional embroidery digitizing services save time and improve quality. A skilled digitizer knows how to choose the right stitch type, set clean density, and adjust the design for different fabrics. This helps your logo or artwork stitch better and look more polished.
When you do it yourself, small mistakes can lead to puckering, broken threads, and wasted material.
A professional team helps you avoid that learning curve and gives you more consistent results across shirts, caps, jackets, and patches. If you want smooth ordering and dependable support, a trusted team like Absolute Digitizing can make the process much easier.
Our Customer Service Includes:
- Instant free quotes.
- 2 to 12-hour turnaround.
- Rush orders in 2 hours.
- 24/7 live chat support.
- Free revisions.
- Your satisfaction or a full refund.
Conclusion
Embroidery digitizing helps turn artwork into clean, machine-ready embroidery. In this guide, you learned what digitizing is, how the process works, which software people use, common beginner mistakes, and why fabric and stitch settings matter. You also saw why professional help can save time and improve quality. If you are just starting, keep learning and practice with simple designs. If you want fast, clean, and reliable results, contact Absolute Digitizing, to Get a Free Instant Quote!
Frequently Asked Questions About Embroidery Digitizing
Can you turn a JPG or PNG into an embroidery file?
A JPG or PNG cannot usually go straight to an embroidery machine. It must be digitized first so the design includes stitch paths, stitch types, density, and other machine instructions.
How much does embroidery digitizing cost?
Embroidery digitizing costs depend on the size, detail, and complexity of the design. Simple logos usually cost less, while detailed artwork, cap designs, and small lettering often cost more.
What is the best embroidery file format?
The best embroidery file format depends on your machine. Common embroidery formats include DST, PES, EXP, JEF, and VP3. Always choose the format that matches your embroidery machine brand and model.
Is embroidery digitizing hard for beginners?
Embroidery digitizing can feel difficult at first, but beginners can learn it with practice. Starting with simple artwork, basic stitch types, and beginner-friendly software makes the process easier.
Why does embroidery look different on fabric than on screen?
Embroidery looks different on fabric because thread, fabric, and stitch movement behave differently than digital images. Fabric can stretch, shift, or pull, which changes the final stitched result.
Do different fabrics need different digitizing settings?
Yes, different fabrics need different digitizing settings. Stretchy, thick, delicate, or textured materials often require changes in stitch density, underlay, pull compensation, and stitch type.
Is professional embroidery digitizing worth it for small businesses?
Professional embroidery digitizing is often worth it for small businesses because it helps improve stitch quality, reduce mistakes, save production time, and create cleaner results for logos, uniforms, and branded apparel.