Stitch density in embroidery controls how close the stitches sit in a design. When spacing is right, the design looks clean, smooth, and balanced. When it is wrong, the fabric may pucker, thread may break, or the logo may feel stiff.
Also, density is not one fixed setting. It changes with fabric type, thread weight, stitch style, underlay, and design size. For this reason, every design needs careful planning before it reaches the machine.
If your artwork needs clean stitching from the start, Absolute Digitizing provides quality digitizing for embroidery designs with the right density balance. In this guide, we will explain density in simple steps to help you avoid common stitch-out problems.
| Quick Summary |
|---|
Correct embroidery density keeps designs clean, soft, and production-ready.
|

- What Is Stitch Density in Embroidery?
- How Is Embroidery Density Measured?
- Does Density Work the Same for Every Stitch Type?
- What Factors Control the Correct Density?
- Recommended Density Starting Points by Thread Weight
- What Happens When Density Is Too High or Too Low?
- Real Embroiderer Problem: Why Is Fabric Showing Through the Stitches?
- How to Adjust Stitch Density Correctly
- How Professional Digitizers Balance Density for Better Stitch-Outs
What Is Stitch Density in Embroidery?

Stitch density means the space between stitches or stitch rows in an embroidery design. A smaller spacing value places stitches closer together and creates heavier coverage. A larger value creates lighter and more open stitching. The correct setting depends on fabric, thread, stitch type, underlay, and design size.
Easy Meaning for Beginners
For beginners, it helps to think of density as spacing. If the spacing is tight, the design uses more thread in that area. If the spacing is wider, the fabric shows more through the stitches.
Also, density affects many parts of the final stitch-out.
What Density Affects
- Design coverage
- Surface texture
- Fabric flexibility
- Stitch count
- Machine speed
- Thread breaks
However, density and stitch count are not the same thing. Density controls how close stitches sit together. Stitch count shows the total number of stitches in the full design.
Therefore, more stitches do not always mean better embroidery. Balanced spacing creates cleaner results.
How Is Embroidery Density Measured?

Understanding Millimeter Spacing
Embroidery density is often measured in millimeters. This number shows the space between stitches or stitch rows. A smaller number means the stitches sit closer together. A larger number means the stitches sit farther apart.
For example, 0.35 mm is denser than 0.45 mm. This is because the machine places more thread into the same design area.
Simple Density Comparison
| Spacing | Relative result |
|---|---|
| 0.35 mm | Tighter and heavier |
| 0.40 mm | Common starting point |
| 0.45 mm | Lighter and softer |
However, these numbers are only comparisons. They are not fixed rules for every design.
Why Density Numbers Can Be Confusing
Some embroidery software may show 4.0 instead of 0.40 mm. Therefore, always check how your program displays spacing before copying a value.
For a clearer visual example, watch this quick and helpful video to see how embroidery density works before choosing your own design settings.
Does Density Work the Same for Every Stitch Type?

No. Each stitch type handles density in a different way. For this reason, one setting cannot control the full design correctly.
Satin Stitch Density
Satin spacing controls how close stitches sit along each side of a column. It works well for borders, letters, and narrow shapes.
However, very small columns may need fewer needle points. If too many stitches pack into a tight area, the fabric can weaken, bunch, or break thread. Some software also adjusts spacing as the satin column becomes wider or narrower.
Tatami or Fill Stitch Density
Tatami, also called “fill stitch,” uses row spacing. Smaller row spacing creates heavier coverage. Wider spacing creates a softer and more open fill.
Also, stitch angle, underlay, and fabric texture can change how full the area looks.
Running Stitch Settings
Running stitches work differently. They usually depend on stitch length, curve control, and repeats. Therefore, they do not use row spacing the same way satin and fill areas do.
What Factors Control the Correct Density?
Correct density depends on the full embroidery setup, not one software number. A clean stitch-out needs the right balance between fabric, thread, underlay, size, and design structure.
Fabric Stability
Fabric plays a major role because each material reacts differently to needle pressure and thread pull.
Common fabric examples include:
- Stable woven fabric
- Stretchy knit fabric
- Delicate satin or silk
- Thick fleece or terry cloth
- Structured caps
However, lightweight and stretchy fabrics need extra care. Dense stitching can pull these materials inward and cause puckering. Meanwhile, thick fabrics may need stronger support, topping, or adjusted stitch spacing to keep the design visible.
Thread Weight
Thread size also changes the density choice. Thinner thread can fit into closer spacing because it takes less room. However, thicker thread needs more space between stitches.
If a design uses tight spacing with heavy thread, the area can build up fast. As a result, the machine may create friction, thread breaks, or hard embroidery.
Underlay and Stabilizer
Poor coverage does not always mean the top stitches need more density. In many cases, better underlay can lift the stitches and control fabric movement.
Also, dense designs need stronger backing. Stretchy or light fabrics often need more stable support than firm woven fabric.
Design Size and Resizing
Shrinking a stitch file without recalculating stitches can make the design too dense. However, enlarging it can create open gaps.
Native design files can adjust stitch count and spacing better. Expanded machine files usually have less resizing control.
Overlaps and Stitch Direction
Hidden overlaps, repeated borders, layered fills, and stitch angles can create heavy areas. Therefore, each object needs a careful review before final stitching.
Recommended Density Starting Points by Thread Weight
Thread weight affects how much space each stitch needs. Thinner thread can sit closer together, while thicker thread needs more room. For this reason, density should match the thread, needle, fabric, and final look.
General Thread Spacing Guide
| Thread weight | Starting spacing |
|---|---|
| 60 weight | About 0.35 mm |
| 40 weight | About 0.40 mm |
| 30 weight | About 0.50 mm |
| 12 weight | About 0.80 mm |
These values are common starting points from Madeira’s density guide. However, they are not fixed rules. The same guide also connects thread weight with needle size, which shows why density cannot stand alone.
Important Note
These numbers are starting points, not final settings. Always test the design with the actual thread, needle, fabric, backing, and machine planned for production.
Also, the final density may change for textured fabric, small lettering, caps, patches, or soft garments. Therefore, a test stitch gives the most trusted answer before full production.
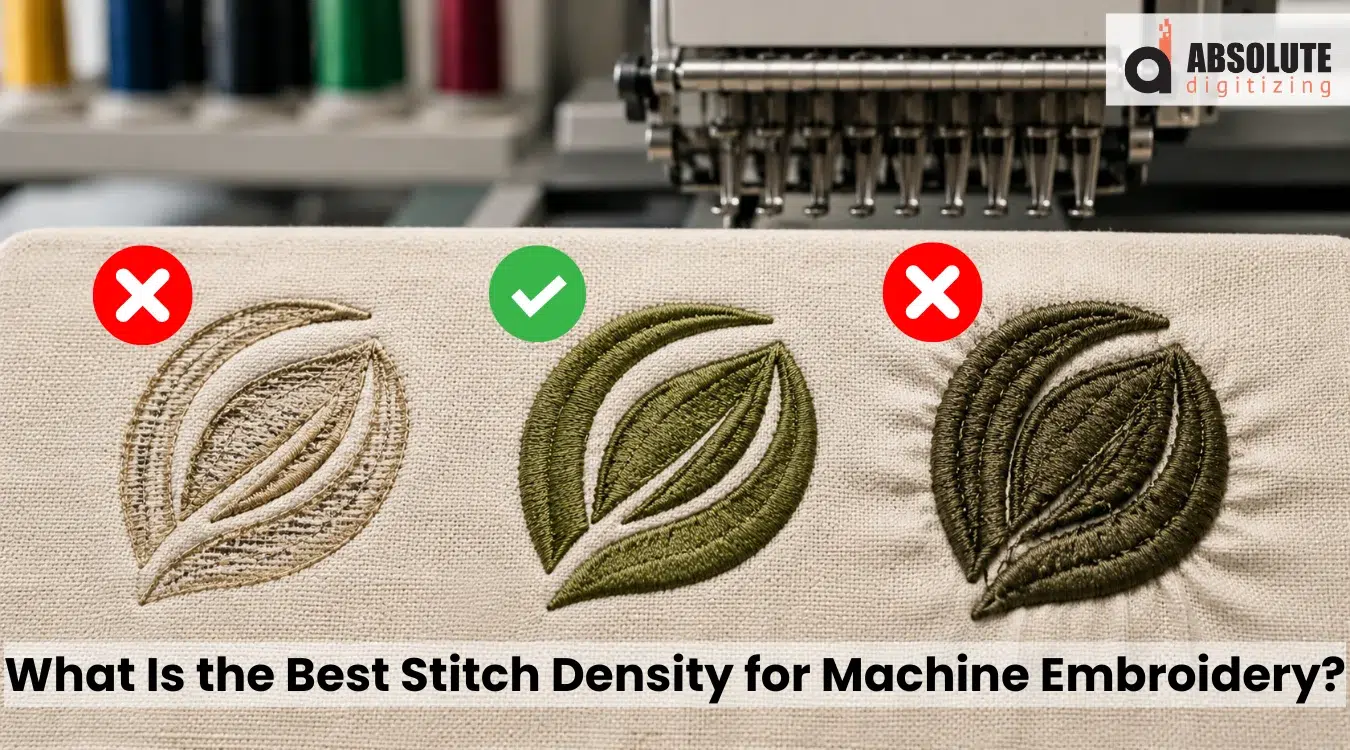
What Happens When Density Is Too High or Too Low?
Wrong density can make a good design sew poorly. However, the problem may not come from density alone. Stabilizer, hooping, thread tension, fabric movement, stitch direction, and design build can create similar issues.
Common Density Problems
| Problem | Possible density issue | What to check |
|---|---|---|
| Fabric puckers | Density may be too high | Underlay, backing, hooping, and tension |
| Design feels stiff | Too many stitches in one area | Overlaps and fill spacing |
| The thread keeps breaking | Stitches may be too close | Needle, thread weight, and machine speed |
| Small letters close up | Excess density or poor column width | Letter size and satin spacing |
| The fabric shows through | Density may be too low | Underlay, topping, and stitch angle |
| The fill looks uneven | Rows may be too open | Fabric texture and row spacing |
| Long machine time | Unnecessary density or overlaps | Stitch count and hidden objects |
Also, dense designs need the right fabric support. Lightweight or stretchy fabric can pull inward when stitches sit too close. As a result, the fabric may wrinkle around the logo.
Therefore, always check the full setup before changing density. A small adjustment in backing, underlay, or hooping may fix the issue without adding more stitches.
Real Embroiderer Problem: Why Is Fabric Showing Through the Stitches?

Problem: Fabric Showing Through the Stitches
The main problem here is low fill coverage. The stitch rows look too open, so the green fabric shows through the red thread. This can happen when the fill density is too light, the underlay is weak, or the fabric is stretchy and not supported well.
Solution: Improve Coverage Before Final Stitching
For 40-weight thread, many digitizers start around 0.40 mm. If the fabric still shows through, you can test a slightly tighter setting, such as 0.35 mm, add proper underlay, and test the design on the same fabric. However, do not make it too dense, or it may cause puckering and thread breaks during embroidery.
How to Adjust Stitch Density Correctly

Adjust density with a clear workflow. This helps you fix the real issue instead of changing the whole design blindly.
Step 1: Check the Fabric and Thread
Start by checking fabric stretch, thickness, and surface texture. Also, review the thread weight and needle size because each one affects stitch spacing.
Step 2: Inspect Each Object Separately
Do not raise or lower density across the full design at once. Instead, check satin columns, fill areas, outlines, lettering, and overlaps one by one.
Step 3: Review the Underlay
Poor coverage does not always need more top stitches. Sometimes, a weak underlay causes the problem.
For example, fleece may need wider spacing with a stronger underlay. However, delicate fabric may need lighter density and less underlay. Structured caps often need firm edge support.
Step 4: Remove Unnecessary Overlaps
Remove hidden stitches where one object sits under another. As a result, the design becomes softer, and the stitch count goes down.
Step 5: Make Small Changes
Change one setting at a time. Large changes can make it hard to know what improved the stitch-out.
Step 6: Recalculate After Resizing
Use software that recalculates stitches when you change design size. Simple machine scaling may not keep proper coverage.
Step 7: Run a Test Stitch
Finally, test the design on the same fabric, backing, topping, thread, and needle planned for production.
How Professional Digitizers Balance Density for Better Stitch-Outs

Professional digitizers do not use one density setting for the full design. Instead, they study each part of the artwork and adjust spacing based on how that area will sew.
A small letter may need a different setting than a large fill area. Also, satin borders, patches, caps, stretchy shirts, and thick fabrics all need special care.
What Experts Check Before Setting Density
- Fabric type and stretch
- Thread weight and needle size
- Stitch type and direction
- Underlay support
- Design size
- Hidden overlaps
- Final use of the item
However, density is only one part of clean digitizing. A skilled digitizer also controls pull and push settings, stitch order, trims, and underlay. As a result, the file runs smoother and creates fewer machine problems.
Proper density control can reduce puckering, thread breaks, stiff embroidery, and fabric gaps. In addition, it can save machine time, thread, garments, and extra test runs.
For this reason, professional embroidery digitizing services are a smart choice when your logo must look clean, sew well, and stay consistent during production.
Final Thoughts
Correct embroidery density helps a design sew clean, feel soft, and look professional. It affects coverage, texture, stitch count, machine speed, and fabric movement. However, the right setting depends on fabric type, thread weight, stitch style, underlay, backing, and design size.
Also, more stitches do not always mean better quality. A balanced file can reduce puckering, thread breaks, stiff areas, and wasted production time.
If you want clean, machine-ready designs with the right density balance, contact Absolute Digitizing today and get an instant free quote.
FAQs
High density can make the design stiff and cause puckering, thread breaks, needle stress, and long machine time. It can also pull lightweight or stretchy fabric out of shape.
Low density can leave gaps in the design. As a result, the fabric may show through the stitches, and the embroidery may look weak or unfinished.
Yes. Higher density can increase stitch count, thread use, machine time, and production cost. However, more stitches do not always mean better quality.
No. Stable woven fabric, fleece, satin, knits, and caps all react differently. Therefore, a digitizer should adjust density based on the fabric and final use.