
Commercial Embroidery SOS: WHAT REASONS CAUSE THE 7 MOST COMMON
ERRORS?
When it comes to deal with commercial embroidery, it seems nature has used the incidences of blunders by a scoopful serving of Murphy’s, Sod’s and Finagles Laws of prediction that the most awful outcomes can only prevail at the worst of times!!!
Using these simple set of solutions to a few of the most common problems, you can keep production flaws and errors at bay and keep running the business efficiently.
But how, is the MAIN question here?
It’s a very simple fact. In commercial embroidery, mistakes might occur sometimes. Problems always seem to happen only at the worst times, like when you are working on a narrow deadline or with high-priced quantities of fabrics. When dealing with errors during production, a new embroider (new to the art of embroidery) can often feel confused and miscarry to fix the problems in the precise way. Mistakes need to be rectified on spot in such cases to save the precious production time. Often, the best way to handle things precisely is by adopting a predefined solution to the expected errors.
Hereby is the list of the top 7 mistakes to avoid when embroidering hats:
Caps and hats are particularly difficult and more prone to problems in quality. And if you’re not careful, poor quality can happen faster than your worst imagination.
 Error #1: A very high-grade speed operation of the embroidery machine.
Solution: Keep things at a calm pace.
Like in any emergency, the best approach is to stay calm. It may seem that disasters never occur during normal demands of time. Things always go wrong at the worst of times, during speedy production with expensive articles.
The greatest advice for forming the best embroidery design is to slow the speed and not invite trouble due to haste. For a typical hat design, a machine should run at about 600 stitches per minute with a hat frame and around 750 for a flat one. Obviously, this is just a mere suggestion made as a rough guess.
Every design will be different from another and cannot be compared to draw conclusions. Slowing down your system down is the ultimate solution if a design has some fine intricate details or minute aspects like tiny letters. In cases of intricate embroidery designs, you can improve registration by slowing down to about 550 stitches per minute for hat frames and 650 stitches per minute for flat ones. Slowing down an embroidery machine will do it right the first time, as well as saving cost by
avoiding the useless product.
A high delivery speed will not matter at all if you deliver a poorly finished product to your customer. If something is sewn incorrectly, the first instinct should be to remove the stitches quickly and make a hurried repair. This increases the likelihoods of making the situation even worse, like end up tearing the fabric. The faster you go; more likely your repair will be a bigger disaster.
The best strategy to fix commercial embroidery errors accurately is to stay cool, composed and self-confident. Freaking out can only invite a clumsier situation! Have a plan to address the problem and follow it methodically.
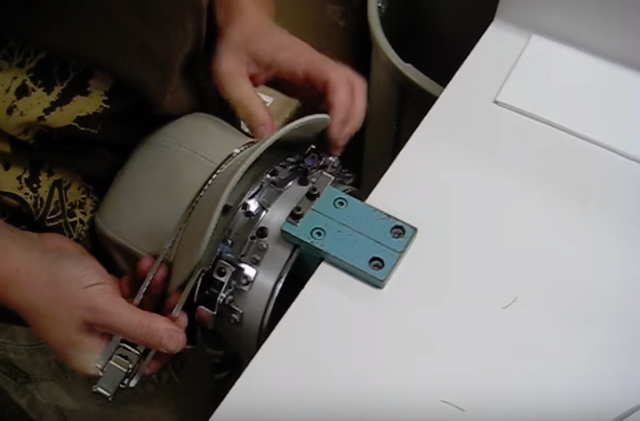 Error # 2: Improper hooping errors:
Solution: Hooping keeps your options open.
While mistakes are discovered in commercial embroidery, the first thing to do is to keep the garment in the embroidery hoop. Finding a problem that needs repair, you should indicate the point of incidence where the problem actually occurred in the design. Mark down the stitch count where the machine stopped.
Sometimes you can record the position straight away on the stabilizer of the garment. The problem often happens just before the ending point, giving you a point of reference in the design. Leaving the machine at the same point, waiting as you fix the problem, is not mainly helpful, especially when using multi-head machines like the SWF K-Series.
Reset the design and start sewing the next piece, except if the repair is extremely easy. Wasting time could cost you several runs, while you spend a half-hour removing stitches. Every embroidery yard should have an extra Durkee hoops in various sizes, so when a hoop is out of service for repairs, you can continue production.
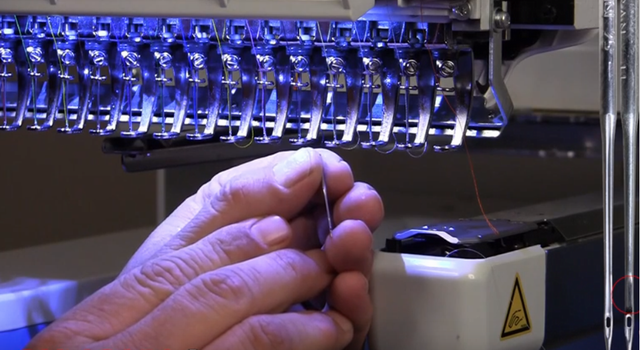
 Error # 3: Not Watching Thread Tension
Solution: Give a proper thread tension period.
Thread tension malfunctions are the most prevalent blunders in the commercial embroidery. Run regular thread tension checks to avoid future errors or you will keep your quality department working strenuously. Quality always rises from accurate tension, which enables your stitches to be nice and tight.
Your commercial embroidery machine should always have the right thread tension, so logos and letters will appear crisp and impacting.
 Error # 4: Overlooking the bobbin
Solution: Cross check the bobbin placement
Check the thread tension every time you change bobbins. Do you wear a seat belt when you drive? It is almost the same thing. Get into a habitual mode of cross checking and it becomes second nature. A bobbin that is either too loose or tight will ruin the quality of your embroidery. The procedure is fast, easy and essential to a stable quality. It should always be repeated every single time to avoid future errors.
 Error #5: Not Changing Needles frequently
Solution: Timely change of needle pieces.
There are no written-in-stone rules for changing needles on commercial embroidery machines. There are several factors, such as how many hours the machine runs, the type of material used and the quality of the needles. A good habit is to check your needles at least weekly, replacing them as needed.
 Error #6: Incorrect Placement of a design
Solution: Accurate placement
When embroidering a hat, the customer may ask for a lowered embroidery design placed next to the bill. This is often observed during a chance of purchasing embroidered products at mall kiosks. The client might not comprehend why it is not a suitable idea to decorate designs too low on a cap.
The answer is simple. Embroidery should be placed lower on a hat next to a bill of a hat, instead of;
before assembling the hat. Usually, the stitching used to be on a flat panel program. Professional embroiderers generally deal with already made chunks of garments. The embroider is restricted to placing a design no less than half an inch away from both the front bill and sides of the hat.
Other placements can compromise the quality of the hat, embroidery or both. In addition, catching a needle on the bill of the cap or the frame will possibly crash the machine.
 Error #7: Overlooking the Digitizing aspect
Solution: Keeping track of minute details
The biggest mistake in commercial embroidery of caps is failing to digitize a logo or designs, taking into account the specific product. If you are embroidering on caps or hats, using a file designed for a flat like a T-shirt, you will face problems. The push and pull compensation of a curved substrate is different than a flat frame. A professional embroidery digitizer can modify the data for the pull compensation for rounded surfaces. Avoiding these mistakes can maintain high quality and reduce the number of products you need to recreate.
A few easy steps are all it takes to produce volumes of supreme quality embroidery caps and keep customers in hand.