
| Creating embroidery patches works best when the design stays simple, and the materials match the job. Clean stitching, strong fabric, proper backing, and neat finishing all improve the final result.
|
Custom embroidery patches give logos, uniforms, hats, and bags a clean and lasting look. They help small businesses stand out and give hobby projects a personal touch. You can use them to promote a brand, mark a team, or create something fun to sell or gift. Best of all, patches are flexible, durable, and easy to apply in different ways.
In this guide, you will learn how to plan, design, and make patches step by step. You will also learn which materials work best, what methods to use, and how to avoid common mistakes. Whether you want to make them yourself or order from a trusted source.
If you need expert support, Absolute Digitizing is offering all types of custom and ready to use embroidered patches to help you create clean, lasting designs with less stress.

- Why Should You Choose Embroidered Patches?
- What Are the Three Main Types of Patching?
- What Materials Do You Need to Make an Embroidery Patch?
- How Can You Create Custom Embroidery Patches? (step-by-step guide)
- What Are The Different Techniques for Making Patches?
- What Is the Best Fabric to Use for Patches?
- What Are the Top Beginner Tips for Getting Better Results?
- Why Order a Custom Patch Instead of Making It Yourself?
- How Much Does a Custom Embroidered Patch Cost?
Why Should You Choose Embroidered Patches?
Embroidered patches are a smart choice for both businesses and hobbyists. They look clean, feel premium, and hold up well with daily wear. Since they are made as separate pieces, you can add them to jackets, hats, bags, uniforms, and more. They give logos and artwork a textured look that stands out on uniforms, jackets, hats, and bags. They also last longer than many print-based decorations and are easy to gift, sell, or hand out at events.
Also, patches are flexible. You can sew them on, heat-apply them, or keep them ready for future use. That makes them great for employee uniforms, sports teams, school groups, fashion drops, and event giveaways. They are also easy to gift, sell, or hand out at trade shows and community events.
Best reasons to choose patches
- Strong for repeat use
- Easy to apply on many items
- Great for branding and promotions
- Simple to replace if needed
When a patch makes more sense than direct embroidery
| Need | Better choice |
|---|---|
| Same design on many products | Patch |
| Easy replacement later | Patch |
| Design stitched right on one item | Direct embroidery |
A patch makes more sense than direct embroidery when you want flexibility, faster placement on different products, and easier updates later.
What Are the Three Main Types of Patching?

The three main patch styles are embroidered, woven, and printed. Each one fits a different kind of design.
Embroidered patches use thread stitched over a fabric base, so they look raised and classic. They work well for bold logos, team badges, and work uniforms. However, very small text and tiny details may not stitch clearly.
Woven patches are made by weaving thread together instead of layering thick stitches on top. Because they are flatter, they can show fine lines and small letters better. They are a smart choice for detailed labels, fashion branding, and neat logo work. Still, they do not have the same thick texture as embroidered styles.
Printed patches use full-color printing, often with added stitching, so they can show photo-like images, soft shading, and many colors. They are great for event merch and fashion pieces.
Best fit:
- Embroidered for a bold stitched look
- Woven for small details and thin lines
- Printed for full-color art and shading
| Type | Best for | Main downside |
|---|---|---|
| Embroidered | Uniforms and badges | Less fine detail |
| Woven | Small text and neat logos | Flatter feel |
| Printed | Gradients and complex art | Less classic texture |
What Materials Do You Need to Make an Embroidery Patch?

The right materials shape the whole patch. They affect how clean it looks, how long it lasts, and how much it costs. Good supplies usually save time and give better results.
Base fabric options
Twill is the top pick for most patches because it is tight, durable, and works well with fine stitching. Felt gives a softer, classic look and is easier for simple designs. Canvas is also strong, but it feels stiffer.
Thread choices
Polyester thread is best for uniforms and patches that face heavy washing. Rayon gives a brighter shine, but it is better for lighter wear. Metallic thread can add sparkle, though it often costs more and needs more care.
Backing choices
Choosing the right patch backing matters because each option works differently. Iron-on is easy to apply. Sew-on gives the most secure hold. Hook-and-loop works well when a patch needs to come off and go back on. Adhesive backing is simple, but it is usually the weakest long-term option.
Border options
A merrow edge gives a thick, classic patch border. A satin stitch border gives a cleaner edge for more shapes. A close-cut edge also works when the design has a custom outline.
Tools and equipment
You will need sharp scissors, needles, a hoop, and an embroidery machine if you want faster, more even results.
Supplies that make the job easier
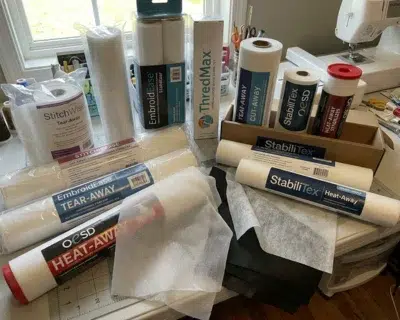
A stabilizer helps keep the fabric flat while stitching. Tear-away works well on firm woven fabrics like twill and canvas, while cut-away helps support high-stitch or stretchy designs. A heat press, silicone paper, and fabric markers can also make finishing easier.
Best material picks
- Twill for strength and detail.
- Polyester thread for wash durability.
- Sew-on backing for long-term hold.
| Material | Best use | Effect on the patch |
|---|---|---|
| Twill | Daily wear patches | Strong and clean-looking |
| Felt | Simple or vintage styles | Softer look, lower durability |
| Polyester thread | Uniforms and washed items | Better fade and wash resistance |
| Iron-on backing | Easy home use | Fast to apply, less permanent |
How Can You Create Custom Embroidery Patches? (step-by-step guide)

Making a great patch is easier when you break the job into clear steps. You need a pleasing design, the right fabric, the right stitch file, and a clean finish. When each part works together, the patch looks sharp and lasts longer.
Step 1: Decide the purpose of the patch
Start with the end use. A patch for uniforms needs strong fabric and secure backing, while a patch for gifts or merch may focus more on style and quick application.
Step 2: Pick the size, shape, and placement
Choose a size that fits the item and leaves enough room for the design to read clearly. Simple shapes like circles, ovals, and rectangles are easier to stitch, cut, and finish neatly.
Step 3: Create a clean design that stitches well
Keep the artwork simple. Bold shapes, clear lines, and larger letters stitch better than tiny details or very thin text.
Step 4: Choose colors that stand out on fabric
Pick thread colors that contrast well with the patch base. Strong contrast helps logos, names, and borders stay easy to read from a distance.
Step 5: Prepare or digitize the artwork for stitching
Convert the design into an embroidery file your machine can read. Good digitizing for patches helps create a file with the right stitch order and clean edge coverage. A strong patch file usually includes a placement line, a cut line, the main design, and a border that runs last to cover raw edges. Satin stitches work well for borders, while fill stitches support larger areas.
Step 6: Choose fabric, backing, and border style
Pick twill if you want a clean, durable base. Then choose sew-on, iron-on, or hook-and-loop backing based on how the patch will be used. For the edge, a satin border works for many shapes, while an overlocked edge gives a more classic badge look.
Step 7: Stabilize the fabric and set up the machine
Hoop the fabric with the right support so it stays flat. Stable woven patch fabrics often work well with tear-away backing, while denser designs may need cut-away support. Thread the machine correctly, use the right needle, and make sure the hoop is tight before you start.
Step 8: Run a test stitch before the final piece
Always stitch one sample first. This helps you catch thread breaks, poor tension, uneven coverage, or sizing issues before you waste time and materials.
Step 9: Stitch the patch and trim it neatly
Run the final patch once the sample looks right. If your file includes a cut line, use it as your guide and trim close without cutting into the border stitches.
Step 10: Add the backing and finish the edges
Apply heat-seal backing with an iron or heat press if you want iron-on use. Then finish the edge with a satin border, zigzag finish, or overedge method to lock the shape and reduce fraying.
Step 11: Check the quality before using or selling it
Look over the patch one last time. Make sure the text is readable, the edge is smooth, the stitches sit cleanly, and the backing feels secure. A quick final check protects your brand and gives the user a better result.
Quick checklist before you stitch
- Keep the design simple and readable
- Match the thread and fabric to the patch use
- Use proper stabilizer support
- Test stitch before full production
- Trim and finish the edge with care
These are the small habits that usually lead to cleaner and more consistent patch results.
This quick video is also helpful in understanding how to make patches on a single-needle embroidery machine.
| Step | Main goal |
|---|---|
| Design | Make the art clear and stitch-friendly |
| Materials | Match fabric, thread, backing, and border to the job |
| Digitizing | Control stitch order, underlay, and stitch density |
| Stitching | Run a test, then sew the final patch carefully |
| Finishing | Trim cleanly, add backing, and inspect quality |
This simple workflow reflects the main process used to make durable, clean-looking embroidered patches from start to finish.
If you want a smoother process and cleaner results, expert help can make a big difference. Absolute Digitizing offers embroidery patches for businesses, teams, and creators who want sharp designs, strong materials, and a professional finish without the stress of doing every step alone.
What Are The Different Techniques for Making Patches?
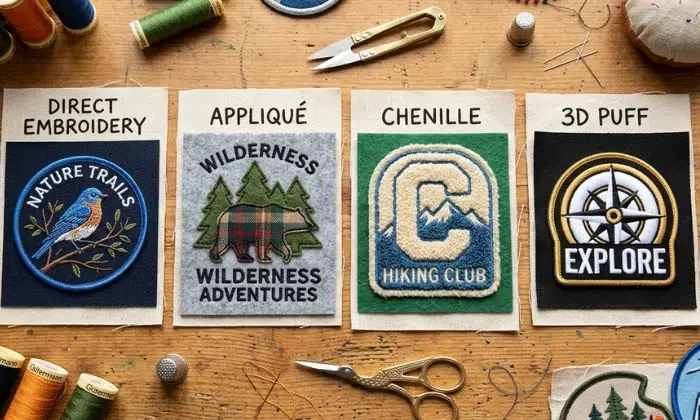
Patch makers use several methods to create different looks.
- Direct embroidery covers a fabric base with stitches, so it gives a classic raised finish.
- Appliqué places fabric pieces on the base and locks them down with stitches, which helps cover large areas with less thread.
- Chenille uses thick yarn on felt to create a soft, fuzzy look.
- 3D puff places foam under the top stitches to add height.
- Woven patches use interlaced threads instead of thick surface stitches, so they show small details and fine text more clearly.
A quick overview
| Technique | Look | Cost level | Best fit |
|---|---|---|---|
| Direct embroidery | Raised and classic | Medium | Workwear, logos |
| Applique | Clean and lighter | Lower to medium | Large shapes |
| Chenille | Soft and plush | Medium to high | Letterman styles |
| 3D puff | Bold and raised | Medium to high | Hats, big letters |
| Woven | Flat and detailed | Medium | Small text, fashion labels |
In general, choose direct embroidery for durability, appliqué for value, chenille for texture, 3D puff for depth, and woven when detail matters most.
What Is the Best Fabric to Use for Patches?
Twill is the best all-around fabric for most patches. It is tightly woven, strong, and smooth, so it holds detail well and resists puckering. That makes it a smart pick for uniforms, workwear, club patches, and everyday items that need to last.
Twill
Twill gives patches a clean, professional look. It supports sharp stitching, neat borders, and regular wear. It also works well when you need small letters or fine shapes. For most business and team uses, this fabric is the safest choice.
Felt
Felt feels softer and gives a more classic, handmade style. It is easy to cut and helpful for simple shapes. However, it is not usually as tough as twill, so it fits craft projects, fashion pieces, and lighter-use patches better.
Canvas
Canvas is sturdy and handles detailed stitching well. It gives a rugged look, but it can feel stiffer than other options. That makes it a good fit for outdoor gear, bags, and bold designs.
Other common options
Sailcloth and polyester blends also work well when you want a firm base. Choose twill for durability, felt for softness, and canvas for a tougher feel.
What Are the Top Beginner Tips for Getting Better Results?
Keep the design simple
Start with clean shapes, clear text, and enough space between small details. Busy artwork can turn into weak stitching, especially on small patches. A simple design usually stitches faster, looks cleaner, and holds up better over time.
Choose colors that read well
Pick thread colors that stand out from the base fabric. Strong contrast makes names, logos, and borders easier to see. This matters even more on uniforms, hats, and small patches, where every detail has less room.
Digitize for the fabric, not just the art
Good digitizing does more than copy a design. The stitch order, underlay, density, pull compensation, and stitch angle all need to match the fabric and patch style. For example, too much density on stretchier material can cause puckering, while a poor sequence can distort the design.
Handle fabric and backing the right way
Use stable patch fabric and the right backing so the design stays flat. Stabilizer helps prevent puckering, shifting, and waving. For items that get washed often or need extra support, more than one layer of backing can improve long-term results.
Set up the machine before full production
Run a test stitch before the final batch. Check thread tension, needle condition, and thread path first. Thread breaks often come from tension problems, worn needles, poor threading, old thread, or rough spots in the thread path. Balanced tension also helps stop looping and messy stitches.
Finish with care for a cleaner patch
Trim closely, keep the border even, and inspect the back and front before you use or sell the patch. A neat finish makes the whole piece look more professional and helps keep results consistent from one patch to the next.
Common mistakes beginners should avoid
Many beginners use designs that are too detailed, skip test stitching, use the wrong stabilizer, or keep sewing with a worn needle. Others ignore tension checks until the thread starts breaking. Fixing those basics early saves time, cuts waste, and leads to better patches with less frustration.
Why Order a Custom Patch Instead of Making It Yourself?
Ordering a patch from a professional maker can save time, stress, and wasted materials. DIY patchwork takes skill, the right tools, and a lot of testing. Small mistakes in digitizing, stitching, trimming, or backing can ruin the final look. That is hard when you need clean detail and a polished finish.
Also, professional production works better for bulk orders, detailed artwork, and repeat jobs. It gives you more consistency from one patch to the next. That matters for uniforms, events, teams, and brand merch.
Best times to order
- You need a large quantity
- Your design has small details
- You want matching results every time
- You do not want to buy extra supplies
In short, ordering makes more sense when quality, speed, and consistency matter most.
How Much Does a Custom Embroidered Patch Cost?
The cost depends on several things. Size matters first. Bigger patches use more thread and more time. Design complexity also affects price because detailed artwork needs more stitches. Quantity matters too. Small orders cost more per patch, while bulk orders lower the price. Backing type, border style, and special finishes can also raise the total.
Most simple patches in small batches may cost a few dollars each. Larger or more detailed patches usually cost more. Bulk orders often bring the best value for businesses and teams.
Typical price examples
| Order size | Example size range | Price per patch |
|---|---|---|
| 12 to 24 | up to 1 inch to 2 inches | $6.69 to $12.91 |
| 50 to 99 | up to 1 inch to 2 inches | $1.90 to $2.97 |
| 100 to 199 | up to 1 inch to 3 inches | $1.30 to $1.90 |
Final Thoughts
Creating embroidery patches may seem hard at first, but the process gets easier when you follow the right steps.
In this guide, we covered patch types, materials, fabric choices, stitching methods, helpful tips, and cost. We also looked at when it makes sense to make a patch yourself and when ordering is the better option. The key is to keep the design clean, choose the right materials, and focus on a neat finish. With practice, anyone can learn the basics.
If you want reliable help with high-quality personalized embroidery patches, contact Absolute Digitizing to get a free quote!
FAQs
Yes, you can make a patch by hand, but it takes more time and effort. Hand stitching can work for simple designs and hobby projects. However, an embroidery machine gives cleaner lines, faster results, and better consistency. If you want a polished look, machine stitching is usually the better choice.
Yes, most iron-on patches can handle normal washing if they are applied the right way. Still, heat, heavy use, and repeated washing can weaken the bond over time. For better hold, many people add a few stitches around the edge. That gives the patch extra strength and helps it last longer.
A well-made patch can last for years. The life of the patch depends on the fabric, thread, backing, and how often you wash or wear it. Patches used on uniforms, jackets, and bags usually last longer when they have strong stitching and a secure backing.
A patch is made on its own piece of fabric and then added to an item later. Direct embroidery is stitched straight onto the garment. A patch gives you more flexibility because you can move it, replace it, or apply it to different items. Direct embroidery works best when you want the design sewn right into one item.
Woven patches are usually the best choice for small text and fine detail. They have a flatter surface, so tiny letters and thin lines show more clearly. Embroidered patches look bolder and more textured, but very small details may not come out as clean.