You have a logo ready, a customer waiting, and a deadline that is not moving. In your head it sounds simple: “I will just convert this file to embroidery and run it.” Then reality hits. Embroidery is not printing. Too much density can pucker the fabric, wrong stitch angles can distort shapes, and tiny text can collapse into a messy line.
Most people who ask, “Can I digitize my own logo for embroidery?” are really asking something deeper: Can I get clean, professional-looking stitches without losing days to trial and error?
Yes, you can learn logo digitizing, especially for simple designs and personal projects where you have room to experiment. For customer orders, uniforms, caps, or any logo you plan to stitch again and again, the stakes are higher and mistakes get expensive. That is why a professionally digitized file often pays for itself by cutting test runs, reducing wasted materials, preventing thread breaks, and avoiding last-minute fixes.
- What “digitizing a logo” really means (it is not just converting a file)
- When DIY Digitizing Makes Sense
- When DIY Becomes Expensive: The Hidden Costs People Miss
- What You Need to Digitize Your Own Logo Properly
- Step-by-Step: How DIY Logo Digitizing Typically Works (Beginner-Friendly Workflow)
- Common DIY Problems (Problem → Cause → Quick Fix)
- DIY vs Professional Digitizing (Time, Cost, Outcome)
- Conclusion: So, can you digitize your own logo?
What “digitizing a logo” really means (it is not just converting a file)
![]()
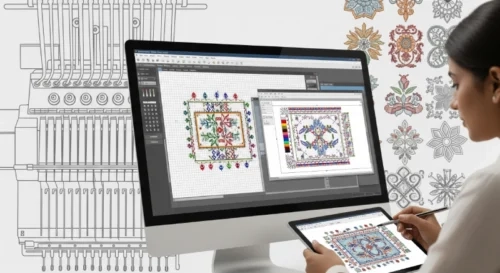
Digitizing a logo for embroidery does not mean taking a JPG or PNG and “saving it as DST/PES.” Those formats are not picture files. They are stitch instructions that tell an embroidery machine exactly what to do, in what order, and how tightly to do it. Think of it like the difference between a photo of a building and the actual engineering blueprint. One shows how it looks, the other tells you how to build it.
When a professional digitizer creates those instructions, they make a long list of decisions that directly control the final stitch-out. They choose the right stitch types for each part of the logo, like satin stitches for borders and letters, fill stitches for larger areas, and running stitches for fine details. They also set stitch direction and angles to make the shapes look clean and avoid ugly gaps. Then comes density and underlay, which decide how stable, smooth, and covered the embroidery will be. Pull compensation is used to fight fabric stretch and “shrinkage” in stitches. Finally, sequencing, trims, and tie-ins/tie-offs keep the design neat, durable, and efficient.
That is why two digitized files can look identical on a computer screen, but one stitches beautifully and the other comes out warped, messy, or full of thread breaks.
When DIY Digitizing Makes Sense
1) You actually have time to learn
DIY digitizing is a good choice when you enjoy learning and can treat it like a skill-building project. If you are not racing against a customer deadline, you can experiment, make mistakes, and improve without pressure. This is important because your first few designs rarely stitch out perfectly on the first run.
2) Your logo is simple and bold
DIY works best for logos with clean shapes, thicker lines, and limited colors. These designs are more forgiving and usually do not require advanced compensation and complex sequencing to look good. If the logo has tiny text, thin outlines, gradients, or lots of small details, DIY becomes harder fast.
3) It is for personal projects or trial runs
Digitizing your own logo makes sense when the stakes are low, like stitching a sample for yourself, testing a new product idea, or learning how a specific fabric behaves. In these cases, even if the first stitch-out is not perfect, it is still valuable because you are learning.
4) You already have proper digitizing software
If you already own a capable digitizing software and know the basics, DIY becomes far more realistic. Free or basic tools can work for practice, but they often limit fine control, which is where quality comes from.
5) What DIY success depends on
Even with the right design, you need time for test stitch-outs, the patience to redo parts of the file, and a stable setup. Consistent materials (same fabric, backing, thread, and needles) and a well-tuned machine make your results much more predictable.
When DIY Becomes Expensive: The Hidden Costs People Miss
1) Software is not “free” (even when it looks free)
Professional digitizing software costs money, and the cheaper or free tools often limit the controls that actually create quality. When you cannot properly manage underlay, density, pull compensation, and clean sequencing, you end up paying in another currency: time and rework.
2) The learning curve is longer than most people expect
Digitizing is not just placing stitches. It is understanding how stitches behave on real fabric. What you think will take an hour can turn into days once you start correcting puckering, gaps, distorted shapes, and unreadable small text.
3) Test stitch-outs quietly eat your budget
Every “quick test” uses thread, backing, fabric, and sometimes needles. Most beginners need multiple stitch-outs to dial in a logo, and those repeats add up fast, especially on caps, stretch polos, and thin fabrics where mistakes show immediately.
4) Machine downtime and missed delivery windows hurt more than waste
While you are testing and adjusting, your machine is not producing paid work. If you are running orders, that lost production time can cost more than the digitizing itself, and delays can damage customer trust.
5) Rework and unhappy clients are the most expensive part
A bad file can mean remakes, refunds, or an awkward “sorry” message to a client who expected professional results. In business terms, the cheapest file is the one that stitches correctly on the first run. That is why, when you are handling real orders, outsourcing digitizing is often cheaper than repeated sampling, repairs, and last-minute firefighting.
What You Need to Digitize Your Own Logo Properly
1) The right tools (not just a file converter)
To digitize a logo properly, you need real digitizing software, not a basic “convert to DST” tool. Programs like Wilcom, Hatch, Pulse, and similar platforms let you control the things that affect stitch quality: underlay, density, pull compensation, and clean sequencing. You also need an embroidery machine you can test stitch on, because digitizing without testing is basically guessing. Finally, you need a basic understanding of stitch mechanics. Knowing how satin, fill, and running stitches behave on different fabrics makes the difference between a file that looks good on screen and one that stitches well in real life.
2) The correct input information (this is what pros ask for too)
Your logo file matters. A clean vector (AI/EPS/SVG) is ideal because it has crisp edges, but a high-resolution PNG can work if it is sharp and not blurry. You also must decide the final size and placement, because a left-chest logo and a cap logo require totally different treatment. Fabric is another key input: cotton, polo knit, fleece, caps, and stretch material all behave differently. Lastly, define the desired look, such as flat embroidery, 3D puff, patch-style borders, or FSL.
3) Reality check
Artwork quality + final size + fabric choice determines how complex your digitizing will be. A “simple” logo can become difficult when it is tiny or stitched on tricky material.
Step-by-Step: How DIY Logo Digitizing Typically Works (Beginner-Friendly Workflow)
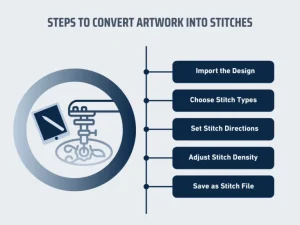
1) Prepare the artwork
Start by cleaning your logo so the digitizing process is not fighting messy input. Remove gradients, shadows, and tiny details that will never translate well into thread. Simplify thin lines, make edges crisp, and convert the design into clean shapes. If you can get a vector file (AI/EPS/SVG), even better.
2) Choose the final size and placement
Decide exactly where the logo will go and how big it will be. A left-chest logo (usually 3–4 inches wide) behaves differently than a cap logo (shorter height, more distortion risk). Sleeves, patches, and jacket backs all need different stitch strategies, so lock this in early.
3) Pick stitch types for each part
Assign stitches based on function. Use satin stitches for borders and bold lettering, fill stitches for larger areas, and running stitches for fine details or very small text. This is where most beginners either overcomplicate or choose the wrong stitch type and lose clarity.
4) Add underlay for structure
Underlay is the foundation that keeps stitches from sinking and shifting. It improves coverage, reduces puckering, and makes satin columns look smoother. Skipping underlay is a common reason designs look weak or unstable.
5) Set density and pull compensation
Density controls how tight the stitching is. Too dense causes stiffness, puckering, and thread breaks; too light causes gaps and poor coverage. Pull compensation helps prevent shapes and borders from shrinking or looking uneven.
6) Plan sequencing
Arrange the stitch order to reduce jump stitches, trims, and unnecessary travel. Good sequencing also prevents the fabric from being overworked in one spot and helps keep the design aligned.
7) Set tie-ins, tie-offs, and trims
These small settings decide durability and cleanliness. Proper tie-ins/tie-offs reduce unraveling, and smart trim placement keeps the back neat and production efficient.
8) Export the correct machine format
Export in the format your machine needs (DST, PES, EXP, etc.). Double-check hoop size, orientation, and color stops before you send it to production.
9) Test stitch on the real fabric with real backing
Always test on the same fabric, stabilizer, needle, and thread you will use in production. A file that stitches fine on cotton can fail on a cap or performance polo.
10) Revise based on the stitch-out
Expect revisions. Beginners often need 2–4 rounds to correct gaps, distortion, density issues, and small-text clarity. Each stitch-out teaches you what to adjust next time.
Common DIY Problems (Problem → Cause → Quick Fix)
-
Puckering → density/underlay/backing mismatch → reduce density, improve underlay, use stronger stabilizer.
-
Gaps between fills → missing pull compensation → add compensation, adjust stitch angle.
-
Small text unreadable → too small for embroidery → increase size, switch to run/satin, simplify font.
-
Jagged borders → wrong stitch type/width → tune satin width, add an edge run.
-
Thread breaks → too dense/too many sharp direction changes → reduce density, smooth paths.
-
Misalignment → poor sequencing + push/pull distortion → resequencing, tweak compensation.
DIY vs Professional Digitizing (Time, Cost, Outcome)
DIY digitizing
It can work if you enjoy learning and you are not under pressure. The trade-off is time: a learning curve, multiple test stitch-outs, and revisions to fix density, pull, and small details. Early results can be inconsistent because each fabric and placement behaves differently. It is doable, but it often takes trial and error before a logo is truly production-ready.
Professional digitizing
Professional digitizing is typically faster and more consistent. The file is built for embroidery from the start, which usually means fewer tests, cleaner sew-outs, and fewer issues like puckering, thread breaks, and misalignment. This matters most when you have customer orders, deadlines, or repeat runs.
The real cost is your time
A practical way to decide is to ask what your time is worth. Hours spent debugging a design could be spent selling, producing, marketing, or managing customers. DIY is great for practice and simple logos, while professional digitizing often makes more sense when speed and flawless results protect revenue.
Conclusion: So, can you digitize your own logo?
![]()
Yes, you can digitize your own logo if you have the right software, enough time to learn, and you can test stitch on the exact fabric and backing you will use. For simple designs and personal projects, DIY can work well and helps you build a useful skill.
For business-critical work, though, outsourcing is often the smarter move. A professionally digitized file usually means fewer failed stitch-outs, faster production, and consistent quality for your clients. It also saves your time, so you can focus on selling, production, and growing the business instead of troubleshooting density, pull, and small text.
If you want a safe start, send your artwork for review or request a quote at Absolute Digitizing for your most important logo first.