
3D Puff Digitizing is widely used during custom hat embroidery digitizing. It makes the design prominent which stands out even from a distance. During embroidery, the magic behind the amazing creation lies in using foam as a base. As embroidery threads cover the foam entirely, it stands tall on the hat as an amazing 3D design. In order to keep the foam hidden from sight, it is matched with the color of the thread. For a neat and clean finish, the embroiderer has to ensure he does not use a different colored foam that could shine from beneath.
Basic Rules for Puff during Embroidery
1. The puffy portion of the design should be the last section when sewn. The first thing you need to do is, lay down a piece of 3D foam. Now make sure all the flat sections around it are sewn.
2. The needle penetrations make a hole in the foam. Upon completion of the sewing, you will notice the excess is pulled away.
3. Besides, being the last sewn segment, the portion of the design that needs to be raised in appearance should be bulky so that the foam can work its magic.
Note: use only satin stitch here. Use width between 3 mm and 11 mm, depending upon the design.
4. Use alphabet text as a point to commence the process for puff letters. But due to traditional methods of alphabet letter embroidery, they will need to be modified first to work with foam and avoid open ends.
Steps for Puff Digitizing
Before everything, the first step involves the work of a digitizer who has to provide the embroidery machine ready files. Utilizing the digitized files, the embroiderer would work in the end to produce a beautiful design on the cap.
For the novice, the process of 3D Puff Digitizing is an uphill task. It requires skills to digitize the design with perfection. Below are some steps which can prove to be handy for anyone who has zero, or basic level skills working with three dimensional designs.
3D Puff Digitizing
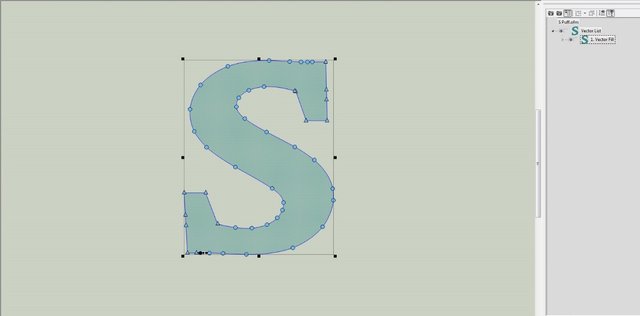
1. In a software of your choice, open the art file provided. Make sure it is already sized in accordance with the final dimensions. In the example below, we will be working on a 2.5 inch design to be embroidered on a high profile hat.
2. In the second step, you will need to set the default values for tie stitch. You can do it by right clicking on the left side of the screen, on the walk input tool. From the pop up options, you get with the right click, select properties.
Now you will see the object properties window open up on the screen, click on the tab with Tie In and Tie Off. Now you will need to turn on the Tie In and Tie Off functions and set 5 as the number of stitches for both. To ensure the thread remains completely secure during embroidery, setting the values at 5 for Tie In and Tie Off will adjust perfectly with the increased thickness of foam.
3. After successfully setting the stitch values, we can now commence the 3D Puff Digitizing of the letter. Start away by digitizing a 20 point walk stitch. It will help secure the foam’s position with the fabric. To get the best results, you must try to maintain the walk stitch within the edge of shape going for the puff. You will need to digitize two layers of the stitch on the inside of the shape.
4. The next step that follows in the digitizing process of our design is, to use the satin stitch element to cover the foam and then ‘close the ends’ securely. During 3D puff embroidery, we will rely on the needle penetrations to cut away the excess foam. The use of satin stitch will ensure that the needle penetrates on each side of the foam.
Since we are using the needle to take care of the excess foam from the sides, we also need to add a satin stitch on the top and bottom too. Failing to do so will not completely release the foam from the fabric and the puff will not be perfect. When using satin elements, there are two ways to close the ends, they are known as capping and pinching.
Ends Closing Methods
Capping: It comprises of digitizing a smaller satin stitch, vertical to the ends beneath the final top satin stitch.
Pinching: It simply requires a change in the direction of the final top satin stitch so that the needle penetrates around the entire design.
On this design, we will use the capping technique but you are free to use pinching too. The main task at hand is to ensure the closing of the ends properly. Now, using one of the column tools, you need to digitize using capping method to close both open ends. We will connect both the capped ends by routing a walk stitch amid the thread path. Using a 3 point density will do nicely.
5. After we have successfully digitized the capped ends, we can finally proceed with digitizing the final top satin stitch. For me, using the column two for puff works best as it enables to keep an even density on the entire design.
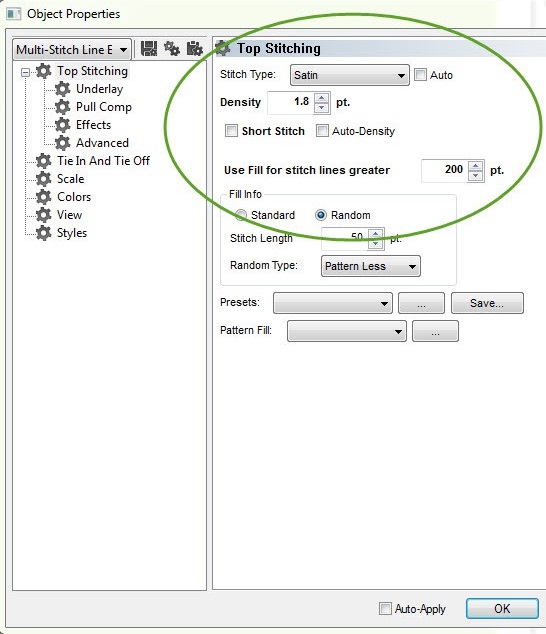
Now finally, choose the top stitch elements properties and enter the density’s value at 1.8 points and “use fill for stitch lines greater” at 200 points. You can also see them highlighted in the picture below. We have turned the short stitches “off”. Center your design and save the file in the required format. Your 3D Puff Digitizing for this design is complete.
3D Puff Digitizing Services
At absolute digitizing, we have the best professional digitizers in the industry. Our experience spans over a decade and we have successfully completed thousands of designs with perfection. If you are looking for 3D Puff Digitizing for your cap or hat, you have reached the right place. We can provide you professional custom embroidery digitising services at $1 / 1000 stitches. You can contact us with your design for a final quote and enjoy flawless digitizing within a few hours only.