

What Is an Embroidery File Format?
Machine-Readable, Not Visual
An embroidery file format is a special type of file that tells an embroidery machine exactly how to stitch a design. Unlike image formats like AI, JPEG, or PNG that show pictures, embroidery files contain stitch commands—they tell the machine where to move the needle, how many stitches to make, what direction to follow, and when to change threads.
Popular Embroidery File Types
There are different file formats for different embroidery machine brands. The most commonly used include:
-
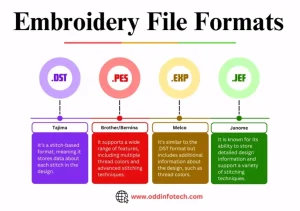
DST – Used by Tajima and commercial machines
-
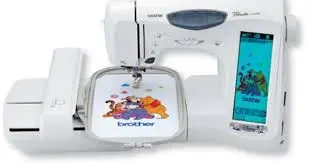
PES – Common for Brother embroidery machines
-
JEF – For Janome machines
-
EXP – For Melco and Bernina
-
HUS – For Husqvarna Viking
-
VP3 – Also used by Husqvarna and Pfaff
Each format speaks the “language” of a specific machine, which is why choosing the right one is crucial for a successful stitch-out.
Why AI Files Can’t Be Used Directly
AI files are graphic formats, meaning they display images but contain no stitching information. Embroidery machines don’t recognize visual shapes—they need data that translates to needle movements and thread behavior. That’s why AI files must be digitized first using embroidery software before they can be converted into formats like DST or PES. Without this step, the machine won’t know how to interpret the design.
The Role of Digitizing in Conversion
What Is Embroidery Digitizing?
Embroidery digitizing is the process of converting a graphic design into a digital file that embroidery machines can read. But it’s not just simple file conversion—it’s the art of planning how every thread will be stitched to recreate the design beautifully on fabric.
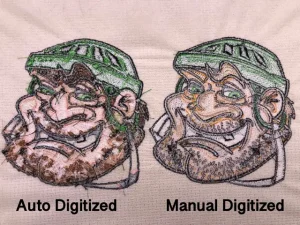
Manual vs. Auto-Digitizing
There are two main approaches: manual digitizing, where an expert places each stitch by hand for maximum precision, and auto-digitizing, where software tries to do it automatically. While auto-digitizing is quick, it often lacks the accuracy and quality of manual work, especially for complex or detailed logos.
More Than Just File Conversion

Digitizing isn’t just uploading a file and hitting “convert.” It involves creatively reimagining the design using thread and stitches. The goal is to make sure the embroidery looks great when stitched—not just on the computer screen.
Key Elements That Matter
Professional digitizers take several factors into account, including:
-
Stitch types (like satin, fill, or run stitches)
-
Stitch direction (how the stitches flow)
-
Stitch density (how close the stitches are)
-
Underlay stitching (foundation stitches for stability)
-
Pull compensation (adjustments to prevent distortion)
These technical decisions ensure that your final embroidered product is sharp, durable, and true to the original design.
Step-by-Step Guide: How to Convert AI to Embroidery Format
Converting an AI (Adobe Illustrator) file into an embroidery format requires more than just file conversion—it’s a creative and technical process that ensures your design stitches out perfectly. Here’s a simple step-by-step guide:
Step 1: Prepare the AI File
Start by cleaning up your artwork in Adobe Illustrator. Remove unnecessary details, simplify shapes, and make sure everything is neat and aligned. Convert all text into outlines so that the fonts don’t get lost or replaced. Finally, ensure your design is layered properly, separating each part logically to make digitizing easier.
Step 2: Export AI to a Digitizing-Friendly Format
Some embroidery software doesn’t support AI files directly. In that case, export your design as SVG, EPS, or PDF. These vector formats retain the quality of your artwork and are more likely to be accepted by digitizing software.
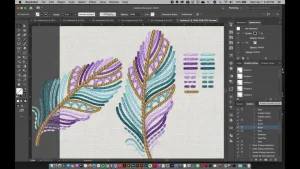
Step 3: Open File in Embroidery Digitizing Software
Import the design into your chosen embroidery software. Popular options include Wilcom, Hatch, Brother PE-Design, Ricoma Chroma, or Ink/Stitch. Tip: If your software can’t open AI files, try using the EPS or SVG version instead.
Step 4: Digitize the Design
Now comes the most important part—digitizing. Assign the right stitch types such as satin for outlines, fill for solid areas, and run stitches for details. Carefully set pathing, stitch angles, underlay, and pull compensation to ensure a clean stitch-out. Pick your thread colors and adjust density based on fabric type.
Step 5: Save/Export to Required Embroidery Format
Once digitizing is complete, save your file in the correct format. Use DST for most commercial embroidery machines or PES for Brother machines. Before finalizing, preview the design in 3D mode if available and, if possible, do a test stitch-out to catch any issues before production.
This process ensures your design transitions smoothly from pixels to perfect stitches!

Software Options for Converting AI to Embroidery Files
Choosing the right software is key when converting AI files into embroidery formats. Each program comes with its own strengths, depending on your budget, machine, and skill level.
Wilcom Embroidery Studio
A top choice for professionals, Wilcom is fully compatible with AI files and supports the U03 format, a native Wilcom embroidery file. It offers advanced tools for precision digitizing, stitch editing, and 3D previews. However, it comes at a higher price point.
Chroma by Ricoma
Chroma is beginner-friendly and supports AI and EPS formats. It’s designed to work smoothly with Ricoma machines but can also export to standard formats like DST. Chroma balances power and simplicity, making it ideal for small businesses.
Ink/Stitch
For those seeking a free option, Ink/Stitch is an open-source extension for Inkscape. It works well with SVG files exported from AI and is great for basic digitizing tasks. While it lacks the polish of paid software, it’s a solid starting point for hobbyists.
Brother PE-Design
Tailored for Brother embroidery machines, this software doesn’t handle AI directly. Instead, convert your AI to a BMP or JPEG first. PE-Design is best for users already invested in the Brother ecosystem.
Why Professional Digitizing Services Are Worth It
Using a professional digitizing service isn’t just about converting an AI file—it’s about ensuring quality, efficiency, and smooth machine operation. A well-digitized design leads to clean embroidery with fewer issues during stitching.
Professionals understand how to optimize your design for embroidery machines. This means you get:
-
Clean stitch-outs with no gaps or overlaps
-
Fewer thread breaks, reducing downtime and frustration
-
Machine-ready files in formats like DST, PES, and more
Instead of struggling with software or poor auto-digitizing results, let the experts handle it.
Absolute Digitizing offers high-quality manual conversion of AI files to DST, PES, and other formats—starting at just $10. Each design is crafted by skilled digitizers, not automated tools. You also get:
-
Free unlimited edits until you’re happy
-
Fast turnaround, often same-day
-
A solid quality guarantee that ensures your design is stitch-ready
Conclusion
Converting an AI file to an embroidery format is far more than a simple file change—it’s a creative transformation. Every detail of your vector artwork must be reimagined in stitches, with careful attention to how thread behaves on fabric.
Whether you use software or partner with a professional, the goal is the same: to bring your designs to life with precision and style. The right tools and expertise make all the difference in achieving smooth, high-quality embroidery.
Ready to turn your artwork into stitches? Try it yourself or contact a trusted digitizing service like Absolute Digitizing. With prices starting at just $10, same-day turnaround, and free unlimited edits, you’re guaranteed results that are machine-ready and embroidery-perfect.