
You will also learn the basics, useful skills, smart tips, AI tools, and free software options.
With the right approach, you can create better vector art with more confidence.
Vector art helps you create clean and sharp designs that look great at any size. That is why so many people use it for logos, printing, branding, and embroidery. If you feel confused by vector art, you are not alone. Many beginners do not know where to start. This blog will make the topic simple and easy to follow.
Especially if you are a beginner, converting a raster to a vector can be a real struggle. As the time goes on, one gradually masters the techniques and mindset required for creating great vector art. Getting started and approaching a particular bitmap with the right mindset constitutes half of the struggle.
In the following article, we will discuss a few tips to sort this struggle out. These tips aim to provide our readers with the correct mindset for creating vector art from any image.
What is Vector Art?
Vector art is digital artwork made with paths, points, curves, and lines instead of tiny pixels. A vector file uses mathematical equations to build each shape. That is why you can resize it without losing quality. It stays sharp on a business card, a banner, or a shirt design.
Raster art works differently. Raster images, like JPEGs or PNGs, are made of pixels. When you enlarge them, they can look blurry or jagged. Vector graphics keep clean edges because the software redraws the shapes based on points and paths.
Quick Comparison:
- Vector art: Scalable, clean, and easy to edit
- Raster art: Pixel-based, detailed, but less flexible when resized
- Best use for vector: Logos, line art, signs, printing, and embroidery prep
- Best use for raster: Photos and highly detailed digital images
Designers use vector art in graphic design, branding, screen printing, packaging, signage, and promotional products. It also plays a big role in embroidery digitizing because clean artwork helps create better stitch paths and more accurate results.
Furthermore, common vector file formats include AI, EPS, SVG, and PDF. These formats make editing and production much easier. If you need clean, print-ready artwork, Absolute Digitizing offers professional vector services that help turn rough images into sharp, usable designs.
What are The Fundamentals of Vector Art?
The fundamentals of vector art start with simple building blocks. These include points, lines, curves, shapes, and paths. A point marks a position on the artboard. When two points connect, they form a line or a curve. When lines and curves close, they create a shape.
Anchor points help control the path. You can move them to change the shape. Bézier curves make smooth bends between anchor points. This gives artists control over rounded edges, waves, and custom outlines. Fills add color inside a shape. Strokes add color or weight to the outline. Layering helps keep each part of the design organized, so you can edit one part without affecting the rest.
Here is A Simple Breakdown:
| Element | What it does | Simple example |
|---|---|---|
| Points | Mark key spots | Corners of a star |
| Paths | Connect points | Outline of a logo |
| Bézier curves | Create smooth bends | Curved leaf edge |
| Fills | Add inside color | Red circle |
| Strokes | Add outline style | Black border |
| Layers | Organize objects | Text on one layer, icon on another |
All these parts work together to make an artwork that stays sharp at any size. That is why vector art works so well for logos, print files, and embroidery-ready designs. For beginners, the best way to learn is to start with simple shapes and build from there.
How Do Beginners Create Great Vector Art? 8 Easy Tips
Creating great vector art gets easier when you follow a clear process. These 8 simple tips will help you clean up your design, save time, and get better results. If you require precise artwork for embroidery digitizing , logos, or printing, these tips will provide a solid foundation.
1. Break Down Image:
When you want to convert image into vector art , first, break it down into base shapes. Breaking down an image into all the constituent base shapes provides a clear plan of action to the vector artist. Otherwise, the image may overwhelm you.
Not knowing where to start and end can cause confusion and distrust for the artist. Such an approach ultimately leads to not producing the very best. Splitting an image in base shapes determines your course of action. It is the pre-planning phase of creating vector art, so don’t overlook this step.
Key Points:
- It gives a clear plan of action
- It reduces confusion for the artist
- It is the pre-planning phase of vector art
2. Basic Geometric Shapes:
Identify the elements in a raster image that can be vectorized using basic geometric shapes. You can model many elements by using geometric shapes or manipulating them. This, in turn, saves a lot of effort and time.
Many a time, a basic geometric shape has to be manipulated and tweaked to convert an element from raster to vector. Many things are not exactly a rectangle, circle, cone, or cylinder. For raster to vector conversion, basic shapes have to be adjusted accordingly. For instance, look at the following image:
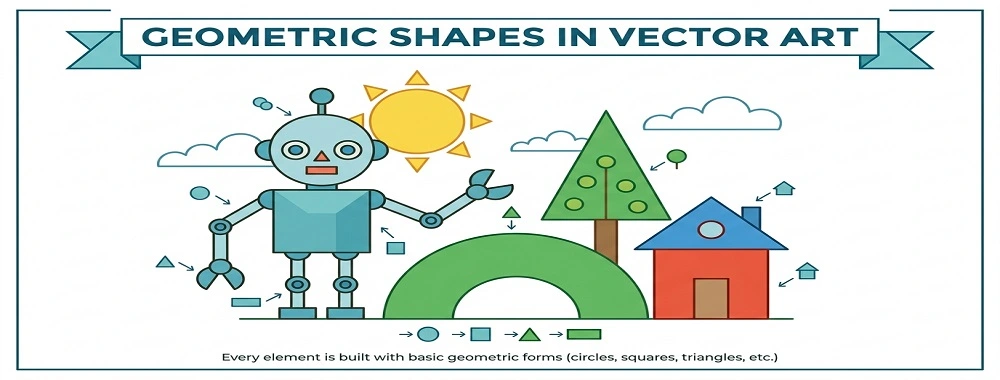
Most of this vector art is created by using just one basic shape. Can you guess which one?
The answer is a rectangle. The above picture primarily uses a rectangle, combined with the wrap effect, to create most of its elements. The wrap effect is used to tweak basic geometric shapes in the desired way.
| Point | Important info |
|---|---|
| Main step | Identify the elements that can be vectorized using basic geometric shapes |
| Main benefit | It saves a lot of effort and time |
| How it works | Many elements can be modeled by using geometric shapes or manipulating them |
| Important note | A basic geometric shape has to be manipulated and tweaked many a time |
| Final step | Basic shapes have to be adjusted accordingly for raster to vector conversion |
3. Using Brushes Smartly:
By smartly using brushes in vector programs, one can significantly save the time and effort needed to create vector art. Brushes are a common tool, but their application is pretty limited. If you notice a frequently seen element or object, think about creating a brush for it.
Consider the following image. It is an example of simple but great vector art.
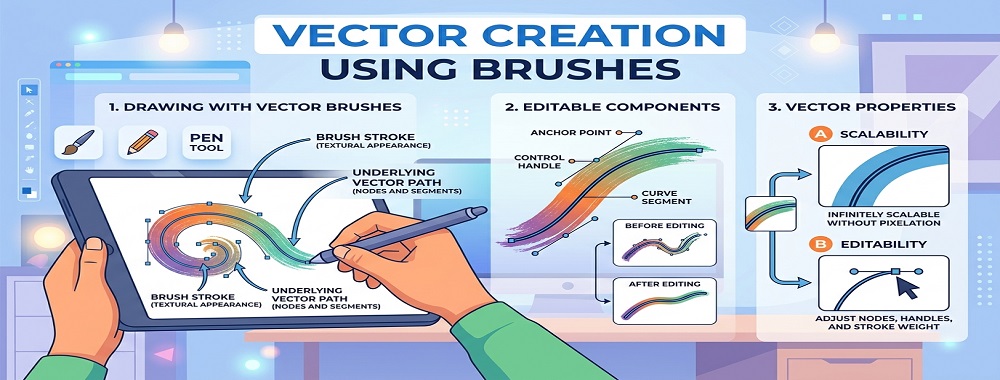
Look at the stars in this vector. Creating these stars individually would take a lot of time. Instead, a scatter brush can be used to create stars of different sizes and spaces in almost no time. This technique is just one simple example of how brushes can be smartly used to save time without settling for a compromised quality.
Key Points:
- Use brushes smartly
- Save time and effort
- Brushes are a common tool
- Their application is pretty limited
- Create a brush for a frequent element
4. Using Layers:
While converting raster to vector, adopt this habit of working in layers. I can understand that almost everybody works in layers while creating vector art, but mostly it is only for the sake of it. Don’t just create layers for the sake of it. Instead, try leveraging layers in a manner that actually helps you create better illustrations.
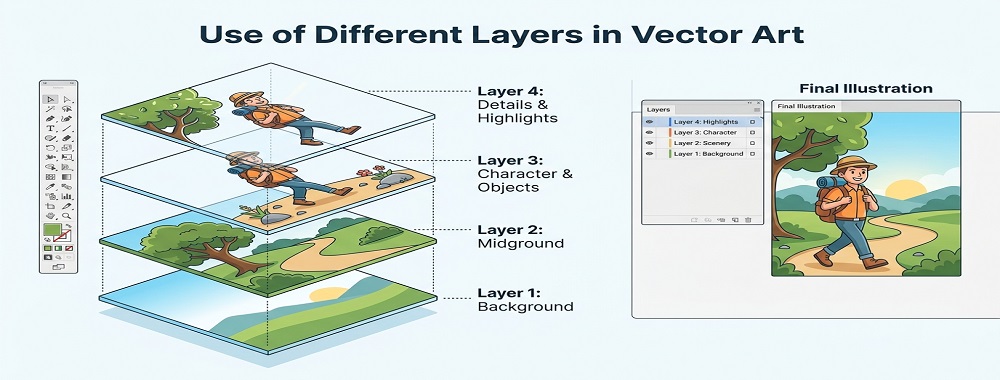
Try creating backgrounds, characters, and fonts in different layers. It gravely enhances your ability and flexibility while working with raster to create vectors. You can duplicate a particular layer and make the changes without losing your primary idea.
Points to be Noted:
- Work in layers when converting raster to vector
- Leverage layers to improve illustrations
- Create separate layers for backgrounds, characters, and fonts
- Duplicate layers to make changes without losing the primary idea
5. Rendering Textures:
Creating textures for different objects is an essential component of vectorizing. Had there been no textures in bitmaps, the life of graphic artists would have been so much easier. But since in the real world there are almost textures involved, skipping textures is inevitable. Fortunately, there are several ways to easily and quickly create textures in illustration and graphics programs.
One of the easiest and direct methods of creating textures is through patterns. You can use patterns to create the most common textures. One of the most common patterns is the wooden pattern that is used to impart a wooden texture.
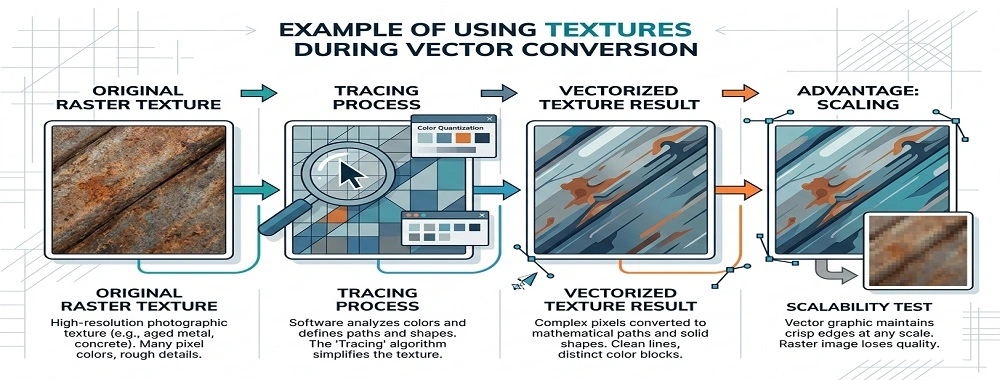
Another way to easily create textures is by using effects in vectorizing programs. You can also edit these effects to be compatible with your desired texture. Similarly, brushes can also be used to create textures. This section again goes on to explain the vitality of brushes and their wide range of possible uses.
Key Points:
- Textures are key when vectorizing objects
- Skipping textures is hard to avoid in real-world designs
- You can create textures quickly using graphics programs
- Patterns are a simple method for creating textures
6. Look For Repetition:
When examining a bitmap that requires vectorization, develop the habit of identifying repeating elements. Most images have repeating elements, which make your job easier if you can find them. During vectorizing, you can conveniently replicate similar elements over and over again.
Look at the image below. It is not difficult to spot repeating elements here. Most vectors won’t have repeated elements with such frequency, but it shows how simplified vectors can be made.
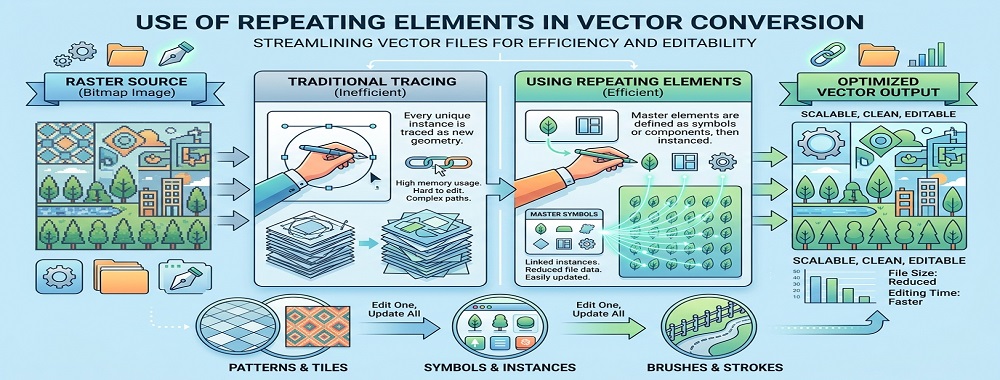
Replicating repeating elements doesn’t mean compromising on a lesser quality while creating vector art. These elements can be individually modified with respect to the color, size, and texture.
Main Points:
- Identify repeating elements in bitmaps for easier vectorization
- Replicate similar elements to simplify the process
- Repetition helps speed up vector creation
- Modifying color, size, and texture doesn’t affect quality
7. Using Shortcuts:
There has been a lot of debate about using shortcuts, as many consider them to be cheating. There are instances where these ‘shortcuts’ are definitely cheating, but making a sweeping statement about all creative shortcuts is nothing but ridiculous. Simply tracing a stock image is cheating, but how often does that happen?
Take a background tracing from a stock image. Since the background is not the primary focus of the vector, it cannot be considered cheating. Similarly, what about creating a blurred background with gradient mesh? Is it cheating, too? Definitely not. It is just making your work easier by optimizing the resources you already have access to.
Important Points:
- Shortcuts can save time, but not all are cheating
- Tracing a stock image can be cheating, but it’s rare
- Tracing backgrounds from stock images is acceptable
- Using gradient mesh to blur backgrounds is not cheating
- Shortcuts help optimize resources for easier work
8. Consistency in Vector Art:
Taking care of consistency throughout a vector is imperative. Although the focus in the above-mentioned tips has been on breaking down the raster to make vectorizing easier, consistency with respect to styles and textures is key. Breaking down things makes the job easier, but in the end, it is one illustration. It is one illustration that should come out outstanding as a whole.
Therefore, remain considerate of how these distinct elements fit in cohesively. You simply cannot deal with distinct elements in isolation.
Important Factors:
- Consistency is crucial throughout the vector art process
- Focus on maintaining styles and textures consistently
- Breaking down elements makes the job easier but unity is key
- Treat the final illustration as a whole, not as separate parts
- Ensure all elements fit together cohesively
What skills are required for vector art?
Creating vector art takes a mix of technical and creative skills. First, you need to know how to use vector software like Adobe Illustrator or CorelDRAW. This helps you work with paths, anchor points, shapes, and layers. You also need a basic understanding of design principles, such as balance, spacing, and alignment. Color theory matters too, because the right colors make a design look clear and professional.
Key Aspects:
- Software skills help you create and edit clean artwork
- Design basics improve layout and visual balance
- Color knowledge makes designs more appealing
- Attention to detail keeps edges, curves, and spacing clean
- Creativity helps turn ideas into original art
- Beginners can build these skills through daily practice
In addition, composition and imagination help you build stronger designs. Attention to detail keeps your artwork neat and production-ready. Over time, regular practice is the best way to grow all of these skills.
Can AI generate vector art?
Yes. AI can generate vector art from text prompts. Tools like Adobe Illustrator’s Text to Vector Graphic, Recraft, and Canva can create editable icons, scenes, and simple illustrations in SVG or other vector-ready formats.
However, AI still needs human review. It can speed up concepts and basic shapes, but manual design gives better control, cleaner details, and stronger brand consistency. That matters most for print and embroidery work, where artwork must stay sharp and production-ready.
What are the best free tools for creating vector art?
Several free tools can help you create clean vector art. Inkscape is the best full-featured desktop option. Vectr is easier for beginners. SVG-Edit works fast in a browser. Lunacy is another strong desktop choice with built-in design assets.
| Tool | Type | Why it helps | What to know |
|---|---|---|---|
| Inkscape | Desktop | Great for logos, paths, text, and print files | Powerful, but it has a learning curve. |
| Vectr | Web/Desktop | Simple interface and real-time collaboration | Best for basic work, not deep editing. |
| SVG-Edit | Web | Fast browser editor and no file upload needed | Best for quick SVG edits. |
| Lunacy | Desktop | Free app with built-in graphics and cross-platform support | Better for design workflows than detailed illustration. |
For beginners:
- Start with Vectr or SVG-Edit for simple practice
- Move to Inkscape when you need more control
- Try Lunacy if you want extra built-in assets
If you need clean, production-ready artwork, Absolute Digitizing can help turn rough images into sharp vector files for print and embroidery.
Final Thoughts
Vector art gives you clean, scalable graphics for print, branding, and embroidery. In this blog, we covered the basics, key skills, helpful tips, AI tools, and free software options. With the right process, you can create sharper artwork with more confidence.
Mastering any skill requires patience and practice. For raster to vector conversion, connect with us for professional assistance. We provide incredibly high-quality work at the most affordable prices. Don’t believe it? You can get a trial vector conversion at 50% off. Place your order or get a vectorizing quote.
Frequently Asked Questions
Vector art is used for logos, branding, printing, signage, and embroidery. It stays sharp at any size.
Vector art scales without losing quality. Raster art can look blurry or pixelated when enlarged.
Common vector file formats include AI, EPS, SVG, and PDF. These formats are easy to edit and resize.
Yes. Beginners can start with simple shapes, basic tools, and free software. Regular practice builds skill over time.
Yes. AI can create simple vector graphics from prompts. However, human editing is still important for clean, accurate, and production-ready results.