
Do you want to stitch out a logo but don’t know how to convert your image to HUS?
Machine embroidery has become very popular, letting you stitch logos, cartoons, floral designs, real pictures, and almost any artwork into embroidery. This gives you lots of creative freedom.
However, converting an image to a HUS embroidery file is not a simple one-click process. It can be complicated and often needs professional help. We’ll explain this process in a simple way. First, let’s understand what image and HUS file formats are before diving into the conversion process.

What is an Image Format?
Image formats like JPEG (Joint Photographic Experts Group) are used for storing digital pictures because they compress the file size while keeping good visual quality. JPEGs support millions of colors and work with almost every software and device like computers, cell phones, cameras, and scanners. They are one of the easiest image formats to use.
JPEG files are great for converting into HUS, an embroidery machine format, because they let digitizers (people who create embroidery designs) see the designs clearly before they start. Digitizers often begin with JPEG images to create detailed designs, match colors correctly, and make the design work well with embroidery machines using special software.

What is a HUS Format?
HUS is a file format used by embroidery machines to create stitch designs. HUS stands for “Husqvarna Viking Embroidery Format” and is used in Husqvarna Viking Embroidery Machines.
The HUS format contains instructions for the embroidery machines to create designs by stitching threads on fabric. These instructions include details like stitch types, colors, and sequences. HUS files can store designs from simple to complex, making them popular with both home users and professionals.
Not all embroidery machines can use the HUS format, so it’s important to check if your machine is compatible. However, all Husqvarna Viking embroidery machines can use HUS files.
Choosing the Conversion Method
Now that we know what both formats are, let’s learn how the conversion actually happens. If you search online, you’ll find several methods to convert images to HUS. Let’s discuss these methods in detail.
1. Learning Embroidery Digitizing Software
Embroidery digitizing software is a tool for converting logos and designs into patterns that embroidery machines can read. You can use this software to import images from your computer and then change them into detailed stitching instructions. These tools let you adjust colors, add text, and make sure everything looks perfect before you start embroidering. You can also see a preview of how the design will look when it is stitched out.
However, using this software is not easy for beginners. Converting images into HUS is not a simple process and requires you to manually input instructions. You have to manage things like stitch order, stitch density, stitch angle, stitch type, and color areas. These tasks are handled by skilled professionals called embroidery digitizers.
It can take about a year for a beginner to learn to use embroidery digitizing software efficiently. It’s also a time-consuming job because you have to pay attention to every little detail to manually convert an image into a HUS file. Buying this software can be expensive, so if you only need to convert images occasionally, it’s not a practical option.
But if you want to make a career in embroidery or frequently need to convert images, this might be a reasonable option for you. Professional embroidery digitizing requires a lot of skill and persistent effort. Not everyone has the time and patience to learn this.
Let’s look at other options.
2. Online Converter Tools
Another option you’ll find is online converter tools. These tools claim you can convert images to HUS with just one click, but this is often misleading.
Many online converters don’t deliver what they promise. They might redirect you to ads or other pages to make money. Some might even try to steal your data or infect your device with malware. So, be very careful with these online tools.
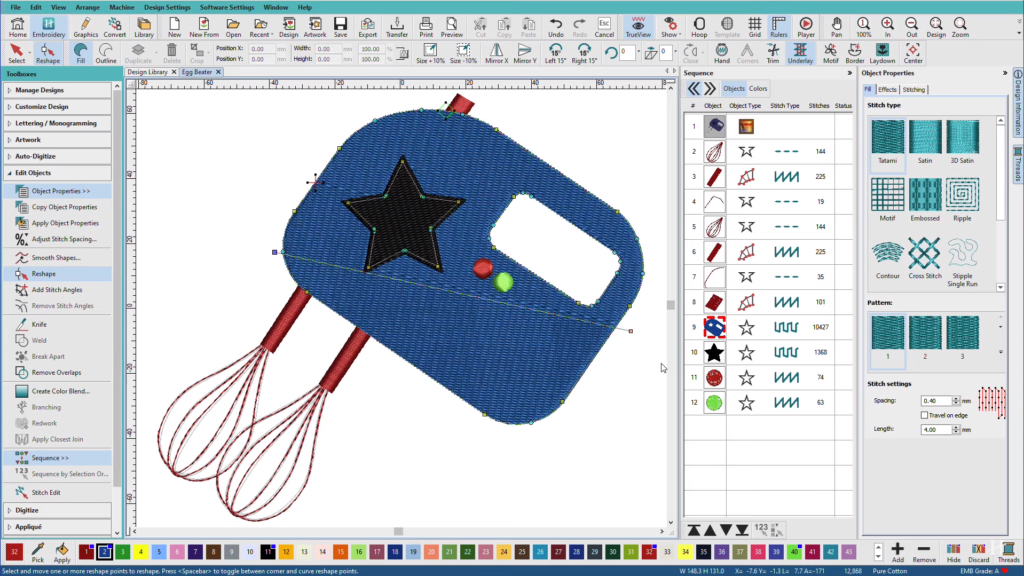
3. Auto-Digitizing
Auto-digitizing is a method that uses embroidery digitizing software to automatically convert images into a digitized format. The software uses algorithms to decide colors, layers, stitch count, and more without any manual effort.
Auto-digitizing might seem convenient, but it usually delivers poor-quality results. People often face issues like stitching problems and a lack of professional appearance in the final designs. This technology is still developing and needs more time to improve.
Auto-digitizing works only for very basic and usually single-color designs. Plus, you’ll still need to buy expensive embroidery digitizing software to use it.
![]()
4. Using an Embroidery Digitizing Service
An embroidery digitizing service offers professional help to convert images into HUS files. These services employ skilled digitizers who use embroidery digitizing software to create stitch patterns, adjust colors, and optimize designs for embroidery machines.
Clients can submit their designs in many formats, not just JPEG, and receive high-quality digitized files compatible with specific embroidery machines. The turnaround times are fast, usually between 2 to 12 hours, and prices start at around $10 per logo conversion. These services are great for both businesses and individuals who want beautifully embroidered products without having to do the digitizing themselves. Outsourcing to a professional digitizing service is often the most cost-effective and time-saving method.
Absolute Digitizing is a trusted service that can convert your images into HUS files for embroidery.

Converting Images to HUS – Step-by-Step Guide
If you know a bit about embroidery digitizing, you can change image files to HUS using these easy steps. However, it is often better to seek professional help for the best results.
Here’s what you will need:
- Software like Wilcom, Tajima Pulse, Hatch, or Ink/Stitch. These are all paid software except Ink/Stitch, which is free and open-source.
We will focus on using Wilcom Embroidery Software in this guide.
- Open your image in Wilcom and remember to save a copy.
- Crop the image to the right size to avoid mistakes later.
- Set the size in inches, centimeters, or millimeters, whichever you prefer.
- Adjust the density of the design according to the fabric.
- Different parts of the image may need different stitch types like run stitch, satin stitch, or fill stitch. Apply the stitches accordingly.
- Measure and group similar objects together, adjusting colors as needed.
- Define stitch areas carefully, ensuring the right tool for each part.
- Double-check everything and save your design as a HUS file for embroidery.
Adjustments and Testing
Once you have converted your image to HUS, use the software’s digital preview to see the final design. Double-check everything, like colors, density, stitch type, and overall look, to ensure accuracy and avoid distortions. Stitch a test sample before starting full production to make sure everything works as expected.
FAQs
What is the difference between manual digitization and auto-digitizing?
Manual digitization involves tracing images manually using embroidery software, requiring advanced skills and time. Auto-digitizing automates this process using the same software, saving time but often resulting in an unsatisfactory outcome.
Should I use free online converters to convert my image to HUS?
No, using free online converters to convert your image to HUS is not recommended. These services are often clickbait and rely on ads or may even attempt to steal your sensitive information or add malware to your computer. Moreover, they usually cannot convert an image to HUS properly.

Conclusion
We have discussed various methods for converting an image to a HUS file. However, hiring an embroidery digitizing company is the most practical approach for converting your image files into HUS format files suitable for Husqvarna Viking embroidery machines. With no setup costs and conversion charges starting at as low as $10, you can get a quick turnaround time of 2 to 12 hours. The result is a professionally digitized file ensuring high-quality sew-out results.