
Freestanding Lace (FSL) embroidery creates one of the most beautiful effects in machine embroidery. It looks delicate and lacy, and it stands on its own without any fabric underneath. This feature makes it completely different from normal embroidery. In FSL, the thread carries the entire structure, so you must plan every stitch carefully. If you set the density, underlay, stabilizer, or connectors incorrectly, the lace falls apart as soon as you wash away the water-soluble base.
This is why you need to follow special rules when digitizing FSL. You can learn these techniques and digitize your own designs, or you can hire a professional digitizer to prepare a perfect, ready-to-stitch file for you.
- What Is Freestanding Lace Embroidery
- Difference Between Normal Digitizing and FSL Digitizing
- Tools and Software Needed
- Preparing Your Artwork for FSL Digitizing
- Step-by-Step: How to Digitize an FSL File
- Common Mistakes to Avoid in FSL Digitizing
- Best Threads, Needles, and Stabilizer for FSL
- Why Many People Prefer Outsourcing FSL Digitizing
- How Absolute Digitizing Can Help You
What Is Freestanding Lace Embroidery
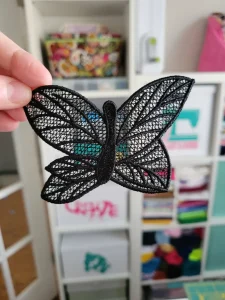
Freestanding Lace (FSL) embroidery is a special type of machine embroidery that you stitch only on water-soluble stabilizer instead of fabric. After you finish stitching, you rinse the stabilizer in water and it melts away. What remains is a beautiful lace shape that can stand on its own without any fabric behind it, which is why it is called freestanding.
People use FSL to make many creative items such as ornaments, earrings, bookmarks, Christmas decorations, small gifts, and even lace-style patches. In FSL, the structure of the design matters much more than the colors you choose. The stitches must lock together tightly so the lace stays strong after washing, which makes the design’s construction more important than the color combination.
Difference Between Normal Digitizing and FSL Digitizing

1. Support System
In normal embroidery, the fabric provides the strength and keeps the stitches secure. FSL has no fabric at all, so the thread itself must create the entire structure. This makes FSL far more sensitive to density, underlay, and stitch direction.
2. Impact of Mistakes
In regular embroidery, small errors like loose gaps or light density usually do not cause major problems. In FSL, those same mistakes can destroy the whole piece. When you wash away the water-soluble stabilizer, any weak area can tear immediately.
3. Stitch Types Used
FSL relies more on fill stitches to build a solid base and uses fewer satin stitches. Satin is often too loose or too narrow to support itself. FSL also avoids open gaps that would leave the lace weak or unstable.
4. Self-Supporting Design
Every part of an FSL design must hold itself together. The pattern must be strong, well-connected, and carefully digitized so the lace keeps its shape after the stabilizer dissolves. Without a self-supporting structure, the final piece will not survive.

Step-by-Step: How to Digitize an FSL File

Step 1: Create a Strong Foundation Layer
Start with a dense fill layer to build the base of your lace. This minimum density keeps the design strong after the stabilizer dissolves. Add a random or lattice underlay to lock the stitches together and prevent the lace from tearing.
Step 2: Build the Lace Pattern on Top
Add motifs, small holes, or decorative lace details. Use running stitches with careful spacing to create the lace look. Avoid large empty areas because they can make the final piece weak and fragile.
Step 3: Add Satin Borders When Needed
Use satin stitches if you want clean, smooth edges. Keep the satin narrow because thick satin can curl or become too heavy for lace. Only add satin where it supports the design without weighing it down.
Step 4: Add Connection Points
Connectors hold the lace together during washing, so include small linking bridges throughout the design. Place them in areas where they blend naturally into the pattern. Keep each connector thick enough to stay strong but thin enough to stay hidden.
Step 5: Set the Correct Density
Aim for a density between 0.35 and 0.45 mm depending on your software. FSL needs higher density than normal embroidery because it has no fabric. If the density is too high, the design forms knots. If it is too low, the lace breaks apart.
Step 6: Choose the Right Underlay
Use underlays like lattice or zigzag to support the lace structure. These underlays create stability without adding bulk. Avoid loose or open underlays because they leave weak spots in the final piece.
Step 7: Adjust Pull Compensation
FSL pulls more than regular embroidery because it has no fabric to stabilize it. Add a safe pull compensation value so your shapes stay accurate. Always run a test stitch to see how your machine handles tension and pull.
Step 8: Set Trims, Tie-Ins, and Tie-Offs
Add clean tie-ins and tie-offs to secure each section. Avoid unnecessary jumps because they can leave weak points after washing. Clean finishing makes the lace last longer and look more professional.
Testing Your FSL Digitized Design
Always test your design before final use. Hoop at least two layers of water-soluble stabilizer for strong support. Stitch the design slowly to prevent thread breaks. After stitching, rinse the stabilizer gently and avoid melting it too fast. Let the lace dry completely before checking strength and structure.
Common Mistakes to Avoid in FSL Digitizing

Using Too Much Satin Stitch
Satin stitches look clean, but using them everywhere makes the lace collapse. Satin is not strong enough to hold the structure once the stabilizer dissolves.
Leaving Large Gaps
Big empty spaces weaken the lace. When the stabilizer melts, these open areas can tear or cause the entire piece to lose its shape.
Skipping the Foundation Fill
Without a solid base layer, the lace has nothing to support it. Always include a strong foundation fill before adding decorative details.
Weak or Missing Connectors
Small connectors keep the lace from falling apart during washing. If the connectors are too thin or missing, the design breaks easily.
Using Cotton Thread
Cotton thread is soft and weak. Use polyester instead because it is stronger, shinier, and can handle dense stitching without breaking.
Incorrect Density
Density that is too low makes the lace fragile. Density that is too high creates knots and tension issues. FSL needs balanced, slightly heavier density for proper strength.
Best Threads, Needles, and Stabilizer for FSL

Polyester Thread (40 Weight)
Polyester is the best choice because it is strong, shiny, and durable. It handles dense stitching much better than cotton, which makes it ideal for lace.
Needle Size 75/11 or 80/12
These needle sizes work well for FSL. They handle tight fill stitches without shredding the thread.
Water-Soluble Stabilizer (Fabric Type)
Use a fabric-like water-soluble stabilizer for FSL. It offers strong support during stitching and helps the lace keep its shape.
Avoid thin film stabilizers for complex lace because they do not provide enough strength, especially for heavy or detailed designs.
Why Many People Prefer Outsourcing FSL Digitizing

FSL Requires More Skill and Time
FSL digitizing takes much more effort than regular embroidery because the thread must support the entire structure. Every stitch matters, and even small errors can break the lace after washing.
Correct Density and Connectors Need Experience
A beginner may struggle with choosing the right density or placing strong connectors. These technical decisions decide whether the lace stays intact or falls apart.
Outsourcing Saves Money and Materials
Test failures waste stabilizer, thread, and hours of work. Outsourcing helps you avoid repeated trial and error, especially with intricate lace pieces.
Professionals Follow Strict FSL Rules
Experienced digitizers use advanced software like Wilcom E4 and follow proven FSL standards. This ensures strong, clean, and flawless lace designs.
How Absolute Digitizing Can Help You

Specialists in Lace and Structural Designs
Our team includes expert digitizers who are trained specifically to create strong and beautiful FSL designs.
Manual Digitizing on Wilcom E4
We use Wilcom Embroidery Studio E4 and digitize every design by hand. This gives you perfect density, properly placed connectors, and smooth, clean edges.
Unlimited Edits and Fast Turnaround
We offer free unlimited edits until you are completely satisfied. You can also get same-day delivery or rush work in just 2 hours.
Conclusion
Freestanding Lace embroidery looks stunning, but it needs careful and skilled digitizing to stay strong after the stabilizer dissolves. You can follow the steps in this guide and learn the process yourself, or you can let professional digitizers handle the technical work for you. A well-digitized lace design always gives you a clean, durable, and perfect final result.
To get a perfect FSL file without any hassle, request an instant free quote at Absolute Digitizing.