Best practices for 3D puff embroidery start with the right setup. Flat embroidery stays smooth, while foam creates a raised look.
|
Getting clean 3D puff embroidery results takes more than just running a design on a machine. You need the right settings, the right materials, and the right method from the start. Small details, like foam thickness, stitch density, needle choice, and machine speed, can change the final look in a big way.
So, if you want sharp edges, bold height, and a clean finish, it helps to follow proven best practices. The right tips can help you avoid common mistakes, save time, and get better results on caps, hats, and other items.
Also, 3D puff embroidery has become more popular because people love designs that stand out. That is why learning the best way to handle each step matters. If you need clean, production-ready files for your puff designs, Absolute Digitizing is here to help.

What is the Difference Between Flat Embroidery and 3D Puff Embroidery?
Flat embroidery and 3D puff embroidery are two popular techniques, but they create very different looks.
Materials and Techniques:
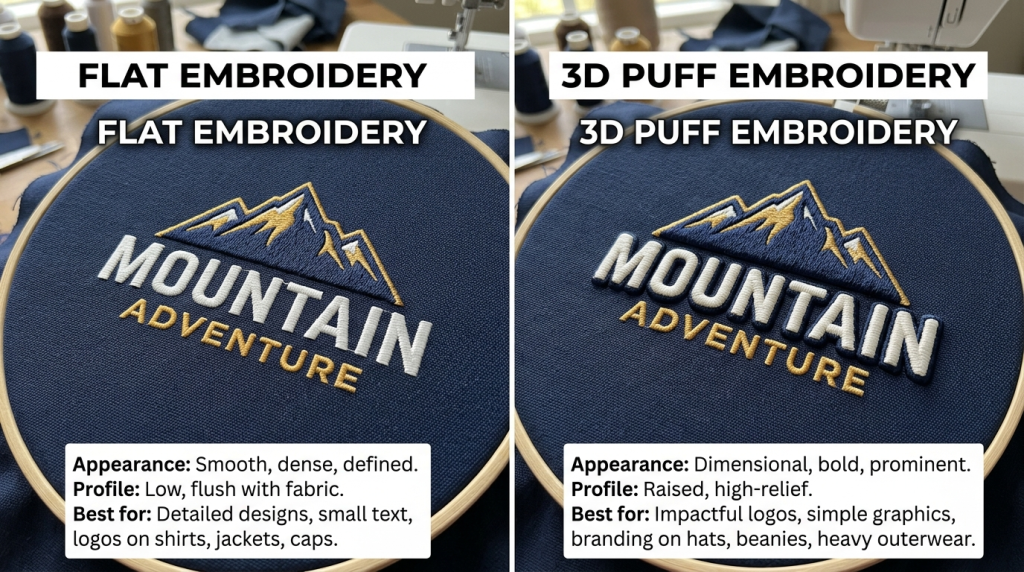
Flat embroidery uses threads to create a design on fabric with no added height. The stitches sit flat against the fabric, making it ideal for simple, detailed designs.
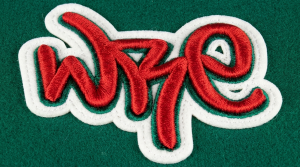
On the other hand, 3D puff embroidery uses foam or puff vinyl under the threads to create a raised, three-dimensional effect. The foam is sewn into the fabric, giving designs more depth and texture.
Equipment:
Both methods require an embroidery machine, but 3D puff embroidery needs special attachments and adjustments to handle the foam. This makes 3D puff embroidery slightly more complex than flat embroidery.
Finished Appearance:
- Flat embroidery has a smooth, even look.
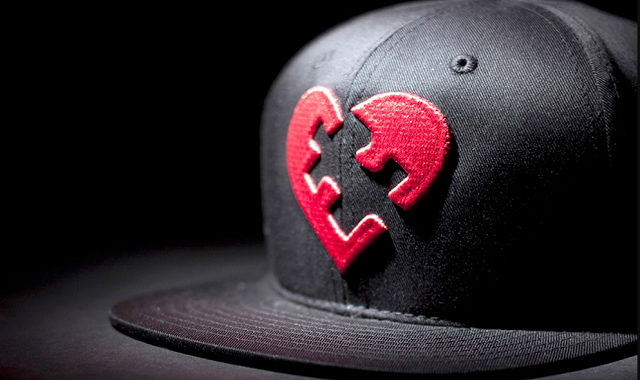
- 3D puff embroidery stands out with a raised effect, making the design pop.
Best Designs for Each Method:
- Flat embroidery is perfect for intricate logos or text.
- 3D puff embroidery works well for bold, simple designs like team logos, sportswear, and caps.
| Feature | Flat Embroidery | 3D Puff Embroidery |
|---|---|---|
| Design Effect | Flat and smooth | Raised and dimensional |
| Materials | Thread only | Thread with foam or puff vinyl |
| Complexity | Simple and detailed | Requires extra steps and equipment |
| Best Use | Text, logos, fine details | Bold designs, logos, sportswear |
Contact Absolute Digitizing today to get expert digitizing services for your 3D puff or flat embroidery designs!
What Are the Best Practices for Successful 3D Puff Embroidery?
To achieve the best results with a 3D effect, it’s important to follow a set of key practices. From adjusting machine speed to choosing the right fabric and foam, each step plays a crucial role in creating sharp, defined designs.
Let’s explore the best practices to help you master 3D puff embroidery and ensure your designs come out flawless every time.
1. Decide Optimum Machine Speed:
Choosing the right machine speed is crucial for getting high-quality embroidered designs. Sometimes, you may need to slow down the machine compared to your regular orders. The best speed will vary depending on the machine. To find the right setting, do some test runs at different speeds and see which one produces the best results.
The main points are:
- Machine speed affects embroidery quality
- Slowing down the speed may be needed for some designs
- Optimum speed differs for each machine
- Test different speeds to find the best setting
- Ensure the chosen speed delivers the best results
2. Choice of Fabric:
When working with 3D puff embroidery, it’s best to avoid delicate and slippery fabrics. These fabrics are more likely to move in the hoop while working with foam.
Additionally, 3D puff embroidery uses a higher stitch density than normal designs, making thicker, stable fabrics like those used in caps the better choice. Lofty fabrics, such as towels, also don’t work well since their loft reduces the 3D effect, making the design less captivating.
Key points:
- Avoid delicate and slippery fabrics for 3D puff embroidery
- Slippery fabrics move in the hoop with foam
- 3D puff embroidery uses a higher stitch density
- Choose thicker, stable fabrics like those in caps
3. Choosing Sharp Needles:
When working with 3D designs, choose sharp needles, which can easily make tiny holes through the foam. Easy and more perforations mean that the foam can be easily removed afterward.
4. Choice of Foam:
The choice of foam is mainly determined by the height of the design you want to create. The thicker the foam, the more 3D or prominent the design will be.
However, thicker foams can be difficult to work with and may affect the smooth functioning of the machine. For commercial embroidery, avoid using very thick foams, as they can cause problems during the embroidery process.
Highlights:
- Choose foam thickness based on design height
- Thicker foam creates a more prominent 3D effect
- Thick foams can be challenging to work with
- Avoid using very thick foams, especially for commercial work
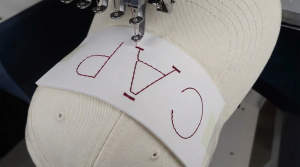
5. Embroider Flat Design First:
Firstly, start with normal designs on your fabric. This step will be done as you would normally embroider fabric. If it is a cap, which will often be the case, take care of all the important factors that play a role during embroidering a cap.
6. Create a stop:
Create a stop once you are done with the flat design. Learn how to program stops on your machine, as this skill is essential for your career, especially when working with 3D puff embroidery.
Also, for color changes, you need to make sure that the machine provides proper stops.
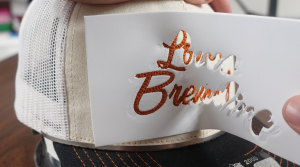
7. Laying the Foam:
Stick the foam on top of the fabric with either tape or sticking spray. The purpose of the adhesive is to keep the fabric in position and resist movement underneath.
8. Sew The Outline:
Before using satin stitches, create an outline for the design. This outline helps stabilize the area that will be embroidered. The foam can make the setup unstable, as it sticks to the fabric. Sewing an outline counters this instability by creating a ‘cut’ in the foam, making the embroidery process smoother.
Importance of the Outline
- Sew an outline before applying satin stitches
- The outline stabilizes the area to be embroidered
Handling Foam Instability
- Foam can create instability during embroidery
- The outline counters the foam’s instability by creating a ‘cut’
9. Remove Excess Foam:
Once the design is done, remove the excess foam. If there are little pieces of puff that are too rigid to be removed with bare hands, apply a heat source.
So, use a heat gun to remove the foam. Some puff bits might remain stuck. Weed them out through tweezers.
10. Include Test Runs:
When working with a new design, always sew some test runs first. Compare different variants to find what works best with your fabric and equipment.
Furthermore, for beginners, test runs are an excellent way to practice and learn. This allows you to see what works well and what doesn’t, helping you set up the best conditions for the actual sew-out and future projects.
Test Run Benefits:
- Sew test runs before finalizing the design
- Compare variants to find the best fit for fabric and equipment
- Inexperienced embroiderers can use test runs for practice
- Helps set up the right conditions for the final embroidery
11. Stitch Density:
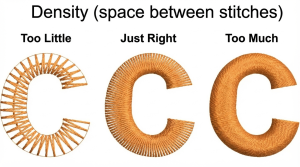
In 3D puff embroidery, the stitch density is higher than in regular flat designs. The high density refers to the satin stitches that sit on top of the design. The stitches underneath should maintain a normal density.
Moreover, most computerized embroidery machines can handle different stitch densities, allowing for tight and close underlay stitches. The increased stitch density of the top satin stitches, compared to the underlay, enhances the “3D effect” of the design.
Stitch Density Key Points:
- 3D effect uses a higher stitch density than flat designs
- Satin stitches on top have a higher density than underlay stitches
- Underlay stitches should have a normal density
- Computerized machines allow for multiple stitch densities
- Higher topstitch density creates a better “3D effect”
12. 3D Embroidery Digitizing:
Digitizing for 3D embroidery designs is challenging but essential to the process. When working on 3D embroidery designs, use longer stitches. Strong underlay borders and satin stitches are ideal for puffs. A good digitizer understands that not all designs work well with foam. Excessive underlay can actually hinder the 3D effect.
So, it’s crucial to work with an experienced digitizer who understands these differences. Look for someone who has a wide range of experience working with various 3D designs to ensure the best results.
At Absolute Digitizing, our skilled team has years of experience with 3D embroidery digitizing. Let us help bring your designs to life with the right techniques and precision!
Key Tips for 3D Embroidery Digitizing:
- Use longer stitches for 3D designs
- Strong underlay borders and satin stitches work best with puffs
- Not all designs are suitable for foam
- Avoid excessive underlay to preserve the 3D effect
- Work with an experienced digitizer service for the best results
Which 5 Machines Are Best for 3D Puff Embroidery?
When selecting an embroidery machine for 3D puff embroidery, it’s important to choose one that can handle foam effectively while offering precise stitch density control and ample hoop compatibility.
Below is a list of top embroidery machines that are great for creating stunning 3D puff designs, both for home and commercial use.
Top Machines for 3D Puff Embroidery:
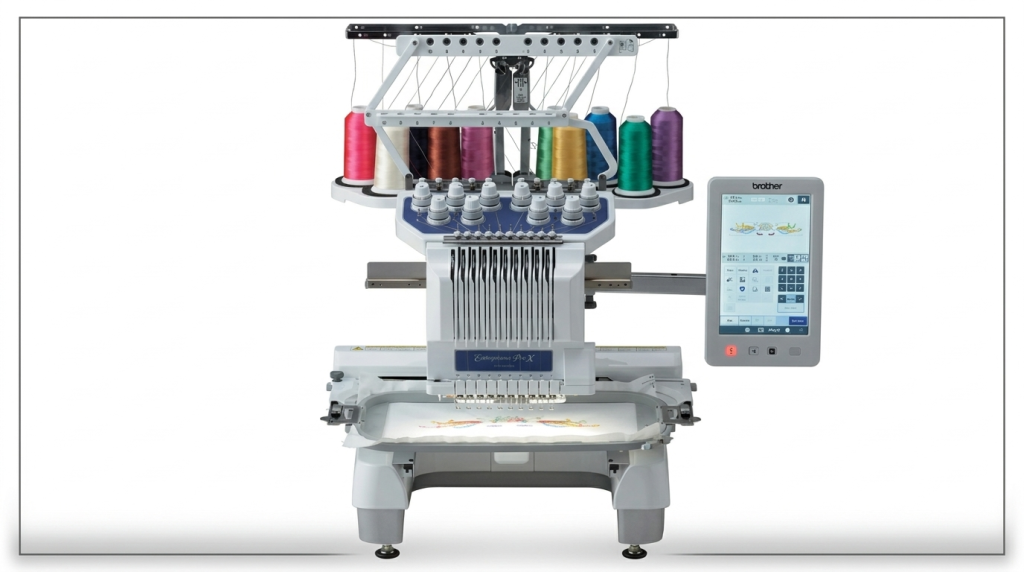
1. Brother PR1055X
Key Features:
- 10 needles for multi-color designs
- Enhanced needle penetration power
- Large embroidery area (10.1-inch touchscreen)
- Adjustable hoop sizes and stitch density control
Why It’s Great:
This versatile machine is perfect for both small businesses and home use. It allows precise foam handling and produces clean, sharp 3D puff designs.
2. Bernina 880 Plus
Key Features:
- 9 needles for complex designs
- Strong motor and needle penetration for foam
- Adjustable stitch density and hoop compatibility
Why It’s Great:
Known for its precision and smooth stitching, this machine handles 3D puff with ease, ensuring that foam is perfectly shaped.
3. Melco Amaya XT
Key Features:
- 16 needles for high-volume production
- Advanced stitch density control for dense designs
- Powerful motor to handle thick foam layers
- Adjustable hoops for different fabric sizes
Why It’s Great:
A top choice for commercial use, this machine is ideal for large-scale projects and heavy-duty 3D puff embroidery.
4. Ricoma EM-1010
Key Features:
- 10 needles
- High needle penetration force
- Easy-to-use software for stitch adjustments
- Large embroidery area and adjustable hoop sizes
Why It’s Great:
This machine is perfect for both beginners and professionals, offering excellent foam handling and precise 3D puff results.
5. Tajima TMFX-IIC
Key Features:
- 6 to 12 needles for efficient designs
- Superior stitch density control
- Strong motor and foam handling capability
Why It’s Great:
A top choice for commercial operations, this machine is known for its high-speed performance and excellent foam stability.
What Are the Common Pitfalls of 3D Puff Embroidery and How Can You Avoid Them?

3D puff embroidery can create stunning designs, but several common pitfalls can affect the final result. Here are the main issues and tips on how to avoid them:
Common Pitfalls and How to Avoid Them:
- Foam Shifting: Foam can shift during stitching, leading to uneven designs.
- Tip: Use adhesive spray or tape to secure the foam firmly to the fabric.
- Thread Breaks: The foam can put stress on the thread, causing frequent breaks.
- Tip: Adjust the tension, use stronger threads, and check the needle size.
- Poor Coverage: Sometimes, the foam doesn’t get enough stitch coverage, leading to visible gaps.
- Tip: Increase stitch density on the satin stitches to ensure full coverage.
- Unwanted Flattening: The 3D effect can flatten if the stitches are too tight.
- Tip: Control stitch density and ensure the foam isn’t over-compressed.
Final Thoughts
You can create wonderful 3D puff embroidery that makes your caps, hats, and sportswear stand out with bold, raised designs. Follow the best practices you learned, choose stable fabrics, sharp needles, the right foam, slow your machine speed, run test samples, sew an outline, and use higher top stitch density. These simple steps deliver clean, professional results every time and help you avoid common mistakes like shifting foam or flat spots.
Trust Absolute Digitizing’s expert team for fast, precise digitizing services. With a team of experienced and skilled embroidery digitizers, we are capable of taking care of all your digitizing needs. Connect with our embroidery digitizing team, and you will never find another cheap digitizing service.
FAQs
3D puff embroidery uses foam to create a raised, dimensional effect on designs, making them stand out with more texture and depth compared to regular flat embroidery.
No, delicate or slippery fabrics are not ideal. Thicker, stable fabrics like those used in caps work best for 3D puff embroidery.
Ensure the right thread tension, use strong threads, and select the correct needle size to reduce thread breaks while working with foam.
Higher stitch density on satin stitches helps create a bold 3D effect, while normal stitch density is maintained for underlay stitches to avoid unnecessary thickness.
Use adhesive spray or tape to secure the foam to the fabric, preventing it from shifting during the stitching process.