What You Need Before You Start

1) Artwork Basics
Start with clean, simple artwork. Use smooth curves and strong edges. Avoid tiny details, because small bumps and sharp angles often stitch poorly. If the outline is messy, the appliqué border will look messy too.
2) Choose the Right Appliqué Fabric
Your fabric choice changes how the appliqué behaves on the machine.
-
Felt: Stable, easy to cut, beginner-friendly.
-
Twill: Sharp, professional look, great for letters and logos.
-
Cotton: Can fray more, so it needs a stronger edge finish.
-
Glitter/PU: Premium look, but thicker and sometimes harder to trim.
This choice affects border width, stitch density, and underlay.
3) Stabilizer and Hooping Basics
Hoop the garment firmly so it does not shift during trimming. Match stabilizer to the base fabric (stretchy fabric needs stronger support). A stable hooping setup improves placement accuracy and reduces puckering.
4) Appliqué Stitch Types You’ll Use
Appliqué is built in layers, and each layer has a job:
-
Placement line: Shows where to place the fabric piece.
-
Tackdown stitch: Holds the fabric in place before trimming.
-
Cover stitch: Finishes the edge (usually satin, zigzag, or blanket).
Appliqué Styles and When to Use Each
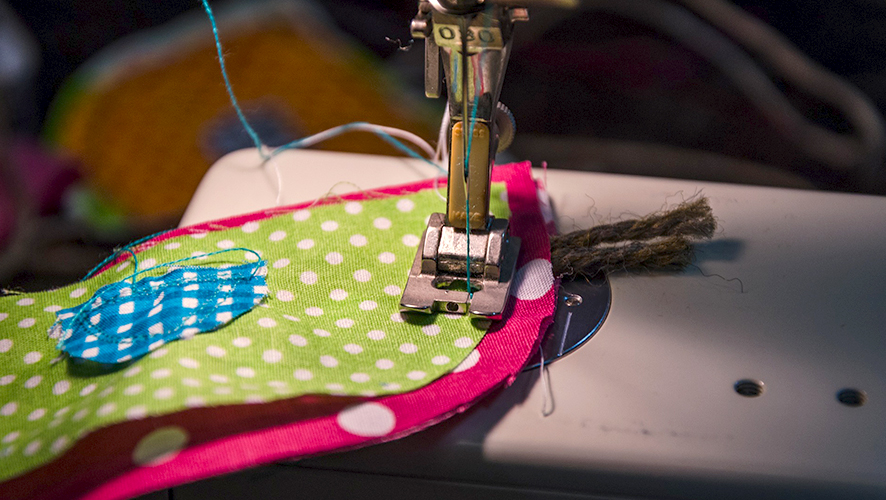
1) Raw-Edge Appliqué
Raw-edge appliqué is the fastest option. You stitch the fabric down and leave the edge exposed. It works well for a casual, textured look. The downside is fraying, especially on cotton. It is better for thicker fabrics or designs that do not need a “perfect” border.
2) Satin-Edge Appliqué
Satin-edge appliqué gives the cleanest, most premium finish. A satin border fully covers the fabric edge, so it looks sharp and professional. This style is very common on caps, polos, and uniforms. It needs good settings, because satin can pucker if density or underlay is wrong.
3) Zigzag or Blanket Stitch Edge
Zigzag and blanket edges look decorative and are more forgiving than satin. They work nicely on thicker appliqué fabrics and rustic designs. They also hide small trimming imperfections better than a thin satin.
4) Double-Tack + Cover
This method uses a stronger hold before the final border. It is ideal for production, because it reduces lifting and shifting. It also keeps results consistent across multiple runs.
Choose this if:
-
Fray risk is high: satin or double-tack + cover
-
Fabric is thick: zigzag/blanket or wider satin
-
Small shapes: satin (clean edge control)
-
Large shapes: raw-edge or zigzag (faster, lighter)
Understand the 4 Layers of an Appliqué
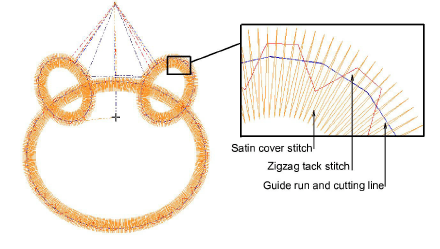
Before you change settings in Wilcom, understand how appliqué is built. Think of it as a simple stitch plan with four layers. Each layer has a clear job. Together, they create a clean and repeatable result.
1) Placement Line
This is the first run stitch. It works like a map on the garment. It shows the exact spot where the appliqué fabric should be placed. When the placement line is accurate, the rest becomes easier.
2) Cut Line (Optional)
Some workflows use a cut line to guide trimming. It can be used to cut the fabric piece before stitching. It can also guide trimming after tackdown. Not every method needs it, so choose it based on your process.
3) Tackdown Stitch
The tackdown is the holding stitch. After you place the fabric, this stitch locks it down. It prevents shifting during trimming. A good tackdown keeps edges stable for the final border.
4) Cover Stitch
This is the finishing border. It covers the raw edge and shapes the final look. Satin gives a clean, premium finish. Blanket or zigzag is more decorative and forgiving.
Wilcom Setup to Digitize Applique in Wilcom: File, Hoop, and Viewing Settings
Set Design Size and Hoop First
Start by setting the final design size and selecting the correct hoop. Do this first, because resizing later can affect stitch spacing and border coverage. A correct hoop choice also helps you place the appliqué accurately and avoid production surprises.
Match the Fabric Profile to the Garment
Next, choose fabric settings that match the base garment. A cap, polo, and hoodie behave very differently on the machine. The right fabric profile gives better default values for density, underlay, and pull compensation. This helps you get cleaner edges with fewer gaps and less puckering.
Use Viewing Settings That Make Editing Easier
Turn on the appliqué fabric preview so you can clearly see the fabric layer under the stitches. Then toggle viewing modes when needed to check overlaps and border coverage. These small visual checks help you catch problems early and save time later.
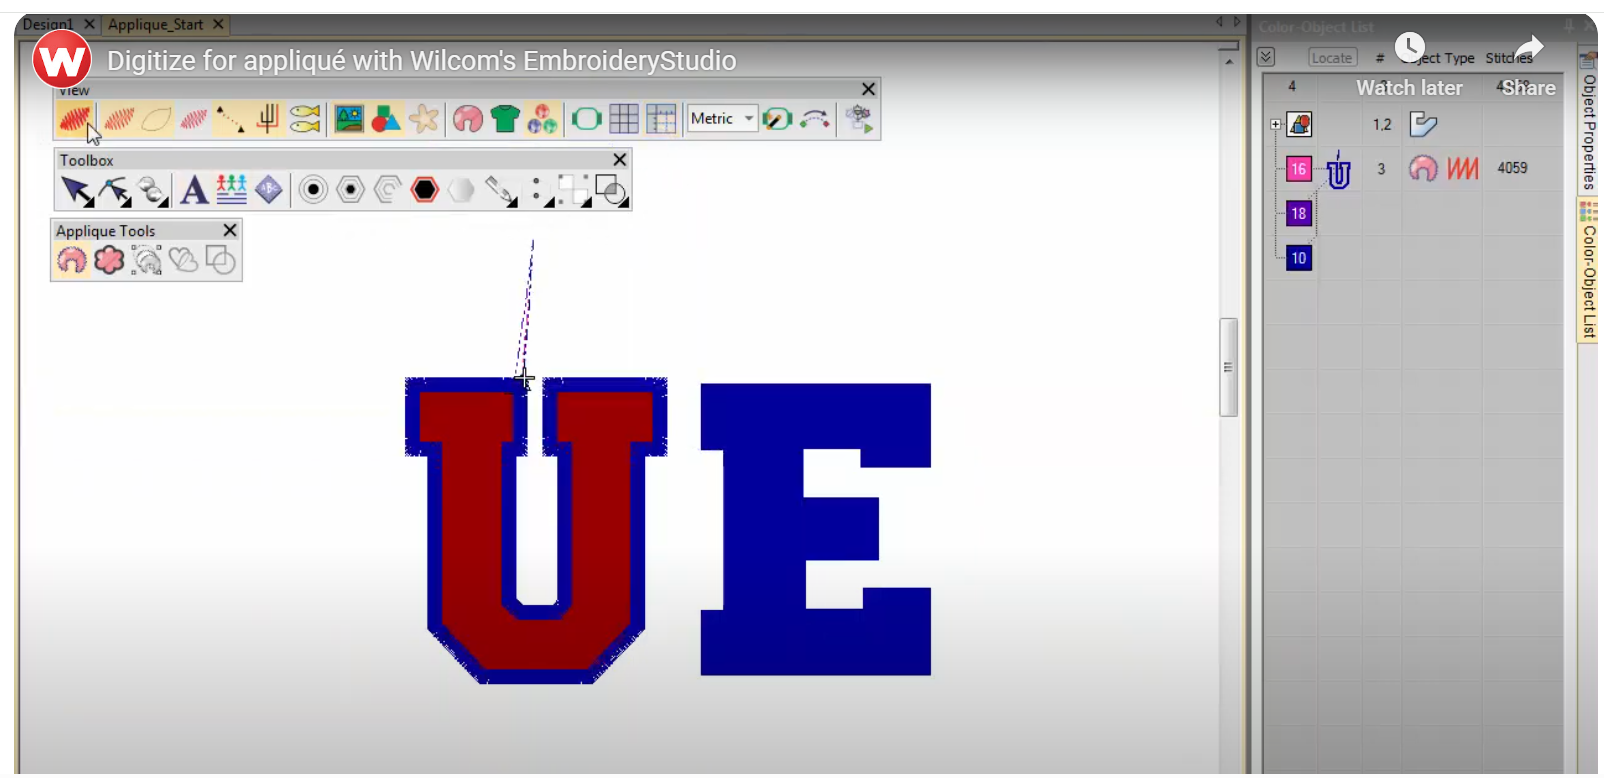
Digitize Appliqué in Wilcom Using the Digitize Appliqué Tool
1. Find the Tool and Start the Object
To begin, open the Appliqué toolbar in Wilcom and select Digitize Appliqué. This tool is designed to build appliqué the “production way.” Instead of you creating separate objects for placement, tackdown, and border, Wilcom creates them together as one grouped appliqué object. That makes your file cleaner in the sequence bar and easier to run on the machine. It also reduces mistakes, because the steps stay linked as one process.
2. Draw the Appliqué Shape
Now trace the shape you want to appliqué. Click around the outline to place points and follow the artwork closely. Use corner points for sharp angles like the edges of letters, badges, or geometric shapes. Use curve points for smooth areas like circles, mascot faces, or rounded lettering. Keep the shape clean and simple. Too many points can make the border stitch look shaky. When you reach the start again, close the shape so Wilcom has a complete boundary to build the appliqué layers correctly.
3. Set Entry and Exit Points
After the shape is complete, set the entry and exit points. These decide where the stitching starts and where it finishes. This matters more than people think. A smart entry point reduces travel stitches, avoids unnecessary jumps, and keeps the sequence smooth. It can also help you hide tie-ins in less visible areas. If Wilcom’s default entry and exit look fine for your design, accept them and move forward. If not, adjust them so the stitch flow matches your production logic.
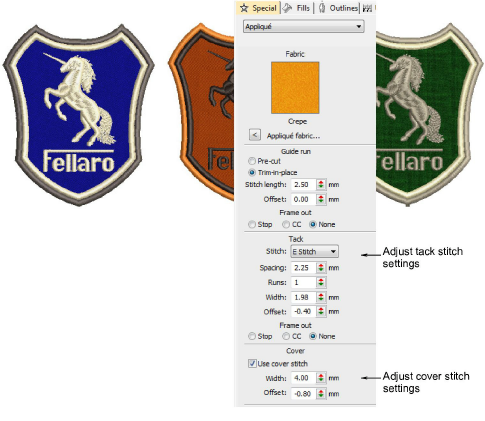
4. Adjust Object Properties: The “Control Center”
Next, open Object Properties for your appliqué object. This is where you control the look and behavior of the appliqué. Start by selecting which parts you want included, such as the placement line, an optional cut/cutting line, the tackdown stitch, and the final cover stitch. Then choose the cover style that fits your fabric and design goal. Use satin when you want a clean, premium edge that fully hides the fabric cut line. Choose blanket or zigzag when the appliqué fabric is thicker, when you want a decorative border, or when you need something more forgiving.
After that, fine-tune the settings that decide quality. Adjust border width so it covers the fabric edge properly. Control density so the border looks full but does not pucker the garment. Choose an underlay style that supports the edge and helps it sit flat. These three settings are often the difference between a crisp appliqué and one that looks wavy, or bulky.
5. Set a Frame-Out / Trim-Friendly Position
Now set a frame-out position. In simple terms, frame-out shifts the hoop to a convenient place so trimming is easier and safer. This is useful because trimming appliqué fabric is a hands-on step. If the hoop stays centered, trimming can feel tight and awkward. Many operators prefer moving the hoop toward a corner, such as the top-left, so they can access the fabric edge more easily. A good frame-out position speeds up trimming, reduces accidental snips, and helps keep production consistent.
6. What Wilcom Creates in the Sequence
Once you confirm your settings, Wilcom automatically builds the appliqué as a grouped set of steps in the sequence bar. You will typically see the process laid out in order, like placement line → tackdown → cover stitch, all under one appliqué object. This matters because the workflow stays organized. It also makes the file easier to hand off to an operator. Fewer separate objects means fewer chances to run the steps in the wrong order.
Do check out this video for a visual demonstration: Wilcom Appliqué Digitizing Tool Tutorial
Pro Tips for Clean Results and Faster Production
Use Partial Appliqué for Overlaps
When shapes overlap, full borders on both pieces create thick, bulky edges. Use partial appliqué on hidden areas so you do not stack cover stitches. This keeps overlaps cleaner and reduces stitch count.
Make Layers Easier to See
Turn on the appliqué fabric display and use a clear editing view. It helps you spot border gaps, trimming zones, and overlaps early. Catching issues here saves rework later.
Auto Tool vs Manual Tuning
The tool is fast, but quality comes from fine-tuning. Always check border width, density, underlay, and pull compensation for your fabric and size. Small tweaks prevent puckering and edge show-through.
Why Hire Professional Services?
When DIY Starts Costing More Than It Saves
Appliqué looks simple on screen, but the real work shows up during stitching. Clean results often need test sew-outs to dial in border coverage, density, underlay, and pull compensation.
The Real Cost of One Failed Run
For customer-facing jobs or bulk orders, one bad run can be expensive. You waste fabric, stabilizer, thread, and machine time. Missed deadlines can cost even more than the materials.
The Practical Takeaway
If you do not digitize appliqué daily, hiring a professional digitizing service is often the smarter move. A production-ready file can cost less than the time and trial runs needed to get it perfect in-house.