Embroidery has the magical ability to turn plain fabric into wearable art. A simple shirt, cap, or tote bag can suddenly stand out with vibrant stitches that bring a design to life. But while machine embroidery offers incredible creative possibilities, not every design ends up looking as good as it should.
The difference between low-quality and high-quality embroidery is easy to spot. Poorly digitized designs often result in puckering fabric, misaligned stitches, broken threads, or logos that look nothing like the original artwork. On the other hand, a well-prepared embroidery file produces smooth lines, balanced density, and a professional finish that enhances the fabric.
If you’ve ever struggled with messy outcomes, you’re not alone. Many beginners face these exact issues, and even experienced embroiderers sometimes get caught in trial-and-error. That’s why in this blog we’ll share 6 proven tips to help you create high-quality machine embroidery designs. And remember, while these tips will sharpen your skills, outsourcing to professional digitizing services is often the best way to guarantee flawless results every time.
1. Understand the Fabric Before You Design
One of the biggest secrets to high-quality embroidery is knowing your fabric inside out. Not all fabrics behave the same way under the needle. A sturdy fabric like denim can handle heavy stitch density and bold designs without losing its shape, while delicate materials such as silk or chiffon need lighter, softer stitches to avoid puckering. Stretchy knits like T-shirts come with their own challenges, as too much pull from the thread can distort the entire design.
This is where stabilizers become your best friend. A stabilizer supports the fabric during stitching, preventing it from shifting or stretching. Choosing the right one, tear-away, cut-away, or water-soluble—can make or break your project. For instance, a cut-away stabilizer works best on stretchy fabrics, while tear-away options suit sturdier materials like canvas. Skipping or mismatching stabilizers is one of the most common mistakes beginners make, leading to warped embroidery that doesn’t sit well on the garment.
The biggest trap to avoid is treating embroidery as “one-size-fits-all.” Using the same design settings for silk, denim, and cotton will almost always end in disappointment. Every fabric demands adjustments in stitch type, density, and underlay.
2. Simplify and Clean Up the Artwork
When it comes to embroidery, less is often more. Tiny details that look stunning on a computer screen don’t always translate well when stitched onto fabric. Thin lines, small lettering, and intricate shading can quickly become a tangled mess of threads, especially on smaller designs. Instead of enhancing the look, too much detail usually ends up making the embroidery appear cluttered and hard to read.
A smart approach is to simplify the artwork before digitizing. Instead of keeping every fine element, focus on bold outlines and clear shapes that will hold up under the needle. Gradients, for example, don’t work the same way in embroidery as they do in graphic design. Instead of smooth transitions, you’ll need to convert gradients into solid areas of color or use carefully planned stitch patterns to create a similar effect.
Vector based software like Adobe Illustrator or CorelDRAW can be excellent tools for cleaning up and simplifying your artwork. They allow you to resize, sharpen, and adjust elements so the final design is embroidery-friendly.
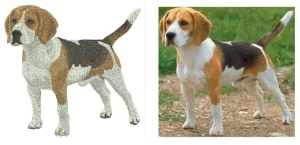
One of the most common mistakes beginners make is trying to replicate photographic-level detail in stitches. Embroidery has its own language, it’s about texture, dimension, and boldness, not pixel-perfect realism.
3. Choose the Right Digitizing Software
Behind every flawless embroidery design lies one essential tool, digitizing software. This is the bridge between your artwork and the embroidery machine, converting graphics into precise stitch instructions. Without the right software, even the best artwork can turn into broken threads, uneven fills, or distorted shapes once stitched.
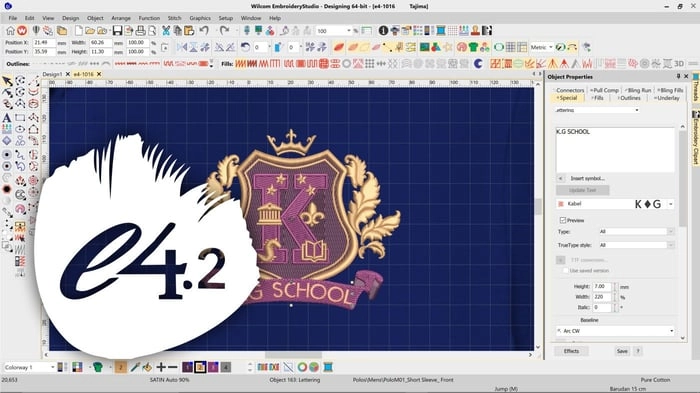
There are many digitizing programs to choose from, each with its own strengths. Wilcom Embroidery Studio is often considered the industry standard for its advanced editing and versatility. Hatch offers a user-friendly interface perfect for small businesses, while Ricoma Chroma is a powerful tool bundled with Ricoma machines. Pulse is another professional-grade choice, and for those just starting, Ink/Stitch, a free extension of Inkscape, provides basic digitizing features.
When evaluating software, look for must-have features like auto-digitizing for quick conversions, stitch editing for fine adjustments, lettering tools for fonts, and embroidery file format export so you can generate DST, PES, EMB, or other machine files.
The main drawback? These programs aren’t cheap, and mastering them takes time. A license for professional software can cost thousands of dollars, and the learning curve can be steep. Many embroiderers spend months experimenting before producing consistent results.
4. Choose the Right Stitch Types for the Design
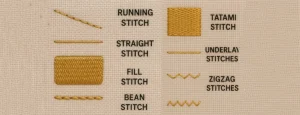
Stitch selection is at the heart of creating high-quality embroidery. Each stitch type serves a unique purpose, and knowing when to use them can make the difference between a professional finish and a design that looks uneven or unfinished.
Satin stitches are ideal for smooth, clean edges and smaller text. They create a polished look that’s perfect for outlines and lettering but lose their shine when stretched over large areas. Fill stitches, on the other hand, are designed for broader sections of a design. They cover larger shapes with textured patterns, ensuring even coverage without making the fabric too stiff. Finally, running stitches are light and versatile, often used for detailing, outlining, or adding subtle accents without adding bulk.
Just as important as stitch type is stitch density, how closely the stitches are placed together. If the density is too high, the design can cause thread breaks, fabric puckering, or a stiff, cardboard-like finish. Too low, and you’ll see gaps, loose coverage, and an overall lack of sharpness. Striking the right balance ensures durability, flexibility, and visual appeal.
5. Pay Attention to Design Size and Placement

One of the most common mistakes in embroidery is treating designs like digital images, thinking you can simply scale them up or down without issues. Unlike pictures on a screen, embroidery designs depend on stitch density, underlay, and fabric interaction. Resizing without adjustments often leads to messy results, broken stitches, or distorted patterns.
When working on small designs, such as chest logos or text under one inch tall, simplicity is key. Thin lines and tiny letters should be avoided, and stitch density must be reduced so the design doesn’t become stiff or unreadable.
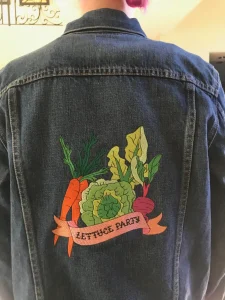
For larger designs, such as jacket backs, planning is even more critical. These require balanced underlay stitches to support the top layers, preventing the fabric from stretching or puckering. Without proper adjustments, a large design can feel heavy and uncomfortable to wear.
Placement also plays a huge role. A flat chest logo behaves differently than a design stitched on a curved cap. Cap embroidery needs special adjustments to account for curvature, while back designs need support for broad, flat coverage. Each placement demands its own digitizing approach.
6. Test, Test, and Test Again
Even the most skilled embroiderers know that testing is an essential step in producing high-quality results. A design may look flawless on screen, but once it’s stitched onto fabric, issues can arise that you didn’t anticipate. That’s why running a test stitch-out before full production is non-negotiable.
During testing, you should check for stitch breaks, alignment issues, and fabric pull. Watch how the design interacts with the fabric—does it lay flat, or does it pucker? Are curves smooth and letters legible? These small checks prevent costly mistakes when working on a larger batch of garments.
It’s also smart to keep a stitch log. Document the fabric type, stabilizer used, thread brand, needle size, and any adjustments you made. Over time, this log becomes a valuable resource, helping you replicate successful results and avoid repeating errors.
Skipping test runs is one of the fastest ways to waste fabric, thread, and time. Even experienced digitizers never skip this step, because every fabric and design combination can react differently.
Why Outsourcing to Professional Services is the Best Choice
DIY Digitizing is Costly and Time-Consuming
Learning to digitize embroidery on your own may sound appealing, but the reality is very different. Professional digitizing software comes with a steep price tag, and mastering it requires months or even years of practice. Many embroiderers who attempt the DIY route quickly realize it is expensive, time-consuming, and frustrating. Repeated mistakes waste fabric, thread, and valuable production hours.
Benefits of Professional Digitizing
Outsourcing solves these problems by putting your designs in the hands of experts. Professional digitizers already know how to manage every technical detail. They understand which stitch types to use, how to balance density, and how to adjust designs for different fabrics and placements. Whether you need a file for caps, jackets, or T-shirts, they ensure the result is smooth, accurate, and ready for production without endless adjustments.
Guaranteed File Compatibility
Another major benefit of outsourcing is compatibility. Professional digitizers provide files in the exact format your machine requires such as DST, PES, or EMB. This eliminates conversion issues and guarantees that the file will perform as intended on your equipment.
Saving Time and Money
Outsourcing also saves money in the long run. Instead of investing heavily in software and wasting materials on trial and error, you can pay a modest fee for a production-ready file. For businesses handling bulk orders, outsourcing ensures consistency so every logo or design looks identical across dozens or even hundreds of garments.
Why Choose Absolute Digitizing
At Absolute Digitizing, we make outsourcing simple and affordable. Our prices start at just $10, with 24/7 live chat support always available. We provide unlimited edits until you are fully satisfied, and rush jobs can be completed in as little as 2 hours. To give you peace of mind, we also offer a money-back guarantee.
Outsourcing is not only convenient but also the smartest way to ensure your embroidery designs are professional, polished, and production-ready.
Conclusion
Creating high-quality embroidery is not just about feeding artwork into a machine. It requires skill, planning, and attention to detail. In this blog we explored seven key factors: understanding the fabric, choosing the right digitizing software, selecting proper stitch types, simplifying and cleaning up artwork, paying attention to design size and placement, testing every design, and using quality threads, needles, and machines. Each of these steps plays a vital role in ensuring your final embroidery looks sharp, durable, and professional.
While DIY digitizing is possible, it comes with a steep learning curve and can often lead to frustration. Outsourcing, on the other hand, gives you access to professionals who are already equipped with the tools, knowledge, and experience to deliver flawless results.
If you want peace of mind and consistently polished embroidery, consider outsourcing your next project. High-quality embroidery is ultimately about precision, experience, and the right support, and professional digitizers provide exactly that.