
Regular maintenance of your embroidery machine is essential to ensure its longevity and optimal performance. A critical aspect of this upkeep is proper oiling, which minimizes friction between moving parts, prevents wear and tear, and reduces the likelihood of issues such as thread breakage. This comprehensive guide will walk you through the importance of oiling your embroidery machine, the materials you’ll need, key areas to focus on, a step-by-step oiling procedure, common mistakes to avoid, and additional maintenance tips to keep your machine running smoothly.
Why Oiling Your Embroidery Machine Is Crucial
Embroidery machines consist of numerous intricate components that move rapidly during operation. Without adequate lubrication, these parts can experience increased friction, leading to wear and tear, overheating, and potential rusting. Regular oiling offers several benefits:
- Reduces Friction: Lubrication allows metal parts to glide smoothly against each other, preventing grinding and subsequent damage.
- Prevents Overheating: By minimizing friction, oiling helps dissipate heat generated during operation, protecting components from heat-related damage.
- Extends Machine Lifespan: Proper maintenance reduces wear on parts, prolonging the overall life of the machine.
- Ensures Stitch Quality: A well-oiled machine operates smoothly, resulting in consistent and high-quality stitches.
Neglecting regular oiling can lead to issues such as thread breakage, inconsistent stitching, and noisy operation, all of which can disrupt your embroidery projects and lead to costly repairs.
Materials Needed for Oiling Your Embroidery Machine
Before you begin the oiling process, gather the following materials:
- Embroidery Machine Oil: Use oil specifically formulated for sewing and embroidery machines to ensure compatibility and effectiveness.
- Soft Brush: A small, soft-bristled brush helps remove lint and dust from delicate components without causing damage.
- Lint-Free Cloth or Microfiber Tissue: Essential for wiping away excess oil and cleaning surfaces without leaving fibers behind.
- Cotton Swabs (Q-tips): Ideal for applying oil precisely in hard-to-reach areas.
- Maintenance Manual: Your machine’s manual provides specific instructions and diagrams for maintenance procedures.
- Tweezers (Optional): Useful for removing stubborn threads or debris from tight spaces.
Identifying Key Oiling Points in Your Embroidery Machine
Proper lubrication requires attention to specific components of your embroidery machine. Key areas to focus on include:
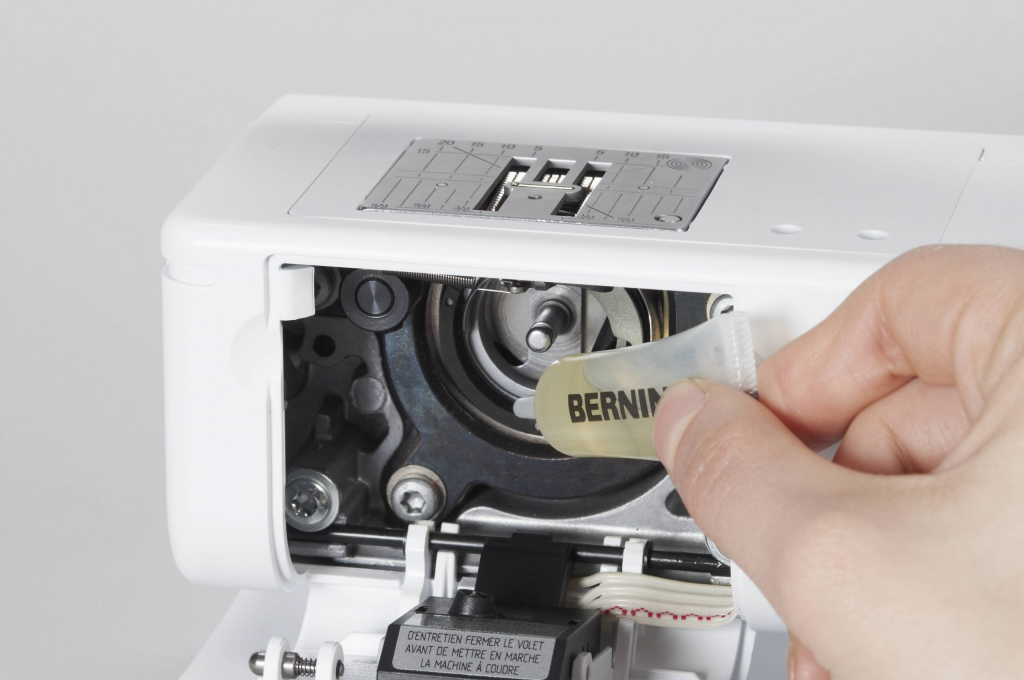
- Hook Race: The rotating hook that catches the thread to form stitches. Apply one drop of oil daily or after every bobbin change to ensure smooth operation.
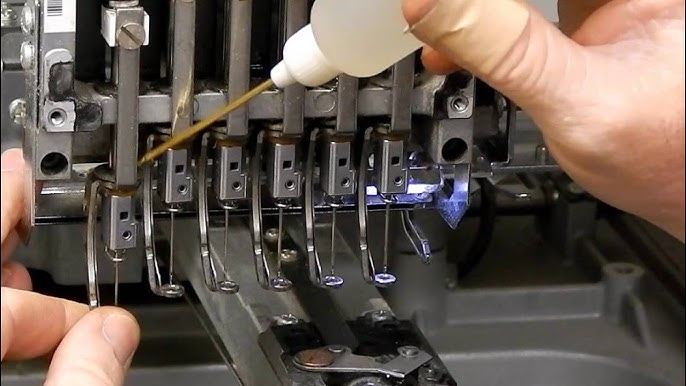
- Needle Bars: The bars that move the needles up and down. Lubricate the lower needle bar felt washer every 40-50 hours of sewing to maintain fluid movement.
- Take-Up Lever: The lever that moves the thread up and down during stitching. Periodic oiling prevents resistance and jamming.
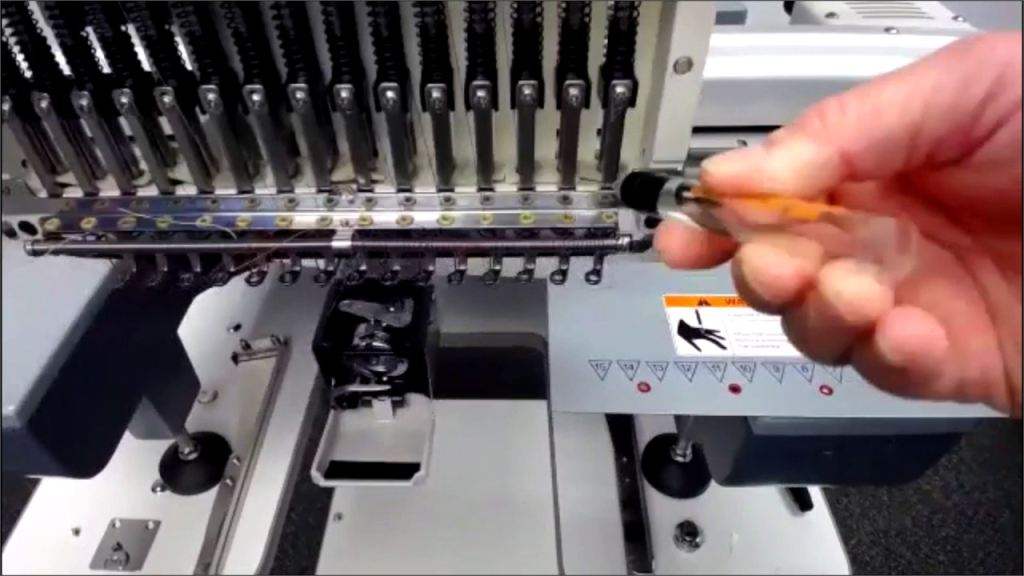
- Thread Guide Pins: Components that direct the thread from the spool to the needle. Lightly oiling these pins reduces resistance and prevents thread breakage.
- Bobbin Case: Holds the bobbin and regulates thread tension. After cleaning, apply a small amount of oil to maintain smooth operation.
- Feed Dogs (if applicable): The teeth that move the fabric under the needle. Occasional oiling ensures smooth fabric movement.
- Presser Foot Mechanism: The part that holds the fabric in place. Lubricate to ensure seamless operation.
Refer to your machine’s maintenance manual for specific oiling points and procedures, as these can vary between models.
Embroidery Digitizing & Vector Art Services
Affordable and high-quality embroidery digitizing and vector art services start at just $10 with Absolute Digitizing! Enjoy quick turnaround times of 4–12 hours or rush jobs in just 2 hours. Get bulk discounts, free edits until you're satisfied, and a money-back quality guarantee. Choose Absolute Digitizing for professional results you can trust. Try Absolute Digitizing today!


Step-by-Step Guide to Oiling Your Embroidery Machine
Follow these steps to properly oil your embroidery machine:
Step 1: Preparation
- Turn Off and Unplug the Machine: Ensure safety by disconnecting the machine from the power source before beginning maintenance.
- Gather Materials: Have all necessary tools and supplies within reach to streamline the process.
Step 2: Access the Oiling Points
- Remove Components: Detach the needle, throat plate, bobbin case, and any other parts obstructing access to oiling points.
- Clean the Area: Use a soft brush to remove lint and debris. Avoid using compressed air, as it can push dirt deeper into the machine.
Step 3: Oiling the Hook Race
- Open the Hook Cover: Remove the bobbin case and open the hook cover to access the hook race.
- Position the Hook: Rotate the handwheel to align the hook race for oiling.
- Apply Oil: Place one drop of oil on the hook race. Avoid over-oiling to prevent fabric contamination.
Step 4: Oiling the Needle Bars
- Select a Needle Bar: Pull one needle bar down to lock it in place.
- Apply Oil: Add a drop of oil to the lower needle bar felt washer. Repeat for each needle bar as needed.
Step 5: Lubricating Other Components
- Thread Guide Pins and Additional Parts: Lightly oil areas such as thread guide pins and tension assemblies, following your machine’s manual.
Step 6: Final Steps
- Wipe Excess Oil: Use a lint-free cloth to remove any extra oil to prevent staining fabric.
- Reassemble the Machine: Securely reattach all removed components.
- Test Run: Operate the machine on scrap fabric to ensure smooth functioning.
Step 7: Establish a Regular Maintenance Schedule
- Frequent Use: For heavily used machines, oil daily or after every bobbin change.
- Occasional Use: For less frequent usage, oil weekly or monthly.
- Maintenance Log: Keep a record of your oiling schedule and any issues to monitor machine health.
Common Mistakes to Avoid When Oiling Your Embroidery Machine
To ensure effective maintenance, avoid these common pitfalls:
- Over-Oiling: Using too much oil can cause a buildup that attracts lint and dust, leading to clogged components and staining your fabric during stitching. Use just a drop or two where required.
- Using Incorrect Oil: Always use oil specifically designed for sewing and embroidery machines. Household oils or other lubricants can damage your machine’s internal components and void warranties.
- Neglecting Cleaning Before Oiling: Skipping the cleaning step can trap dust and lint, causing parts to jam and reducing the effectiveness of the oil.
- Missing Key Areas: Forgetting to oil vital components like the hook race or needle bars can lead to increased wear and tear, shortening your machine’s lifespan.
- Ignoring the Maintenance Manual: Each machine has unique requirements, and the manual provides detailed instructions on how to care for your specific model.
- Infrequent Oiling: Delaying oiling sessions can result in parts drying out, leading to noisy operation and potential damage.
- Failing to Test Post-Maintenance: Always run your machine on scrap fabric after oiling to ensure smooth operation and no residual oil leaks.
Understanding Wear and Tear on an Embroidery Machine
Even with proper maintenance, your embroidery machine will experience wear and tear over time. Here are some common issues and how oiling can help prevent them:
- Thread Breakage:
- Cause: Dry or unlubricated components can create tension inconsistencies, causing threads to snap.
- Solution: Regular oiling ensures smooth thread passage and reduces stress on the thread.
- Noisy Operation:
- Cause: Friction between dry metal parts can lead to grinding noises.
- Solution: Applying oil reduces friction and allows parts to move quietly.
- Skipped Stitches:
- Cause: Worn-out components or excessive lint can interrupt the stitching process.
- Solution: Proper lubrication and cleaning maintain alignment and smooth movement.
- Uneven Tension:
- Cause: Debris or lack of lubrication can disrupt thread tension mechanisms.
- Solution: Regular maintenance keeps tension assemblies functioning optimally.
- Overheating:
- Cause: High friction due to dry components can generate heat.
- Solution: Lubrication dissipates heat and prevents parts from overheating.
- Decreased Speed and Efficiency:
- Cause: Unlubricated parts may operate sluggishly, affecting productivity.
- Solution: Oiling restores fluid movement and operational speed.
Additional Maintenance Tips
- Use Quality Threads: Poor-quality threads can shed fibers and create lint, which clogs your machine. Investing in high-quality threads minimizes debris and improves stitching quality.
- Store Your Machine Properly: When not in use, cover your machine to protect it from dust and humidity, which can accelerate wear and tear.
- Inspect Needles Regularly: Replace bent or dull needles immediately, as they can damage fabric and put undue stress on the machine.
- Professional Servicing: Schedule professional maintenance annually or biannually, especially for heavily used machines, to ensure all internal components are in top condition.
- Monitor Stitch Quality: Pay attention to stitch consistency, as irregularities often indicate maintenance is needed.
Why Choose Absolute Digitizing for Embroidery Needs?
Maintaining your embroidery machine ensures it runs smoothly, but having well-digitized designs is just as crucial for flawless embroidery results. Absolute Digitizing specializes in high-quality embroidery digitizing services at affordable rates, starting at just $10. Our experienced team ensures precision and detail in every design, helping you achieve professional-grade results.
Why Absolute Digitizing?
- Affordable Rates: Custom designs starting at $10.
- Fast Turnaround: Receive your digitized designs within 12-24 hours.
- Free Revisions: We prioritize your satisfaction and offer free edits until you are happy with the result.
- Experienced Team: Decades of experience in creating designs for various industries and projects.
- Excellent Support: Our team is always ready to assist with any queries or special requirements.
Taking care of your embroidery machine and using professionally digitized designs go hand in hand for stunning embroidery projects. If you are ready to refine your work, reach out to Absolute Digitizing today!
Embroidery Digitizing & Vector Art Services
Affordable and high-quality embroidery digitizing and vector art services start at just $10 with Absolute Digitizing! Enjoy quick turnaround times of 4–12 hours or rush jobs in just 2 hours. Get bulk discounts, free edits until you're satisfied, and a money-back quality guarantee. Choose Absolute Digitizing for professional results you can trust. Try Absolute Digitizing today!
FAQs
1. How often should I oil my embroidery machine?
The frequency depends on your machine usage. For daily use, oil the hook race and other key areas daily or after every bobbin change. For occasional use, oiling weekly or monthly may suffice.
2. Can I use any oil on my embroidery machine?
No, always use oil specifically formulated for sewing and embroidery machines. Using unsuitable oil can damage internal components.
3. What happens if I skip oiling my machine?
Neglecting regular oiling can lead to friction, increased wear and tear, noisy operation, and potential damage, ultimately shortening your machine.
4. Do computerized embroidery machines need oiling?
Yes, computerized machines also require oiling. Refer to your manual for specific guidelines on oiling points and frequency.
5. Can Absolute Digitizing help with custom designs?
Absolutely! Absolute Digitizing provides expert digitizing services to transform your ideas into stunning embroidery designs.
By following this guide, you can keep your embroidery machine in excellent condition while avoiding common maintenance mistakes. Proper care ensures your machine remains a reliable partner in bringing your creative ideas to life. When paired with professional digitizing services from Absolute Digitizing, your embroidery projects will stand out with precision and elegance!