Logos are the heart of a brand’s identity—the first thing a customer notices. Over time, a well-designed logo becomes synonymous with the brand itself, often making words unnecessary. Just seeing the logo is enough to recognize the company behind it. But when it comes to apparel, logos can’t simply be printed or pasted—they need to be embroidered. And that’s where digitization comes in. A logo can only make a strong impression if it’s digitized correctly for embroidery. This brings us to the million-dollar question: How to digitize a logo for embroidery?
![]()
Digitizing a logo correctly requires precision. Unlike digital graphics, embroidery stitches have depth, texture, and movement, which means poor digitizing can lead to distorted results. While some may attempt DIY digitizing using auto-digitizing software, the results are often subpar. Professional digitizing services, on the other hand, ensure clean, well-defined embroidery that truly reflects the brand’s identity.
This blog will guide you through the basics of how to digitize logo for embroidery and explore cost-effective, efficient ways to get your logo digitized professionally. So, let’s get started!
- Step-by-Step Process: How to Digitize a Logo for Embroidery
- DIY Logo Digitizing – What You Need to Know
- Buying Embroidery Digitizing Software
- Learning How to Digitize
- Hiring an In-House Digitizer
- Why Hiring a Professional Embroidery Digitizing Service is the Best Option
- How to Get Your Logo Digitized by a Professional in 3 Simple Steps
- Conclusion – The Smartest Choice for Embroidery Digitizing
Step-by-Step Process: How to Digitize a Logo for Embroidery
![]()
Here is How to digitize a logo for embroidery yourself, here’s a simplified step-by-step process:
1. Choose Embroidery Software – Use professional software like Wilcom, Hatch, or Pulse to create a stitch file.
2. Import the Logo – Open your logo file (JPG, PNG, or AI) in the digitizing software.
3. Set the Design Size – Adjust the dimensions according to your embroidery needs.
4. Select Stitch Types – Assign different stitch types (satin, fill, or running stitch) based on the design elements.
5. Add Underlay Stitches – These help stabilize the fabric and prevent distortion.
6. Adjust Stitch Density – Set the right stitch spacing to avoid thick or loose embroidery.
7. Apply Pull Compensation – Adjust settings to prevent fabric from shrinking or stretching.
8. Optimize Thread Colors & Sequence – Arrange color changes and stitch order for smooth embroidery.
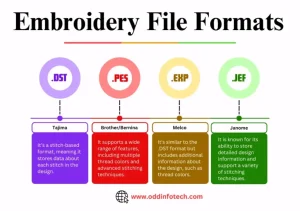
9. Save in Machine Format – Convert the file to the required format (DST, PES, EMB, etc.).
10. Test the Embroidery – Run a test stitch on fabric to check for errors and make necessary adjustments.
While this process may seem straightforward, it requires skill, experience, and time to master.
DIY Logo Digitizing – What You Need to Know
Many people consider digitizing their own logos instead of hiring a professional, but the process is more complicated than it seems. To start, you need embroidery digitizing software, which comes with a significant cost and learning curve.
Buying Embroidery Digitizing Software
Professional-grade embroidery software like Wilcom, Pulse, Hatch, and Chroma can cost anywhere from $2000 to over $5,000, making it a hefty investment for someone who only needs occasional digitizing. While there are free or lower-cost alternatives available, they often come with serious limitations—such as lack of precision, limited stitch types, and missing advanced features like auto-underlay, pull compensation, and stitch direction control. Without these, the final embroidery may look distorted, uneven, or unprofessional.
Even with the best software, digitizing is not an automatic process. It requires skill, experience, and a deep understanding of embroidery techniques. Many beginners assume that auto-digitizing features in software can do the job, but these tools often produce poor results, with unnecessary stitches, loose thread connections, and improper density settings. Without expertise, you risk wasting time and materials on multiple failed embroidery attempts.
At the end of the day, DIY digitizing is a steep learning curve. Unless you’re willing to spend weeks mastering the software and investing in expensive programs, it’s often more cost-effective to outsource digitizing to professionals who can do it right the first time—for as little as $10 per logo.
Learning How to Digitize
Even with embroidery digitizing software, creating a professional-quality stitch file is not as simple as clicking a few buttons. Digitizing is a technical skill that requires a deep understanding of embroidery mechanics. To produce a clean, well-stitched logo, you must learn stitch types, stitch density, underlays, push and pull compensation, and more.
The learning curve is steep—it can take weeks or even months to develop the expertise needed to create high-quality embroidery files. Each design behaves differently on fabric, and without proper knowledge, a digitized logo can easily turn into a stitching disaster.
Beginners often make common mistakes, such as:
- Gaps in stitches, where the fabric shows through due to incorrect push and pull compensation.
- Uneven stitch density, leading to bulky, stiff embroidery or loose, weak designs.
- Thread breaks and machine errors, caused by poor stitch direction or excessive jump stitches.
Perfecting Digitizing Requires an Embroidery Machine
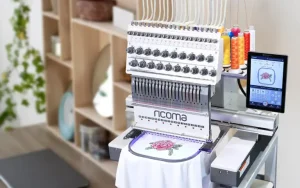
One of the biggest challenges of DIY digitizing is that you can’t truly improve your skills without an embroidery machine. While software allows you to create stitch files, the real test of quality comes from sew-outs—the actual embroidery on fabric. Without an embroidery machine, you won’t be able to see how your designs translate into real stitches, making it impossible to fine-tune your work.
Mastering digitizing isn’t just about using software—it’s about knowing how embroidery machines interpret stitch files and how different fabrics affect the final result. Instead of spending hours struggling with trial and error, hiring a professional digitizer ensures your logo looks perfect on the first try—saving you time and resources.

Conclusion – The Smartest Choice for Embroidery Digitizing