Machine embroidery has revolutionized the textile and fashion industry with its precision, efficiency, and versatility. Among the various techniques used, run stitch, satin stitch, and fill stitch stand out as fundamental to creating intricate and appealing designs. This blog aims to explore these stitches in detail, providing a comprehensive understanding of their uses, characteristics, and applications.

Introduction to Machine Embroidery Stitches

Machine embroidery involves the use of automated embroidery machines to create patterns and designs on fabric. Unlike hand embroidery, machine embroidery is faster and can produce more consistent results. The three primary stitches used in machine embroidery are run stitch, satin stitch, and fill stitch. Each of these stitches has unique properties and serves different purposes in the creation of embroidered designs.

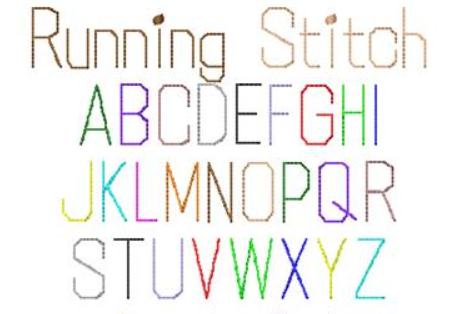
1. Run Stitch: The Outline and Detail Master

Characteristics:

  • Definition: Run stitch, also known as a straight stitch or walking stitch, is a simple, continuous line of stitching.
  • Stitch Length: The length of the run stitch can be adjusted, typically ranging from very short (for fine details) to longer stitches (for less intricate lines).

Uses:

  • Outlining: Run stitch is commonly used to outline shapes and designs. It defines the edges of an embroidery pattern, making the design more distinct.
  • Detailing: It’s perfect for adding fine details within a larger design, such as facial features, text, or intricate patterns.
  • Underlay: Often used as an underlay stitch to provide a stable foundation for other stitches, especially on stretchy or delicate fabrics.

Applications:

  • Text: Ideal for embroidering small text due to its ability to create clean and readable letters.
  • Fine Details: Used in detailed artworks like line drawings or intricate designs that require precision.
  • Structural Support: Helps in securing fabric layers before applying more complex stitches.

Example in Practice:

In a logo design, run stitch might be used to outline the entire logo and add small details like text or intricate patterns within the logo, ensuring clarity and precision.

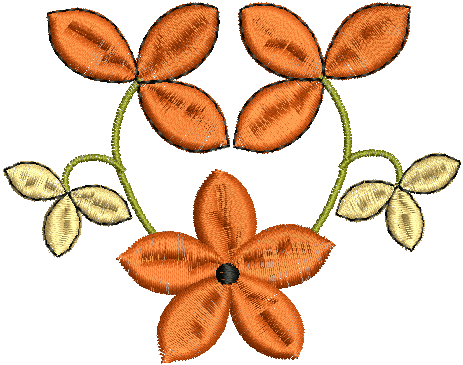
2. Satin Stitch: The Shiny and Smooth Contour

Characteristics:

  • Definition: Satin stitch, also known as zigzag stitch, consists of closely spaced zigzag stitches that form a smooth, shiny surface.
  • Appearance: It creates a satin-like sheen and is known for its smooth and lustrous finish.
  • Width and Density: The width of the satin stitch can vary, and its density is adjustable to achieve the desired thickness and coverage.

Uses:

  • Borders: Commonly used to create thick, bold borders around shapes and letters, adding a polished look to designs.
  • Monograms and Lettering: Perfect for monograms, initials, and larger text because of its dense and attractive appearance.
  • Small Filled Areas: Suitable for filling small areas within a design, giving them a rich, smooth texture.

Applications:Applications:

  • Corporate Logos: Often used in corporate logo embroidery for its professional and high-quality finish.
  • Decorative Elements: Enhances the look of decorative elements in designs, such as floral patterns or ornamental borders.
  • Appliqué: Frequently used to secure appliqué pieces, providing both functionality and decorative appeal.

Example in Practice:

In an embroidered badge, satin stitch might be used to create bold borders around the edges and to fill in larger text elements, giving the badge a professional and polished appearance.

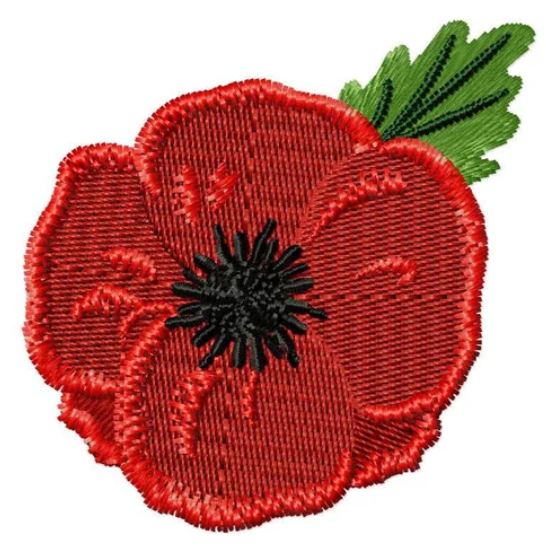
3. Fill Stitch: The Coverage Expert

Characteristics:

  • Definition: Fill stitch, also known as tatami or ceding stitch, consists of rows of stitching that fill large areas with thread.
  • Appearance: It creates a solid, textured surface and can vary in pattern and direction to achieve different effects.
  • Density and Pattern: The density of fill stitches can be adjusted, and they can be stitched in various patterns (e.g., zigzag, lattice) to create different textures and appearances.

Uses:

  • Large Areas: Ideal for covering large areas with thread, providing a solid background or filling for designs.
  • Textures: Can be used to create textured effects within a design, adding depth and dimension.
  • Gradients and Shading: Allows for the creation of gradients and shading by varying the stitch direction and density.

Applications:

  • Backgrounds: Used to fill the background of a design, making the foreground elements stand out.
  • Complex Designs: Suitable for complex designs that require extensive coverage, such as landscapes or large motifs.
  • Texture Addition: Adds texture and interest to designs, making them more visually appealing and dynamic.

Example in Practice:

In a landscape embroidery, fill stitch might be used to create the sky and ground, providing a solid background for other elements like trees and buildings that are embroidered with different stitches.

Combining Stitches for Enhanced Design

The true artistry in machine embroidery lies in the skillful combination of run stitch, satin stitch, and fill stitch. By understanding their unique properties and applications, embroiderers can create designs that are not only beautiful but also structurally sound and durable.

Design Strategy:

  • Outlining with Run Stitch: Start by outlining the design with run stitch to define the shape and add fine details.
  • Emphasizing with Satin Stitch: Use satin stitch to highlight key elements and create a smooth, shiny appearance for borders and text.
  • Filling with Fill Stitch: Apply fill stitch to cover large areas and add texture, ensuring a solid and complete design.

Example in Practice:

For an embroidered floral design, the petals might be outlined with run stitch, filled with fill stitch in varying directions to create texture, and the edges of the petals highlighted with satin stitch for a polished look.

Tips for Successful Machine Embroidery

Choosing the Right Stabilizer:

  • Stabilizers provide support and prevent fabric distortion. The choice of stabilizer depends on the fabric and the complexity of the design.

Thread Selection:

  • Thread Type: Use high-quality embroidery threads that match the fabric and design requirements.
  • Color Choices: Select thread colors that complement the design and enhance its visual appeal.
See Also: Using Specialty Threads in Machine Embroidery

Machine Settings:

  • Tension: Adjust the machine tension according to the fabric and thread to ensure smooth stitching.
  • Speed: Control the machine speed for better accuracy and precision, especially for intricate designs.

Practice and Experimentation:

  • Test Runs: Perform test runs on similar fabric scraps to fine-tune settings and identify potential issues.
  • Continuous Learning: Stay updated with new techniques and technologies in machine embroidery to enhance your skills.

Conclusion

Understanding the nuances of run stitch, satin stitch, and fill stitch is essential for anyone involved in machine embroidery. Each stitch type offers unique benefits and serves specific purposes, from outlining and detailing to creating bold borders and filling large areas. By mastering these stitches and learning how to combine them effectively, embroiderers can elevate their craft and produce stunning, professional-quality designs. Whether you are a hobbyist or a professional, appreciating the intricacies of these stitches will undoubtedly enhance your embroidery projects and open up new creative possibilities.

Are you looking to bring your embroidery designs to life with precision and excellence? Look no further than Absolute Digitizing. With our expert digitizing services, we transform your creative ideas into flawless, machine-ready embroidery files. Whether you need intricate details, bold borders, or extensive fill areas, our skilled team ensures your designs are executed perfectly every time. Trust Absolute Digitizing to deliver top-notch quality and efficiency for all your embroidery needs. Contact us today to elevate your embroidery projects to a professional level.