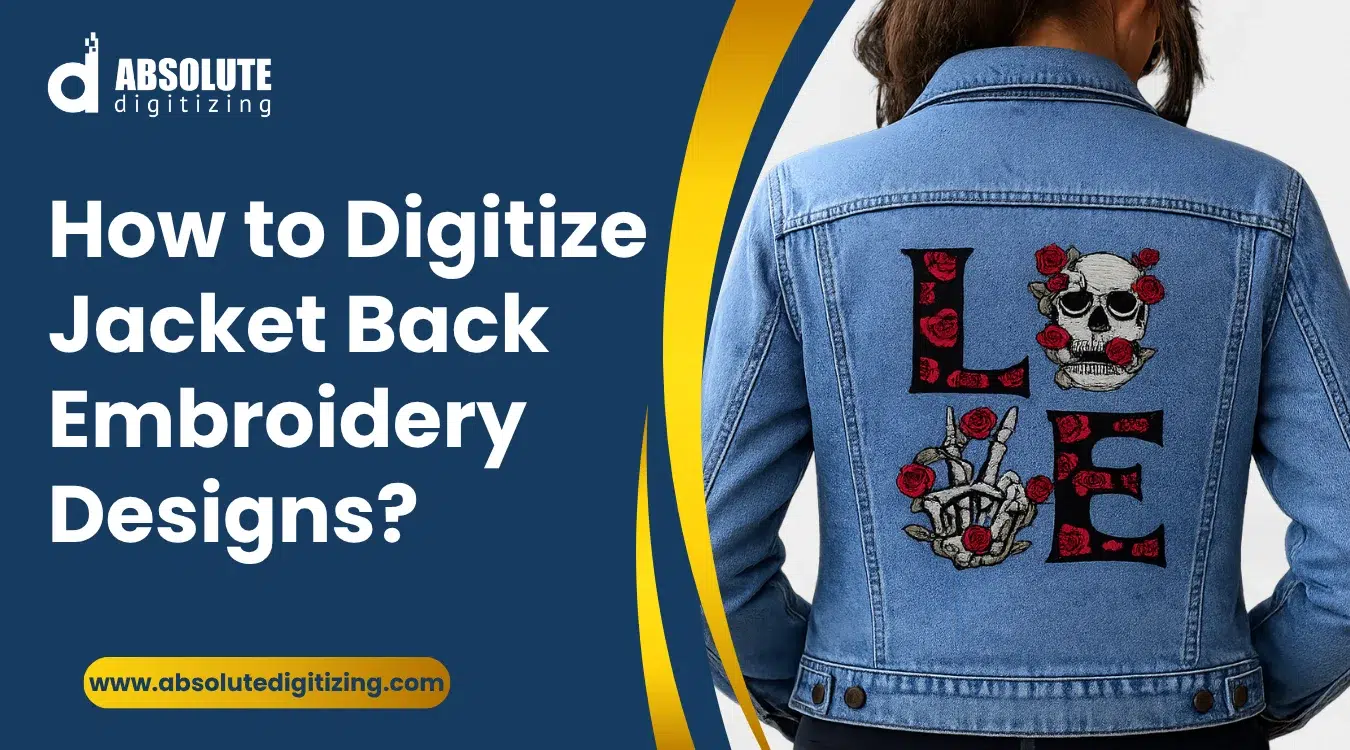
Jacket back embroidery needs the right stitch plan to stay clean, smooth, and durable.
|
Jacket back embroidery needs more care than a small left chest logo. The design covers a larger area, so every stitch must support the fabric and hold the artwork in place. This is why jacket back digitizing starts with the right plan, not quick resizing.
Also, large designs need proper stitch types, balanced density, strong underlay, and good fabric control. If these settings are wrong, the jacket can pucker, outlines can shift, and gaps can show around borders or letters.
In addition, poor digitizing can lead to thread breaks, stiff designs, and messy details. These problems waste time and can ruin expensive jackets.
For better results, use a clean embroidery file made for your jacket type, design size, and machine format.
Absolute Digitizing provides reliable embroidery digitizing services that help small businesses and hobbyists get smooth, professional jacket back embroidery with fewer stitch issues.

- What Does Jacket Back Digitizing Involve?
- Why Does Jacket Back Embroidery Require Specialized Digitizing?
- How to Digitize Jacket Back Designs? Step-by-Step Guide
- Which Stitch Types Work Best for Jacket Back Embroidery?
- What Are Common Mistakes in Jacket Back Digitizing and How Can You Avoid Them?
- Why Should You Hire a Professional Digitizing Service?
- Final Thoughts
- Frequently Asked Questions
What Does Jacket Back Digitizing Involve?

Jacket back embroidery digitizing turns artwork into a stitch file that an embroidery machine can read. The file guides stitch type, direction, density, underlay, trims, and color changes. This process helps the machine stitch the design in the right order and shape.
However, a jacket back design needs more planning than a small left-chest logo. A larger design covers more fabric. So, the digitizer must control fabric pull, stitch flow, and overall weight.
Also, the design must look good from a distance. Large artwork needs clean borders, readable text, and balanced fills. Tiny details may need simplification, so they do not close up during stitching.
Why Size Changes the Process
Large embroidery can shift more while the machine runs. For that reason, the file needs a stronger underlay, careful stitch order, and smart density control.
The digitizer also plans the design around the jacket fabric. Denim, fleece, nylon, leather, and varsity jackets do not react the same way.
Key Requirements for Clean Results
- Final design size
- Jacket fabric type
- Hoop size
- Stitch direction
- Underlay support
- Pull compensation
- Thread color order
- Test sew-out
What Are the Most Common Types of Jackets?
Different jacket fabrics need different stitch plans. Choose the jacket based on design detail, fabric strength, and how the person will wear it.
Popular jacket options include:
- Denim jackets support bold logos, patches, and streetwear art.
- Leather jackets look premium, but they need fewer needle holes.
- Varsity jackets work well for names, numbers, and team logos.
- Bomber jackets suit fashion branding and clean back designs.
- Biker jackets often use large emblems and strong borders.
- Windbreakers (nylon) need a light density because the fabric can shift.
- Fleece jackets need a strong underlay so stitches do not sink.
For detailed designs, choose denim, varsity, or bomber jackets. For simple logos, fleece and windbreakers can work well.
What type of designs are used for jackets?
Jackets work best with bold, clear artwork. Simple shapes and strong outlines usually stitch better than very thin lines or photo-style details.
Common jacket designs include:
- Business logos
- Team names
- Club emblems
- Varsity letters
- Biker designs
- Workwear branding
- Large back patches
- Custom streetwear art
In addition, heavier jacket designs may need basting or extra fabric support during stitching to help keep the jacket and stabilizer steady.
Why Does Jacket Back Embroidery Require Specialized Digitizing?

Jacket back embroidery needs a different digitizing plan because the design covers a wide area. A small logo may stitch well on a chest, but the same artwork can fail when enlarged for the back of a jacket.
As a result, the digitizer must plan the design for size, weight, fabric movement, and long wear. This helps the final embroidery stay clean, smooth, and durable.
Large designs show small mistakes
Large embroidery makes every small error easier to see. A small gap around a border may not stand out on a pocket logo. However, it can look obvious on a full jacket back.
Also, large designs use more stitches. If the density is too high, the design can feel stiff and heavy. It may also cause thread breaks, puckering, or needle stress.
Common large-design issues include:
- Border gaps
- Fabric puckering
- Uneven fills
- Thread breaks
- Distorted shapes
- Heavy stitch buildup
For this reason, the file needs balanced density, proper underlay, and pull compensation. The fabric type, stitch density, underlay, and backing can affect push-pull distortion and stitch registration.
Different jacket fabrics react differently
Jacket fabrics do not stitch the same way. Denim and canvas feel firm, so they need a different setup than fleece, nylon, leather, or varsity material.
For example, thick denim may need a lighter density to avoid bulk. Fleece often needs a stronger underlay so stitches do not sink. Slick nylon can shift under the needle, so it needs better support and control.
In addition, the right stabilizer helps the jacket hold its shape. Proper backing helps reduce puckering, distortion, and unraveling, especially when fabric and design type are matched correctly.
Time and skill matter
Jacket back designs take time because the file needs careful planning. A simple back design may take 5 to 6 hours to digitize. A large or detailed design can take around 20 hours or more.
As a result, specialized digitizing helps protect the jacket, improve durability, and create cleaner embroidery. It also helps the design stitch smoothly from start to finish with fewer thread breaks and less rework.
How to Digitize Jacket Back Designs? Step-by-Step Guide

A jacket back design needs a clear stitch plan before it goes to the machine. Large embroidery covers more fabric, so each setting must support clean stitching, smooth borders, and long wear.
Step 1: Set the design size
Start with the final size. Do not digitize a small logo and stretch it later. Large resizing can change stitch density, spacing, and shape.
Use the jacket size, hoop size, and placement area to set the design. A balanced back design should look centered and easy to read from a distance.
Size checks to make:
- Jacket width
- Back seam position
- Hoop limit
- Design height
- Text readability
Step 2: Pick the right stitch types
After sizing, choose stitch types that match the artwork. Large solid areas need fill stitches. Borders and bold letters often need satin stitches. Small details may need run stitches.
However, avoid very wide satin stitches. They can snag, loop, or look loose. For very large filled areas, appliqué can reduce stitch count and keep the jacket more flexible.
Step 3: Add a strong underlay
An underlay acts like a base under the top stitches. It holds the fabric in place and helps the top stitches sit cleanly.
Use the underlay based on the fabric and design style. Edge run underlay helps with borders. Zigzag underlay supports satin areas. Fill underlay supports large shapes.
Good underlay can help reduce:
- Shifting
- Puckering
- Border gaps
- Uneven fills
- Sinking stitches
Step 4: Adjust stitch density
Then, balance the stitch density. Density means how close the stitches sit together. If the stitches sit too close, the jacket can feel stiff and heavy.
Also, high density can cause thread breaks and puckering. If the density is too light, the fabric may show through. Match the density to the jacket fabric, thread type, and design size.
Step 5: Set pull compensation
During embroidery, stitches can pull fabric inward. This can make shapes look smaller than planned. It can also create gaps between fills and borders.
Pull compensation adds a little extra width to the design area. This helps the final stitched design look correct after the fabric moves.
Use more care on soft, stretchy, or thick fabrics because they can move more during stitching.
Step 6: Plan stitch direction
Stitch direction affects texture, shine, and fabric pull. A large fill area stitched in one direction may look flat or cause stress on the fabric.
Instead, change stitch angles where needed. This can add depth and help the design look cleaner. It can also control pull in wide areas.
Step 7: Sequence the design
Now, plan the stitch order. A good sequence helps the fabric stay stable while the machine runs.
In many jacket back designs, the center area should be stitched before the outer areas. This helps push fabric movement outward instead of trapping it inside the design.
A clean sequence should:
- Stitch stable areas early
- Avoid crossing too much
- Keep colors in order
- Reduce fabric movement
- Support clean borders
Step 8: Reduce trims and jump stitches
Jump stitches happen when the needle moves from one area to another without stitching. Trims cut those threads. Too many jumps and trims can slow down production and create a messy back.
So, plan a smooth path. Keep nearby shapes together when possible. This saves time and gives the embroidery a cleaner finish.
Step 9: Save the correct file format
After digitizing, save the file in the format your machine needs. Common embroidery file formats include DST, PES, JEF, EXP, VP3, and XXX.
Also, save a working file if your software allows it. This helps you make edits later without starting over.
Step 10: Test before final sew-out
Finally, test the design on a similar fabric before stitching the final jacket. A test sew-out shows real problems that the screen may not show.
Check for puckering, thread breaks, gaps, stiff areas, and misaligned borders. Then adjust the file before running the final jacket.
This step can save time, thread, and expensive jackets.
Best Practices for Design Clarity
| Best Practice | Why It Matters | Simple Tip |
|---|---|---|
| Avoid too many small details | Small details may get lost on thick fabric | Simplify thin lines and tiny shapes |
| Choose strong outlines | Outlines help the design stand out | Use clear borders around key shapes |
| Use balanced stitch density | Heavy density can make details look crowded | Match density to fabric and design size |
| Plan stitch direction | Stitch angle affects shine and texture | Change angles to add depth |
| Leave space between elements | Tight areas can blend together | Add breathing room around letters and shapes |
| Test the sewout | A test shows real stitch issues | Check gaps, puckering, and readability |
For smoother results, let Absolute Digitizing prepare your jacket back file with the right stitch types, density, underlay, and machine format. A clean file can help you avoid costly mistakes and get professional embroidery on the first run.
Which Stitch Types Work Best for Jacket Back Embroidery?
The best stitch type depends on the design size, fabric, and final look. Jacket backs often need a mix of stitches because large artwork has bold shapes, borders, text, and detail areas.
Best Stitch Types for Jacket Back Designs
| Stitch Type | Best Use | Simple Guidance |
|---|---|---|
| Fill stitch | Large solid areas | Use balanced density to avoid stiffness |
| Satin stitch | Borders and bold letters | Keep satin widths controlled |
| Run stitch | Fine lines and small details | Use only when details can be held clearly |
| Tatami stitch | Wide shapes and backgrounds | Change angles for texture and depth |
| Appliqué | Very large filled areas | Reduce stitch count and keep jackets flexible |
| Zigzag stitch | Support under satin areas | Use it to add strength and shape |
Short guidance:
Use fill stitches for large blocks, but do not make them too dense. Heavy fills can make the jacket stiff and may cause puckering.
Use satin stitches for clean borders, names, and bold text. However, very wide satin stitches can snag or look loose.
For big jacket backs, appliqué works well when the design has large color areas. It lowers stitch count and gives a softer feel.
Always match the stitch types to the jacket fabric, design size, and wear needs.
What Are Common Mistakes in Jacket Back Digitizing and How Can You Avoid Them?
Small mistakes can ruin a large jacket back design. Since the design covers more fabric, problems like puckering, gaps, and misalignment become easy to see. However, a better stitch plan can prevent most issues before production starts.
Common Problems and Fixes
| Mistake | Cause | Fix |
|---|---|---|
| Puckering | High density, weak backing, or tight hooping | Lower density and use a proper stabilizer |
| Border gaps | Poor pull compensation or fabric movement | Add overlap and improve the underlay |
| Thread breaks | Dense stitches, poor pathing, or wrong needle | Reduce density and clean the stitch order |
| Stiff embroidery | Too many fill stitches in large areas | Use lighter fills or appliqué |
| Misaligned design | Poor hooping, weak underlay, or bad sequence | Center the design and stitch stable areas first |
Expert Tips for Better Results
Always set the final design size before digitizing. Do not stretch a small file for a large jacket back.
Also, match the stitch plan to the fabric. Denim, fleece, nylon, leather, and varsity jackets all need different support.
In addition, test the sew-out on similar fabric before stitching the final jacket. A test helps catch gaps, puckering, thread breaks, and stiff areas early. This saves time and protects expensive jackets.
Why Should You Hire a Professional Digitizing Service?

The jacket’s back embroidery is not the best place to guess. Large designs need the right stitch types, density, underlay, and pull control. A small mistake can cause puckering, gaps, thread breaks, or a stiff design.
Professionals handle large designs better
A professional digitizer knows how to build a file for size, fabric, and machine type. They can adjust stitch direction, reduce bulk, and plan the sewing order for smoother results.
This matters most when the design has:
- Large filled areas
- Small text
- Detailed logos
- Thick jacket fabric
- Leather or nylon
- Bulk order needs
DIY digitizing takes time and money to learn
Digitizing software requires time to learn. It can also cost a lot, especially when you add updates, training, and test materials. You need time to understand stitches, density, compensation, trims, and test sew-outs.
Even then, the first file may not stitch well. A poor file can waste thread, backing, machine time, and expensive jackets.
However, outsourcing digitizing services saves time and lowers risk. Meanwhile, small business owners can focus on sales, orders, customers, and production instead of paying for software and fixing stitch problems.
Better files save time and cost
A professional file can reduce thread breaks, wasted jackets, and repeated test runs. It also helps each jacket look more consistent.
For clean, machine-ready jacket back embroidery files, Absolute Digitizing can prepare your artwork with the right settings for smooth stitching and professional results.
Final Thoughts
Jacket back embroidery digitizing needs more than basic resizing. A clean result starts with the right design size, stitch type, underlay, density, pull compensation, and stitch direction. It also needs proper sequencing, fewer trims, the correct file format, and a test sew-out before final production.
When you plan these steps well, you can avoid puckering, border gaps, thread breaks, stiff embroidery, and misaligned outlines. This helps your jackets look cleaner and last longer.
For smooth, machine-ready files, contact Absolute Digitizing today. Get expert embroidery digitizing services and a free quote for your next jacket back design.
Frequently Asked Questions
You should not simply resize a small logo. A larger design needs new stitch settings, better underlay, balanced density, and proper pull compensation. This helps the design stitch cleanly on a wide jacket surface.
It depends on the design. Fill stitches work well for large areas. Satin stitches work best for borders and bold letters. Appliqué works well for very large color blocks because it lowers stitch count and keeps the jacket flexible.
Puckering can happen when the stitch density is too high, the backing is weak, or the fabric moves during stitching. You can reduce puckering by using balanced density, a strong underlay, a proper stabilizer, and a test sew-out.
Borders can shift when the fabric pulls during stitching. Poor pull compensation, weak underlay, or bad hooping can also cause gaps. A digitizer can fix these issues by adding overlap, adjusting the stitch order, and testing the file.
The file format depends on your embroidery machine. Common formats include DST, PES, JEF, EXP, VP3, and XXX. Always check your machine requirements before stitching the design.
Yes. Leather needs careful digitizing because every needle hole stays in the material. The design should use smart density, fewer unnecessary stitches, and a clean stitch path to reduce damage.
Yes. Appliqué works well for large jacket designs. It can reduce stitch count, lower stiffness, and give the jacket a bold custom look.